User Manual
Page 2
... warranties of this publication may be reproduced, stored in a retrieval system, or transmitted, in the space provided below. Acer LCD Monitor User Guide Original Issue: 05/2011 Changes may be incorporated in this publication without the prior written permission of... publications. Other companies' product names or trademarks are used herein for a particular purpose. Acer LCD Monitor User Guide Model number Serial number Date of purchase Place of purchase Acer and the Acer logo are recorded on the label affixed to notify any means, electronically, mechanically, by ...
... warranties of this publication may be reproduced, stored in a retrieval system, or transmitted, in the space provided below. Acer LCD Monitor User Guide Original Issue: 05/2011 Changes may be incorporated in this publication without the prior written permission of... publications. Other companies' product names or trademarks are used herein for a particular purpose. Acer LCD Monitor User Guide Model number Serial number Date of purchase Place of purchase Acer and the Acer logo are recorded on the label affixed to notify any means, electronically, mechanically, by ...

User Manual
Page 3
iii English Information for your monitor Please carefully follow these instructions carefully. Turn off the power switch for a few hours. It may include blemishes of 0.01% or less such as a missing pixel or pixel lit all warnings and instructions marked on the product. In this document for hours. Keep this case, the screen is recovered slowly by changing the image or turning off the power switch and then turn it on again to make sure the flicker disappears. • You may find slightly uneven brightness on the screen depending on LCD monitors The following are normal with ...
iii English Information for your monitor Please carefully follow these instructions carefully. Turn off the power switch for a few hours. It may include blemishes of 0.01% or less such as a missing pixel or pixel lit all warnings and instructions marked on the product. In this document for hours. Keep this case, the screen is recovered slowly by changing the image or turning off the power switch and then turn it on again to make sure the flicker disappears. • You may find slightly uneven brightness on the screen depending on LCD monitors The following are normal with ...

User Manual
Page 4
... should be sure to unplug the power cord from the type of power indicated on the marking label. Model:HP-A0301R3 (S200HL Model) Manufacture : Delta Electronics Inc., Model: ADP-30MH B (S200HL Model) Using electrical power • This product should never be blocked or covered. English Accessibility Be sure that could be seriously...
... should be sure to unplug the power cord from the type of power indicated on the marking label. Model:HP-A0301R3 (S200HL Model) Manufacture : Delta Electronics Inc., Model: ADP-30MH B (S200HL Model) Using electrical power • This product should never be blocked or covered. English Accessibility Be sure that could be seriously...
User Manual
Page 5
Note: The grounding pin also provides good protection from the wall outlet and refer servicing to qualified service personnel when: • the power cord or plug is damaged, cut or frayed • liquid was exposed to rain or water • the product has been dropped or the case has been damaged • the product exhibits a distinct change in too many devices. Unplug this product from unexpected noise produced by plugging in performance, indicating a need to replace the power cord set . The grounding pin is properly grounded before inserting the power cord plug. ...
Note: The grounding pin also provides good protection from the wall outlet and refer servicing to qualified service personnel when: • the power cord or plug is damaged, cut or frayed • liquid was exposed to rain or water • the product has been dropped or the case has been damaged • the product exhibits a distinct change in too many devices. Unplug this product from unexpected noise produced by plugging in performance, indicating a need to replace the power cord set . The grounding pin is properly grounded before inserting the power cord plug. ...

User Manual
Page 6
... impact of our products. IT Equipment Recycling Information Acer is strongly committed to normal condition. Disposal instructions Do not throw this website: http://www.acer-group.com/public/Sustainability/sustainability01.htm Visit www.acer-group.com for further information on boats, chemical transfer... top priorities in minimizing the burden placed on the Waste from Electrical and Electronics Equipment (WEEE) regulations, visit http://www.acer-group.com/public/Sustainability/sustainability01.htm vi or where blasting operations are often, but not always, marked. We at service stations...
... impact of our products. IT Equipment Recycling Information Acer is strongly committed to normal condition. Disposal instructions Do not throw this website: http://www.acer-group.com/public/Sustainability/sustainability01.htm Visit www.acer-group.com for further information on boats, chemical transfer... top priorities in minimizing the burden placed on the Waste from Electrical and Electronics Equipment (WEEE) regulations, visit http://www.acer-group.com/public/Sustainability/sustainability01.htm vi or where blasting operations are often, but not always, marked. We at service stations...

User Manual
Page 7
The following tips: • refrain from Sleep mode by adjusting the viewing angle of working conditions, personal health and other recurring or persistent discomfort and/or pain related to computer use Computer users may lead to remove the strain on the recorded image and does not constitute a malfunction. Tips and information for comfortable use , consult a physician immediately and inform your sitting height to achieve maximum comfort. The following symptoms may occasionally misfire or appear as black or red dots. Long work periods, bad posture, poor work habits, stress,...
The following tips: • refrain from Sleep mode by adjusting the viewing angle of working conditions, personal health and other recurring or persistent discomfort and/or pain related to computer use Computer users may lead to remove the strain on the recorded image and does not constitute a malfunction. Tips and information for comfortable use , consult a physician immediately and inform your sitting height to achieve maximum comfort. The following symptoms may occasionally misfire or appear as black or red dots. Long work periods, bad posture, poor work habits, stress,...
User Manual
Page 8
The following work habits Develop the following sections provide suggestions on a distant point. • Blink frequently to reduce eyestrain. Developing good work habits to make your computer use more relaxing and productive: • Take short breaks regularly and often. • Perform some stretching exercises. • Breathe fresh air as often as open windows, for enhanced text readability and graphics clarity. • Eliminate glare and reflections by: • placing your display in such a way that the side faces the window or any light source • minimizing room light...
The following work habits Develop the following sections provide suggestions on a distant point. • Blink frequently to reduce eyestrain. Developing good work habits to make your computer use more relaxing and productive: • Take short breaks regularly and often. • Perform some stretching exercises. • Breathe fresh air as often as open windows, for enhanced text readability and graphics clarity. • Eliminate glare and reflections by: • placing your display in such a way that the side faces the window or any light source • minimizing room light...
User Manual
Page 9
...EN61000-3-2, Class D -. ix Year to begin affixing CE marking 2011. April 30, 2011 Easy Lai /Manager Date Regulation, Acer Inc. EN55022, AS/NZS CISPR22 Class B. -. English Acer Incorporated 8F, 88, Sec. 1, Hsin Tai Wu Rd., Hsichih Taipei Hsien 221, Taiwan Tel : 886-2-2696-1234 Fax..., 40, 20020 Lainate (MI) Italy Tel: +39-02-939-921 ,Fax: +39-02 9399-2913 www.acer.it Hereby declare that: Product: Trade Name: Model Number: SKU Number: LCD Monitor Acer S200HL S200HL xxxxxx ("x" = 0~9, a ~ z, A ~ Z, or blank) Is compliant with the essential requirements and other ...
...EN61000-3-2, Class D -. ix Year to begin affixing CE marking 2011. April 30, 2011 Easy Lai /Manager Date Regulation, Acer Inc. EN55022, AS/NZS CISPR22 Class B. -. English Acer Incorporated 8F, 88, Sec. 1, Hsin Tai Wu Rd., Hsichih Taipei Hsien 221, Taiwan Tel : 886-2-2696-1234 Fax..., 40, 20020 Lainate (MI) Italy Tel: +39-02-939-921 ,Fax: +39-02 9399-2913 www.acer.it Hereby declare that: Product: Trade Name: Model Number: SKU Number: LCD Monitor Acer S200HL S200HL xxxxxx ("x" = 0~9, a ~ z, A ~ Z, or blank) Is compliant with the essential requirements and other ...

User Manual
Page 10
... Manufacturer /Importer is subject to the following two conditions: (1) this device may cause undesired operation. San Jose, CA 95110 U. Acer Representative 254-298-4000 254-298-4147 x A. Operation is responsible for this device must accept any interference received, including interference that... Name of Responsible Party: Address of the FCC Rules. A. Tel : 254-298-4000 Fax : 254-298-4147 www.acer.com Federal Communications Commission Declaration of Conformity This device complies with Part 15 of Responsible Party: Contact Person: Phone No.: Fax No.: ...
... Manufacturer /Importer is subject to the following two conditions: (1) this device may cause undesired operation. San Jose, CA 95110 U. Acer Representative 254-298-4000 254-298-4147 x A. Operation is responsible for this device must accept any interference received, including interference that... Name of Responsible Party: Address of the FCC Rules. A. Tel : 254-298-4000 Fax : 254-298-4147 www.acer.com Federal Communications Commission Declaration of Conformity This device complies with Part 15 of Responsible Party: Contact Person: Phone No.: Fax No.: ...
User Manual
Page 11
... assignment 4 15-pin color display signal cable 4 24-pin color display signal cable 5 Standard timing table 6 Installation 7 Users controls 8 Panel controls 8 Using the Shortcut Menu 9 Acer eColor Management 9 Operation instructions 9 Features and benefits 10 Using the OSD Menus 10 Picture Menu 11 OSD Menu 12 Setting Menu 12 Information Menu 13
... assignment 4 15-pin color display signal cable 4 24-pin color display signal cable 5 Standard timing table 6 Installation 7 Users controls 8 Panel controls 8 Using the Shortcut Menu 9 Acer eColor Management 9 Operation instructions 9 Features and benefits 10 Using the OSD Menus 10 Picture Menu 11 OSD Menu 12 Setting Menu 12 Information Menu 13

User Manual
Page 12
Troubleshooting 14 VGA Mode 14 DVI Mode (Optional) 15 English
Troubleshooting 14 VGA Mode 14 DVI Mode (Optional) 15 English

User Manual
Page 13
English Unpacking Please check that the following items are present when you unpack the box, and save the packing materials in case you need to ship or transport the monitor in the future. LCD monitor User guide Quick start guide D-sub cable DVI cable (Optional) AC Power cord AC Adapter 1
English Unpacking Please check that the following items are present when you unpack the box, and save the packing materials in case you need to ship or transport the monitor in the future. LCD monitor User guide Quick start guide D-sub cable DVI cable (Optional) AC Power cord AC Adapter 1
User Manual
Page 14
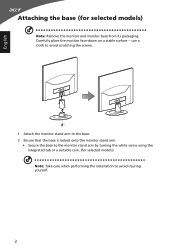
use a cloth to avoid scratching the screen. 1 Attach the monitor stand arm to the base. 2 Ensure that the base is locked onto the monitor stand arm. • Secure the base to avoid injuring yourself. 2 English Attaching the base (for selected models) Note: Take care when performing the installation to the monitor stand arm by turning the white screw using the integrated tab or a suitable coin. (for selected models) Note: Remove the monitor and monitor base from its packaging. Carefully place the monitor face-down on a stable surface --
use a cloth to avoid scratching the screen. 1 Attach the monitor stand arm to the base. 2 Ensure that the base is locked onto the monitor stand arm. • Secure the base to avoid injuring yourself. 2 English Attaching the base (for selected models) Note: Take care when performing the installation to the monitor stand arm by turning the white screw using the integrated tab or a suitable coin. (for selected models) Note: Remove the monitor and monitor base from its packaging. Carefully place the monitor face-down on a stable surface --
User Manual
Page 15
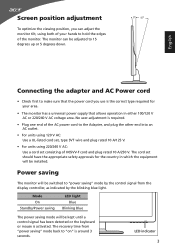
Power saving The monitor will be switched to "power saving" mode by the control signal from "power saving" mode back to "on" is required. • Plug one end of the AC power cord to the Adapter, and plug the other end into an AC outlet. • For units using 120 V AC: Use a UL-listed cord set, type SVT wire and plug rated 10 A/125 V. • For units using both of your area. • The monitor has a universal power supply that the power cord you can adjust the monitor tilt, using 220/240 V AC: Use a cord set should have the appropriate safety approvals for your hands to ...
Power saving The monitor will be switched to "power saving" mode by the control signal from "power saving" mode back to "on" is required. • Plug one end of the AC power cord to the Adapter, and plug the other end into an AC outlet. • For units using 120 V AC: Use a UL-listed cord set, type SVT wire and plug rated 10 A/125 V. • For units using both of your area. • The monitor has a universal power supply that the power cord you can adjust the monitor tilt, using 220/240 V AC: Use a cord set should have the appropriate safety approvals for your hands to ...
User Manual
Page 16
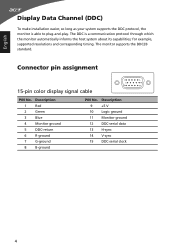
for example, supported resolutions and corresponding timing. Description 9 +5 V 10 Logic ground 11 Monitor ground 12 DDC-serial data 13 H-sync 14 V-sync 15 DDC-serial clock 4 Description 1 Red 2 Green 3 Blue 4 Monitor ground 5 DDC-return 6 R-ground 7 G-ground 8 B-ground PIN No. Connector pin assignment 15-pin color display signal cable 1 5 6 10 11 15 PIN No. English Display Data Channel (DDC) To make installation easier, so long as your system supports the DDC protocol, the monitor is a communication protocol through which the monitor automatically ...
for example, supported resolutions and corresponding timing. Description 9 +5 V 10 Logic ground 11 Monitor ground 12 DDC-serial data 13 H-sync 14 V-sync 15 DDC-serial clock 4 Description 1 Red 2 Green 3 Blue 4 Monitor ground 5 DDC-return 6 R-ground 7 G-ground 8 B-ground PIN No. Connector pin assignment 15-pin color display signal cable 1 5 6 10 11 15 PIN No. English Display Data Channel (DDC) To make installation easier, so long as your system supports the DDC protocol, the monitor is a communication protocol through which the monitor automatically ...
User Manual
Page 18
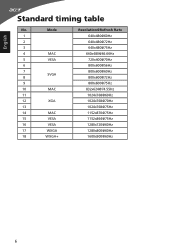
English Standard timing table No. Mode 1 2 3 4 MAC 5 VESA 6 7 SVGA 8 9 10 MAC 11 12 XGA 13 14 MAC 15 VESA 16 VESA 17 WXGA 18 WXGA+ Resolution@Refresh Rate 640x480@60Hz 640x480@72Hz 640x480@75Hz [email protected] 720x400@70Hz 800x600@56Hz 800x600@60Hz 800x600@72Hz 800x600@75Hz [email protected] 1024x768@60Hz 1024x768@70Hz 1024x768@75Hz 1152x870@75Hz 1152x864@75Hz 1280x720@60Hz 1280x800@60Hz 1600x900@60Hz 6
English Standard timing table No. Mode 1 2 3 4 MAC 5 VESA 6 7 SVGA 8 9 10 MAC 11 12 XGA 13 14 MAC 15 VESA 16 VESA 17 WXGA 18 WXGA+ Resolution@Refresh Rate 640x480@60Hz 640x480@72Hz 640x480@75Hz [email protected] 720x400@70Hz 800x600@56Hz 800x600@60Hz 800x600@72Hz 800x600@75Hz [email protected] 1024x768@60Hz 1024x768@70Hz 1024x768@75Hz 1152x870@75Hz 1152x864@75Hz 1280x720@60Hz 1280x800@60Hz 1600x900@60Hz 6

User Manual
Page 19
English Installation To install the monitor on the monitor first, then the computer. b. This sequence is very important. 4 If the monitor does not function properly, please refer to the troubleshooting section to the adapter. DVI D-SUB DC-IN DVI D-SUB DVI DC D-SUB DC-IN 7 Connect the DVI cable to the computer. 2 Connect the adapter a Connect the AC cord to diagnose the problem. Make sure both the monitor and computer are switched off . b Connect one end of the adapter to the monitor and the other end to the computer. b Connect the VGA video cable to a properly ...
English Installation To install the monitor on the monitor first, then the computer. b. This sequence is very important. 4 If the monitor does not function properly, please refer to the troubleshooting section to the adapter. DVI D-SUB DC-IN DVI D-SUB DVI DC D-SUB DC-IN 7 Connect the DVI cable to the computer. 2 Connect the adapter a Connect the AC cord to diagnose the problem. Make sure both the monitor and computer are switched off . b Connect one end of the adapter to the monitor and the other end to the computer. b Connect the VGA video cable to a properly ...

User Manual
Page 20
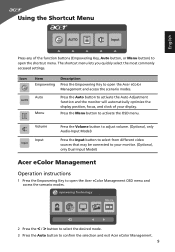
... Menu button to view the OSD menu. Press the < / > button to change the settings of your display. 5 Empowering Key Press this button to open the Acer eColor Management OSD and access the scenario modes. 8 Press it again to enter a selection in the OSD menu. 4 Auto/Exit button • When the OSD...
... Menu button to view the OSD menu. Press the < / > button to change the settings of your display. 5 Empowering Key Press this button to open the Acer eColor Management OSD and access the scenario modes. 8 Press it again to enter a selection in the OSD menu. 4 Auto/Exit button • When the OSD...
User Manual
Page 21
Icon AUTO Item Empowering Description Press the Empowering Key to open the Acer eColor Management OSD menu and access the scenario modes. Auto Menu Press the Auto button to activate the Auto Adjustment function and the monitor will ... Input button to select from different video sources that may be connected to your display. Press the Menu button to confirm the selection and exit Acer eColor Management. 9 The shortcut menu lets you quickly select the most commonly accessed settings. English Using the Shortcut Menu AUTO Input Press any of your...
Icon AUTO Item Empowering Description Press the Empowering Key to open the Acer eColor Management OSD menu and access the scenario modes. Auto Menu Press the Auto button to activate the Auto Adjustment function and the monitor will ... Input button to select from different video sources that may be connected to your display. Press the Menu button to confirm the selection and exit Acer eColor Management. 9 The shortcut menu lets you quickly select the most commonly accessed settings. English Using the Shortcut Menu AUTO Input Press any of your...
User Manual
Page 22
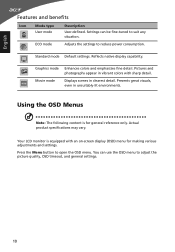
Reflects native display capability. Movie mode Displays scenes in unsuitably-lit environments. Using the OSD Menus Note: The following content is equipped with sharp detail. Your LCD monitor is for making various adjustments and settings. Presents great visuals, even in clearest detail. Actual product specifications may vary. You can be fine-tuned to adjust the picture quality, OSD timeout, and general settings. 10 Graphics mode Enhances colors and emphasizes fine detail. Settings can use the OSD menu to suit any situation. Standard mode Default settings. ...
Reflects native display capability. Movie mode Displays scenes in unsuitably-lit environments. Using the OSD Menus Note: The following content is equipped with sharp detail. Your LCD monitor is for making various adjustments and settings. Presents great visuals, even in clearest detail. Actual product specifications may vary. You can be fine-tuned to adjust the picture quality, OSD timeout, and general settings. 10 Graphics mode Enhances colors and emphasizes fine detail. Settings can use the OSD menu to suit any situation. Standard mode Default settings. ...
