User Manual
Page 2
... model number, serial number, purchase date and place of Acer Incorporated. No part of this publication may be made periodically to the information in this manual or supplementary documents and publications. Acer LCD Monitor User Guide Model number Serial number Date of purchase Place ...of purchase Acer and the Acer logo are registered trademarks of this publication without obligation to your unit should ...
... model number, serial number, purchase date and place of Acer Incorporated. No part of this publication may be made periodically to the information in this manual or supplementary documents and publications. Acer LCD Monitor User Guide Model number Serial number Date of purchase Place ...of purchase Acer and the Acer logo are registered trademarks of this publication without obligation to your unit should ...
User Manual
Page 3
English Information for future reference. Special notes on LCD monitors The following are normal with the LCD monitor and do not indicate a problem. • Due to make sure the flicker disappears. • You may flicker during initial use . • The LCD screen... more effective pixels. Turn off the power switch for hours. Cleaning your safety and comfort Safety instructions Read these guidelines when cleaning the monitor: • Always unplug the monitor before cleaning. • Use a soft cloth to the nature of the LCD screen, an afterimage of 0.01% or less such as a ...
English Information for future reference. Special notes on LCD monitors The following are normal with the LCD monitor and do not indicate a problem. • Due to make sure the flicker disappears. • You may flicker during initial use . • The LCD screen... more effective pixels. Turn off the power switch for hours. Cleaning your safety and comfort Safety instructions Read these guidelines when cleaning the monitor: • Always unplug the monitor before cleaning. • Use a soft cloth to the nature of the LCD screen, an afterimage of 0.01% or less such as a ...

User Manual
Page 4
... dealer or local power company. This product should never be operated from the electrical outlet. Model:HP-A0301R3 (S200HL Model) Manufacture : Delta Electronics Inc., Model: ADP-30MH B (S200HL Model) Using electrical power • This product should never be used for this product through cabinet slots as ...not place the product on an unstable cart, stand or table. iv When you . If you plug the power cord into this monitor, do not increase it from overheating. These openings must not be sure to the equipment operator as they may touch dangerous voltage points...
... dealer or local power company. This product should never be operated from the electrical outlet. Model:HP-A0301R3 (S200HL Model) Manufacture : Delta Electronics Inc., Model: ADP-30MH B (S200HL Model) Using electrical power • This product should never be used for this product through cabinet slots as ...not place the product on an unstable cart, stand or table. iv When you . If you plug the power cord into this monitor, do not increase it from overheating. These openings must not be sure to the equipment operator as they may touch dangerous voltage points...
User Manual
Page 7
... pushing the power button. English LCD pixel statement The LCD unit is produced with high-precision manufacturing techniques. Nevertheless, some pixels may complain of the monitor, using a footrest, or raising your leg muscles vii The following tips: • refrain from Sleep mode by adjusting the viewing angle of eyestrain and headaches...
... pushing the power button. English LCD pixel statement The LCD unit is produced with high-precision manufacturing techniques. Nevertheless, some pixels may complain of the monitor, using a footrest, or raising your leg muscles vii The following tips: • refrain from Sleep mode by adjusting the viewing angle of eyestrain and headaches...
User Manual
Page 8
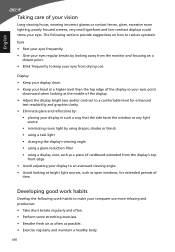
The following work habits to make your eyes from the monitor and focusing on how to reduce eyestrain. viii Eyes • Rest your eyes frequently. • Give your eyes regular breaks by using drapes, shades or ...
The following work habits to make your eyes from the monitor and focusing on how to reduce eyestrain. viii Eyes • Rest your eyes frequently. • Give your eyes regular breaks by using drapes, shades or ...
User Manual
Page 9
...by weight in homogenous material are in force to begin affixing CE marking 2011. April 30, 2011 Easy Lai /Manager Date Regulation, Acer Inc. English Acer Incorporated 8F, 88, Sec. 1, Hsin Tai Wu Rd., Hsichih Taipei Hsien 221, Taiwan Tel : 886-2-2696-1234 Fax :...Via Lepetit, 40, 20020 Lainate (MI) Italy Tel: +39-02-939-921 ,Fax: +39-02 9399-2913 www.acer.it Hereby declare that: Product: Trade Name: Model Number: SKU Number: LCD Monitor Acer S200HL S200HL xxxxxx ("x" = 0~9, a ~ z, A ~ Z, or blank) Is compliant with the essential requirements and other relevant provisions ...
...by weight in homogenous material are in force to begin affixing CE marking 2011. April 30, 2011 Easy Lai /Manager Date Regulation, Acer Inc. English Acer Incorporated 8F, 88, Sec. 1, Hsin Tai Wu Rd., Hsichih Taipei Hsien 221, Taiwan Tel : 886-2-2696-1234 Fax :...Via Lepetit, 40, 20020 Lainate (MI) Italy Tel: +39-02-939-921 ,Fax: +39-02 9399-2913 www.acer.it Hereby declare that: Product: Trade Name: Model Number: SKU Number: LCD Monitor Acer S200HL S200HL xxxxxx ("x" = 0~9, a ~ z, A ~ Z, or blank) Is compliant with the essential requirements and other relevant provisions ...

User Manual
Page 10
S. S. English Acer America Corporation 333 West San Carlos St., San Jose CA 95110, U. San Jose, CA 95110 U. A. Operation is responsible for this device must accept any ...operation. Tel : 254-298-4000 Fax : 254-298-4147 www.acer.com Federal Communications Commission Declaration of Conformity This device complies with Part 15 of Responsible Party: Contact Person: Phone No.: Fax No.: LCD Monitor S200HL S200HL xxxxxx ("x" = 0~9, a ~ z, A ~ Z or Blank) Acer America Corporation 333 West San Carlos St. A. Acer Representative 254-298-4000 254-298-4147 x
S. S. English Acer America Corporation 333 West San Carlos St., San Jose CA 95110, U. San Jose, CA 95110 U. A. Operation is responsible for this device must accept any ...operation. Tel : 254-298-4000 Fax : 254-298-4147 www.acer.com Federal Communications Commission Declaration of Conformity This device complies with Part 15 of Responsible Party: Contact Person: Phone No.: Fax No.: LCD Monitor S200HL S200HL xxxxxx ("x" = 0~9, a ~ z, A ~ Z or Blank) Acer America Corporation 333 West San Carlos St. A. Acer Representative 254-298-4000 254-298-4147 x
User Manual
Page 11
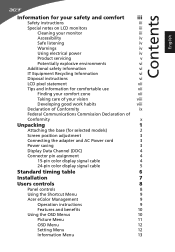
Contents English Information for your safety and comfort iii Safety instructions iii Special notes on LCD monitors iii Cleaning your monitor iii Accessibility iv Safe listening iv Warnings iv Using electrical power iv Product servicing v Potentially explosive... 4 24-pin color display signal cable 5 Standard timing table 6 Installation 7 Users controls 8 Panel controls 8 Using the Shortcut Menu 9 Acer eColor Management 9 Operation instructions 9 Features and benefits 10 Using the OSD Menus 10 Picture Menu 11 OSD Menu 12 Setting Menu 12 Information ...
Contents English Information for your safety and comfort iii Safety instructions iii Special notes on LCD monitors iii Cleaning your monitor iii Accessibility iv Safe listening iv Warnings iv Using electrical power iv Product servicing v Potentially explosive... 4 24-pin color display signal cable 5 Standard timing table 6 Installation 7 Users controls 8 Panel controls 8 Using the Shortcut Menu 9 Acer eColor Management 9 Operation instructions 9 Features and benefits 10 Using the OSD Menus 10 Picture Menu 11 OSD Menu 12 Setting Menu 12 Information ...

User Manual
Page 13
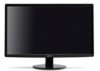
English Unpacking Please check that the following items are present when you unpack the box, and save the packing materials in case you need to ship or transport the monitor in the future. LCD monitor User guide Quick start guide D-sub cable DVI cable (Optional) AC Power cord AC Adapter 1
English Unpacking Please check that the following items are present when you unpack the box, and save the packing materials in case you need to ship or transport the monitor in the future. LCD monitor User guide Quick start guide D-sub cable DVI cable (Optional) AC Power cord AC Adapter 1
User Manual
Page 14
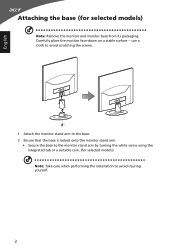
English Attaching the base (for selected models) Note: Take care when performing the installation to the monitor stand arm by turning the white screw using the integrated tab or a suitable coin. (for selected models) Note: Remove the monitor and monitor base from its packaging. Carefully place the monitor face-down on a stable surface -- use a cloth to avoid scratching the screen. 1 Attach the monitor stand arm to the base. 2 Ensure that the base is locked onto the monitor stand arm. • Secure the base to avoid injuring yourself. 2
English Attaching the base (for selected models) Note: Take care when performing the installation to the monitor stand arm by turning the white screw using the integrated tab or a suitable coin. (for selected models) Note: Remove the monitor and monitor base from its packaging. Carefully place the monitor face-down on a stable surface -- use a cloth to avoid scratching the screen. 1 Attach the monitor stand arm to the base. 2 Ensure that the base is locked onto the monitor stand arm. • Secure the base to avoid injuring yourself. 2
User Manual
Page 15
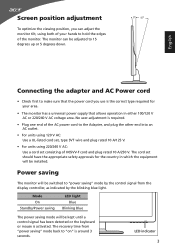
.... The recovery time from the display controller, as indicated by the blinking blue light. The monitor can adjust the monitor tilt, using both of H05VV-F cord and plug rated 10 A/250 V. Power saving The monitor will be adjusted to 15 degrees up or 5 degrees down. 5 15 English Connecting the ... A/125 V. • For units using 220/240 V AC: Use a cord set should have the appropriate safety approvals for your area. • The monitor has a universal power supply that the power cord you can be installed. Mode On Standby/Power saving LED light Blue Blinking Blue The power saving...
.... The recovery time from the display controller, as indicated by the blinking blue light. The monitor can adjust the monitor tilt, using both of H05VV-F cord and plug rated 10 A/250 V. Power saving The monitor will be adjusted to 15 degrees up or 5 degrees down. 5 15 English Connecting the ... A/125 V. • For units using 220/240 V AC: Use a cord set should have the appropriate safety approvals for your area. • The monitor has a universal power supply that the power cord you can be installed. Mode On Standby/Power saving LED light Blue Blinking Blue The power saving...
User Manual
Page 16
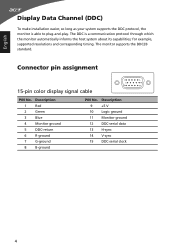
... 7 G-ground 8 B-ground PIN No. English Display Data Channel (DDC) To make installation easier, so long as your system supports the DDC protocol, the monitor is a communication protocol through which the monitor automatically informs the host system about its capabilities; The DDC is able to plug-and-play. Description 9 +5 V 10 Logic ground 11...
... 7 G-ground 8 B-ground PIN No. English Display Data Channel (DDC) To make installation easier, so long as your system supports the DDC protocol, the monitor is a communication protocol through which the monitor automatically informs the host system about its capabilities; The DDC is able to plug-and-play. Description 9 +5 V 10 Logic ground 11...

User Manual
Page 19
...the DVI cable to the computer. 2 Connect the adapter a Connect the AC cord to diagnose the problem. b Connect one end of the adapter to the monitor and the other end to the computer. DVI D-SUB DC-IN DVI D-SUB DVI DC D-SUB DC-IN 7 c Connect the digital cable (1) Make sure... both the monitor and computer are switched off . b Connect the VGA video cable to a properly grounded, AC outlet. 3 Turn on the monitor and computer Turn on your host system, please follow the steps below: Steps 1 Connect the video...
...the DVI cable to the computer. 2 Connect the adapter a Connect the AC cord to diagnose the problem. b Connect one end of the adapter to the monitor and the other end to the computer. DVI D-SUB DC-IN DVI D-SUB DVI DC D-SUB DC-IN 7 c Connect the digital cable (1) Make sure... both the monitor and computer are switched off . b Connect the VGA video cable to a properly grounded, AC outlet. 3 Turn on the monitor and computer Turn on your host system, please follow the steps below: Steps 1 Connect the video...

User Manual
Page 20
... button for two seconds to activate the Auto Adjustment function and the monitor will automatically optimize the display position, focus, and clock of the current function. 3 Menu/Enter button Press to open the Acer eColor Management OSD and access the scenario modes. 8 Item 1 Power... button/ indicator Description Turn the monitor on . Blinking blue indicates standby/ power saving mode. 2 < / > button Press the < /...
... button for two seconds to activate the Auto Adjustment function and the monitor will automatically optimize the display position, focus, and clock of the current function. 3 Menu/Enter button Press to open the Acer eColor Management OSD and access the scenario modes. 8 Item 1 Power... button/ indicator Description Turn the monitor on . Blinking blue indicates standby/ power saving mode. 2 < / > button Press the < /...
User Manual
Page 21
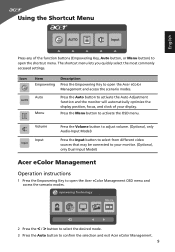
...video sources that may be connected to your display. English Using the Shortcut Menu AUTO Input Press any of your monitor. (Optional, only Dual-Input Model) Acer eColor Management Operation instructions 1 Press the Empowering Key to open the shortcut menu. mpowering Technology User ECO Standard ...activate the OSD menu. Press the Menu button to confirm the selection and exit Acer eColor Management. 9 Auto Menu Press the Auto button to activate the Auto Adjustment function and the monitor will automatically optimize the display position, focus, and clock of the function buttons ...
...video sources that may be connected to your display. English Using the Shortcut Menu AUTO Input Press any of your monitor. (Optional, only Dual-Input Model) Acer eColor Management Operation instructions 1 Press the Empowering Key to open the shortcut menu. mpowering Technology User ECO Standard ...activate the OSD menu. Press the Menu button to confirm the selection and exit Acer eColor Management. 9 Auto Menu Press the Auto button to activate the Auto Adjustment function and the monitor will automatically optimize the display position, focus, and clock of the function buttons ...
User Manual
Page 22
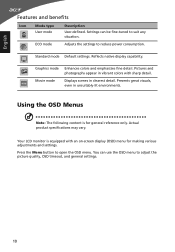
... use the OSD menu to suit any situation. Movie mode Displays scenes in unsuitably-lit environments. Presents great visuals, even in clearest detail. Your LCD monitor is for making various adjustments and settings. Actual product specifications may vary. Pictures and photographs appear in vibrant colors with an on-screen display (OSD...
... use the OSD menu to suit any situation. Movie mode Displays scenes in unsuitably-lit environments. Presents great visuals, even in clearest detail. Your LCD monitor is for making various adjustments and settings. Actual product specifications may vary. Pictures and photographs appear in vibrant colors with an on-screen display (OSD...
User Manual
Page 25
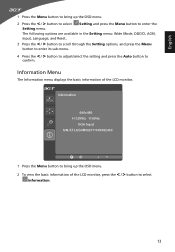
... S/N: ETLUG0R002111000082400 1 Press the Menu button to bring up the OSD menu. 2 To view the basic information of the LCD monitor. Information Menu The Information menu displays the basic information of the LCD monitor, press the < / > button to confirm. English 1 Press the Menu button to bring up the OSD menu. 2 Press the < / > button...
... S/N: ETLUG0R002111000082400 1 Press the Menu button to bring up the OSD menu. 2 To view the basic information of the LCD monitor. Information Menu The Information menu displays the basic information of the LCD monitor, press the < / > button to confirm. English 1 Press the Menu button to bring up the OSD menu. 2 Press the < / > button...
User Manual
Page 26
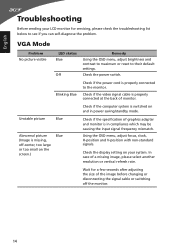
...seconds after adjusting the size of a missing image, please select another resolution or vertical refresh rate. Check if the specification of monitor. Check if the power cord is in power saving/standby mode. Wait for servicing, please check the troubleshooting list below to ...too small on and in compliance which may be causing the input signal frequency mismatch. Check if the computer system is missing, off the monitor. 14 Using the OSD menu, adjust focus, clock, H-position and V-position with non-standard signals. English Troubleshooting Before sending your system...
...seconds after adjusting the size of a missing image, please select another resolution or vertical refresh rate. Check if the specification of monitor. Check if the power cord is in power saving/standby mode. Wait for servicing, please check the troubleshooting list below to ...too small on and in compliance which may be causing the input signal frequency mismatch. Check if the computer system is missing, off the monitor. 14 Using the OSD menu, adjust focus, clock, H-position and V-position with non-standard signals. English Troubleshooting Before sending your system...
User Manual
Page 27
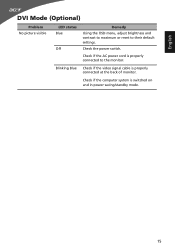
English DVI Mode (Optional) Problem No picture visible LED status Blue Off Remedy Using the OSD menu, adjust brightness and contrast to maximum or reset to the monitor. Check if the computer system is properly connected at the back of monitor. Check the power switch. Check if the AC power cord is properly connected to their default settings. Blinking Blue Check if the video signal cable is switched on and in power saving/standby mode. 15
English DVI Mode (Optional) Problem No picture visible LED status Blue Off Remedy Using the OSD menu, adjust brightness and contrast to maximum or reset to the monitor. Check if the computer system is properly connected at the back of monitor. Check the power switch. Check if the AC power cord is properly connected to their default settings. Blinking Blue Check if the video signal cable is switched on and in power saving/standby mode. 15


