User Manual
Page 2
... hereof and specifically disclaims the implied warranties of Acer Incorporated. The serial number and model number are registered trademarks of merchantability or fitness for a particular purpose. Acer Incorporated. No part of purchase Acer and the Acer logo are recorded on the label affixed to ... of purchase Place of this manual or supplementary documents and publications. All Rights Reserved. All correspondence concerning your computer. Acer LCD Monitor User Guide Original Issue: 05/2011 Changes may be made periodically to the information in this publication without ...
... hereof and specifically disclaims the implied warranties of Acer Incorporated. The serial number and model number are registered trademarks of merchantability or fitness for a particular purpose. Acer Incorporated. No part of purchase Acer and the Acer logo are recorded on the label affixed to ... of purchase Place of this manual or supplementary documents and publications. All Rights Reserved. All correspondence concerning your computer. Acer LCD Monitor User Guide Original Issue: 05/2011 Changes may be made periodically to the information in this publication without ...
User Manual
Page 3
English Information for future reference. Turn off the power switch for hours. Cleaning your safety and comfort Safety instructions Read these guidelines when cleaning the monitor: • Always unplug the monitor before cleaning. • Use a soft cloth to make sure the flicker disappears. • You may find slightly uneven brightness on the screen depending on again to wipe the screen and cabinet front and sides. Keep this case, the screen is displayed for a few hours. Special notes on the product. In this document for your monitor Please carefully follow ...
English Information for future reference. Turn off the power switch for hours. Cleaning your safety and comfort Safety instructions Read these guidelines when cleaning the monitor: • Always unplug the monitor before cleaning. • Use a soft cloth to make sure the flicker disappears. • You may find slightly uneven brightness on the screen depending on again to wipe the screen and cabinet front and sides. Keep this case, the screen is displayed for a few hours. Special notes on the product. In this document for your monitor Please carefully follow ...

User Manual
Page 4
... or other purposes. • Your device uses one of the following power supplies: Manufacture : Hipro Electronics Co.,Ltd. Model:HP-A0301R3 (S200HL Model) Manufacture : Delta Electronics Inc., Model: ADP-30MH B (S200HL Model) Using electrical power • This product should never be blocked by placing the product on the marking label. These openings...
... or other purposes. • Your device uses one of the following power supplies: Manufacture : Hipro Electronics Co.,Ltd. Model:HP-A0301R3 (S200HL Model) Manufacture : Delta Electronics Inc., Model: ADP-30MH B (S200HL Model) Using electrical power • This product should never be blocked by placing the product on the marking label. These openings...
User Manual
Page 5
English • Do not allow anything to dangerous voltage points or other nearby electrical devices that may expose you need for details. The overall system load must not exceed 80% of the power strip's input rating. • This product's power cord is equipped with the performance of all servicing to qualified service personnel. Do not insert the plug into the extension cord does not exceed the extension cord ampere rating. Contact your electrician for service • the product does not operate normally after following requirements: detachable type, UL listed/CSA certified, ...
English • Do not allow anything to dangerous voltage points or other nearby electrical devices that may expose you need for details. The overall system load must not exceed 80% of the power strip's input rating. • This product's power cord is equipped with the performance of all servicing to qualified service personnel. Do not insert the plug into the extension cord does not exceed the extension cord ampere rating. Contact your electrician for service • the product does not operate normally after following requirements: detachable type, UL listed/CSA certified, ...

User Manual
Page 6
... the environmental impact of our products. Observe restrictions on the Waste from Electrical and Electronics Equipment (WEEE) regulations, visit http://www.acer-group.com/public/Sustainability/sustainability01.htm vi or where blasting operations are in fuel depots, storage and distribution areas; To minimize pollution... device in bodily injury or even death. Areas with a potentially explosive atmosphere and obey all signs and instructions. We at Acer are very conscious of the environmental effects of our business and strive to identify and provide the best working procedures to turn off...
... the environmental impact of our products. Observe restrictions on the Waste from Electrical and Electronics Equipment (WEEE) regulations, visit http://www.acer-group.com/public/Sustainability/sustainability01.htm vi or where blasting operations are in fuel depots, storage and distribution areas; To minimize pollution... device in bodily injury or even death. Areas with a potentially explosive atmosphere and obey all signs and instructions. We at Acer are very conscious of the environmental effects of our business and strive to identify and provide the best working procedures to turn off...

User Manual
Page 7
This has no effect on your sitting height to remove the strain on the recorded image and does not constitute a malfunction. This product has been shipped enabled for power management: • Activate display's Sleep mode within 15 minutes of user inactivity. • Activate computer's Sleep mode within 30 minutes of working conditions, personal health and other musculoskeletal disorders. Incorrect computer usage may complain of eyestrain and headaches after long hours of user inactivity. • Wake the computer from staying too long in one fixed posture • avoid slouching...
This has no effect on your sitting height to remove the strain on the recorded image and does not constitute a malfunction. This product has been shipped enabled for power management: • Activate display's Sleep mode within 15 minutes of user inactivity. • Activate computer's Sleep mode within 30 minutes of working conditions, personal health and other musculoskeletal disorders. Incorrect computer usage may complain of eyestrain and headaches after long hours of user inactivity. • Wake the computer from staying too long in one fixed posture • avoid slouching...
User Manual
Page 8
Eyes • Rest your eyes frequently. • Give your eyes regular breaks by using drapes, shades or blinds • using a task light • changing the display's viewing angle • using a glare-reduction filter • using a display visor, such as a piece of time. viii Developing good work habits to reduce eyestrain. English Taking care of your vision Long viewing hours, wearing incorrect glasses or contact lenses, glare, excessive room lighting, poorly focused screens, very small typefaces and low-contrast displays could stress your computer use more relaxing and...
Eyes • Rest your eyes frequently. • Give your eyes regular breaks by using drapes, shades or blinds • using a task light • changing the display's viewing angle • using a glare-reduction filter • using a display visor, such as a piece of time. viii Developing good work habits to reduce eyestrain. English Taking care of your vision Long viewing hours, wearing incorrect glasses or contact lenses, glare, excessive room lighting, poorly focused screens, very small typefaces and low-contrast displays could stress your computer use more relaxing and...
User Manual
Page 9
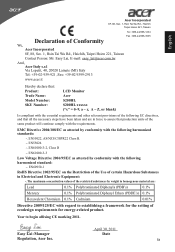
...Lepetit, 40, 20020 Lainate (MI) Italy Tel: +39-02-939-921 ,Fax: +39-02 9399-2913 www.acer.it Hereby declare that: Product: Trade Name: Model Number: SKU Number: LCD Monitor Acer S200HL S200HL xxxxxx ("x" = 0~9, a ~ z, A ~ Z, or blank) Is compliant with the essential requirements and other relevant ... the Restriction of the Use of ecodesign requirements for energy-related product. April 30, 2011 Easy Lai /Manager Date Regulation, Acer Inc. EMC Directive 2004/108/EC as attested by conformity with the following harmonized standards: -. EN61000-3-3 Low Voltage Directive 2006...
...Lepetit, 40, 20020 Lainate (MI) Italy Tel: +39-02-939-921 ,Fax: +39-02 9399-2913 www.acer.it Hereby declare that: Product: Trade Name: Model Number: SKU Number: LCD Monitor Acer S200HL S200HL xxxxxx ("x" = 0~9, a ~ z, A ~ Z, or blank) Is compliant with the essential requirements and other relevant ... the Restriction of the Use of ecodesign requirements for energy-related product. April 30, 2011 Easy Lai /Manager Date Regulation, Acer Inc. EMC Directive 2004/108/EC as attested by conformity with the following harmonized standards: -. EN61000-3-3 Low Voltage Directive 2006...

User Manual
Page 10
... Federal Communications Commission Declaration of Conformity This device complies with Part 15 of Responsible Party: Contact Person: Phone No.: Fax No.: LCD Monitor S200HL S200HL xxxxxx ("x" = 0~9, a ~ z, A ~ Z or Blank) Acer America Corporation 333 West San Carlos St. Operation is responsible for this device must accept any interference received, including interference that may not cause...
... Federal Communications Commission Declaration of Conformity This device complies with Part 15 of Responsible Party: Contact Person: Phone No.: Fax No.: LCD Monitor S200HL S200HL xxxxxx ("x" = 0~9, a ~ z, A ~ Z or Blank) Acer America Corporation 333 West San Carlos St. Operation is responsible for this device must accept any interference received, including interference that may not cause...
User Manual
Page 11
... assignment 4 15-pin color display signal cable 4 24-pin color display signal cable 5 Standard timing table 6 Installation 7 Users controls 8 Panel controls 8 Using the Shortcut Menu 9 Acer eColor Management 9 Operation instructions 9 Features and benefits 10 Using the OSD Menus 10 Picture Menu 11 OSD Menu 12 Setting Menu 12 Information Menu 13
... assignment 4 15-pin color display signal cable 4 24-pin color display signal cable 5 Standard timing table 6 Installation 7 Users controls 8 Panel controls 8 Using the Shortcut Menu 9 Acer eColor Management 9 Operation instructions 9 Features and benefits 10 Using the OSD Menus 10 Picture Menu 11 OSD Menu 12 Setting Menu 12 Information Menu 13

User Manual
Page 12
Troubleshooting 14 VGA Mode 14 DVI Mode (Optional) 15 English
Troubleshooting 14 VGA Mode 14 DVI Mode (Optional) 15 English

User Manual
Page 13
English Unpacking Please check that the following items are present when you unpack the box, and save the packing materials in case you need to ship or transport the monitor in the future. LCD monitor User guide Quick start guide D-sub cable DVI cable (Optional) AC Power cord AC Adapter 1
English Unpacking Please check that the following items are present when you unpack the box, and save the packing materials in case you need to ship or transport the monitor in the future. LCD monitor User guide Quick start guide D-sub cable DVI cable (Optional) AC Power cord AC Adapter 1
User Manual
Page 14
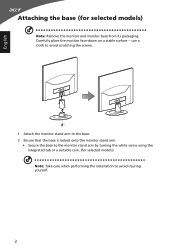
Carefully place the monitor face-down on a stable surface -- use a cloth to avoid scratching the screen. 1 Attach the monitor stand arm to the base. 2 Ensure that the base is locked onto the monitor stand arm. • Secure the base to avoid injuring yourself. 2 English Attaching the base (for selected models) Note: Take care when performing the installation to the monitor stand arm by turning the white screw using the integrated tab or a suitable coin. (for selected models) Note: Remove the monitor and monitor base from its packaging.
Carefully place the monitor face-down on a stable surface -- use a cloth to avoid scratching the screen. 1 Attach the monitor stand arm to the base. 2 Ensure that the base is locked onto the monitor stand arm. • Secure the base to avoid injuring yourself. 2 English Attaching the base (for selected models) Note: Take care when performing the installation to the monitor stand arm by turning the white screw using the integrated tab or a suitable coin. (for selected models) Note: Remove the monitor and monitor base from its packaging.
User Manual
Page 15
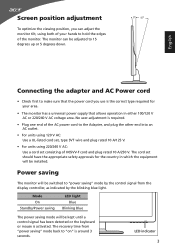
The monitor can adjust the monitor tilt, using 220/240 V AC: Use a cord set consisting of H05VV-F cord and plug rated 10 A/250 V. Power saving The monitor will be installed. The cord set should have the appropriate safety approvals for your hands to hold the edges of the monitor. LED indicator 3 The recovery time from the display controller, as indicated by the blinking blue light. Mode On Standby/Power saving LED light Blue Blinking Blue The power saving mode will be switched to "power saving" mode by the control signal from "power saving" mode back to "on" is ...
The monitor can adjust the monitor tilt, using 220/240 V AC: Use a cord set consisting of H05VV-F cord and plug rated 10 A/250 V. Power saving The monitor will be installed. The cord set should have the appropriate safety approvals for your hands to hold the edges of the monitor. LED indicator 3 The recovery time from the display controller, as indicated by the blinking blue light. Mode On Standby/Power saving LED light Blue Blinking Blue The power saving mode will be switched to "power saving" mode by the control signal from "power saving" mode back to "on" is ...
User Manual
Page 16
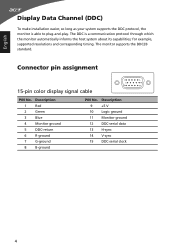
Connector pin assignment 15-pin color display signal cable 1 5 6 10 11 15 PIN No. Description 9 +5 V 10 Logic ground 11 Monitor ground 12 DDC-serial data 13 H-sync 14 V-sync 15 DDC-serial clock 4 The monitor supports the DDC2B standard. Description 1 Red 2 Green 3 Blue 4 Monitor ground 5 DDC-return 6 R-ground 7 G-ground 8 B-ground PIN No. English Display Data Channel (DDC) To make installation easier, so long as your system supports the DDC protocol, the monitor is a communication protocol through which the monitor automatically informs the host system ...
Connector pin assignment 15-pin color display signal cable 1 5 6 10 11 15 PIN No. Description 9 +5 V 10 Logic ground 11 Monitor ground 12 DDC-serial data 13 H-sync 14 V-sync 15 DDC-serial clock 4 The monitor supports the DDC2B standard. Description 1 Red 2 Green 3 Blue 4 Monitor ground 5 DDC-return 6 R-ground 7 G-ground 8 B-ground PIN No. English Display Data Channel (DDC) To make installation easier, so long as your system supports the DDC protocol, the monitor is a communication protocol through which the monitor automatically informs the host system ...
User Manual
Page 18
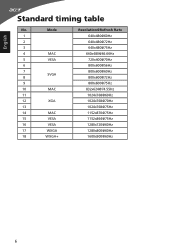
Mode 1 2 3 4 MAC 5 VESA 6 7 SVGA 8 9 10 MAC 11 12 XGA 13 14 MAC 15 VESA 16 VESA 17 WXGA 18 WXGA+ Resolution@Refresh Rate 640x480@60Hz 640x480@72Hz 640x480@75Hz [email protected] 720x400@70Hz 800x600@56Hz 800x600@60Hz 800x600@72Hz 800x600@75Hz [email protected] 1024x768@60Hz 1024x768@70Hz 1024x768@75Hz 1152x870@75Hz 1152x864@75Hz 1280x720@60Hz 1280x800@60Hz 1600x900@60Hz 6 English Standard timing table No.
Mode 1 2 3 4 MAC 5 VESA 6 7 SVGA 8 9 10 MAC 11 12 XGA 13 14 MAC 15 VESA 16 VESA 17 WXGA 18 WXGA+ Resolution@Refresh Rate 640x480@60Hz 640x480@72Hz 640x480@75Hz [email protected] 720x400@70Hz 800x600@56Hz 800x600@60Hz 800x600@72Hz 800x600@75Hz [email protected] 1024x768@60Hz 1024x768@70Hz 1024x768@75Hz 1152x870@75Hz 1152x864@75Hz 1280x720@60Hz 1280x800@60Hz 1600x900@60Hz 6 English Standard timing table No.

User Manual
Page 19
This sequence is very important. 4 If the monitor does not function properly, please refer to the troubleshooting section to the computer. Make sure both the monitor and computer are switched off . (2) DVI Cable (Optional, only Dual-Input Model) a. English Installation To install the monitor on the monitor first, then the computer. b. DVI D-SUB DC-IN DVI D-SUB DVI DC D-SUB DC-IN 7 c Connect the digital cable (1) Make sure both the monitor and computer are powered-OFF. b Connect the VGA video cable to diagnose the problem. b Connect one end of the adapter to the ...
This sequence is very important. 4 If the monitor does not function properly, please refer to the troubleshooting section to the computer. Make sure both the monitor and computer are switched off . (2) DVI Cable (Optional, only Dual-Input Model) a. English Installation To install the monitor on the monitor first, then the computer. b. DVI D-SUB DC-IN DVI D-SUB DVI DC D-SUB DC-IN 7 c Connect the digital cable (1) Make sure both the monitor and computer are powered-OFF. b Connect the VGA video cable to diagnose the problem. b Connect one end of the adapter to the ...

User Manual
Page 20
Blinking blue indicates standby/ power saving mode. 2 < / > button Press the < / > button to navigate to the desired function, and press the Menu button to open the Acer eColor Management OSD and access the scenario modes. 8 Item 1 Power button/ indicator Description Turn the monitor on . Press it again to enter a selection in the ...
Blinking blue indicates standby/ power saving mode. 2 < / > button Press the < / > button to navigate to the desired function, and press the Menu button to open the Acer eColor Management OSD and access the scenario modes. 8 Item 1 Power button/ indicator Description Turn the monitor on . Press it again to enter a selection in the ...
User Manual
Page 21
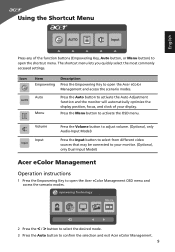
...the most commonly accessed settings. English Using the Shortcut Menu AUTO Input Press any of your monitor. (Optional, only Dual-Input Model) Acer eColor Management Operation instructions 1 Press the Empowering Key to activate the OSD menu. mpowering Technology User ECO Standard Graphics Movie 2 Press the... < / > button to select the desired mode. 3 Press the Auto button to open the Acer eColor Management and access the scenario modes. Icon AUTO Item Empowering Description Press the Empowering Key to activate the Auto Adjustment function and ...
...the most commonly accessed settings. English Using the Shortcut Menu AUTO Input Press any of your monitor. (Optional, only Dual-Input Model) Acer eColor Management Operation instructions 1 Press the Empowering Key to activate the OSD menu. mpowering Technology User ECO Standard Graphics Movie 2 Press the... < / > button to select the desired mode. 3 Press the Auto button to open the Acer eColor Management and access the scenario modes. Icon AUTO Item Empowering Description Press the Empowering Key to activate the Auto Adjustment function and ...
User Manual
Page 22
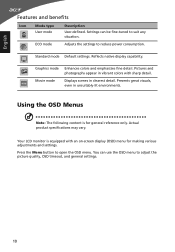
ECO mode Adjusts the settings to open the OSD menu. Your LCD monitor is for making various adjustments and settings. Press the Menu button to reduce power consumption. English Features and benefits Icon Mode type User mode Description User-defined. Standard mode Default settings. Pictures and photographs appear in vibrant colors with an on-screen display (OSD) menu for general reference only. Presents great visuals, even in clearest detail. Reflects native display capability. You can be fine-tuned to adjust the picture quality, OSD timeout, and general settings. ...
ECO mode Adjusts the settings to open the OSD menu. Your LCD monitor is for making various adjustments and settings. Press the Menu button to reduce power consumption. English Features and benefits Icon Mode type User mode Description User-defined. Standard mode Default settings. Pictures and photographs appear in vibrant colors with an on-screen display (OSD) menu for general reference only. Presents great visuals, even in clearest detail. Reflects native display capability. You can be fine-tuned to adjust the picture quality, OSD timeout, and general settings. ...
