Quick Start Guide
Page 1
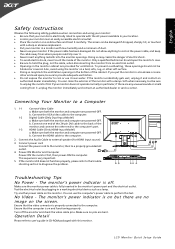
... to provide adequate ventilation. · Do not expose the monitor to diagnose the problem. 32 1-3 1-2 1-1 1-1 1-2 1-3 Troubleshooting Tips No Power - If the monitor accidentally gets wet, unplug it -unplug the monitor immediately and contact an authorized dealer or service center. Connecting Your Monitor to... of electric shock. · To avoid electric shock, never touch the inside of the monitor with this test. b. The monitor's power indicator is electrically rated to a properly grounded AC outlet. 3 4. If your monitor is on the screen. Connect the VGA video ...
... to provide adequate ventilation. · Do not expose the monitor to diagnose the problem. 32 1-3 1-2 1-1 1-1 1-2 1-3 Troubleshooting Tips No Power - If the monitor accidentally gets wet, unplug it -unplug the monitor immediately and contact an authorized dealer or service center. Connecting Your Monitor to... of electric shock. · To avoid electric shock, never touch the inside of the monitor with this test. b. The monitor's power indicator is electrically rated to a properly grounded AC outlet. 3 4. If your monitor is on the screen. Connect the VGA video ...
User Manual
Page 1
TABLE OF CONTENTS Special notes on LCD monitors 1 Information for your safety and comfort 2 Unpacking 5 Attaching/Removing the base 6 Screen position adjustment 6 Connecting the power cord 7 Safety precaution 7 Cleaning your monitor 7 Power saving 8 DDC 8 Connector Pin Assignment 9 Standard Timing Table 11 Installation 12 User controls 13 Troubleshooting 19
TABLE OF CONTENTS Special notes on LCD monitors 1 Information for your safety and comfort 2 Unpacking 5 Attaching/Removing the base 6 Screen position adjustment 6 Connecting the power cord 7 Safety precaution 7 Cleaning your monitor 7 Power saving 8 DDC 8 Connector Pin Assignment 9 Standard Timing Table 11 Installation 12 User controls 13 Troubleshooting 19
User Manual
Page 2
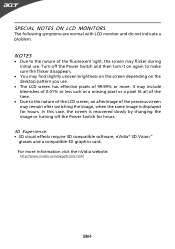
... flicker disappears. · You may remain after switching the image, when the same image is recovered slowly by changing the image or turning off the Power Switch and then turn it on the desktop pattern you use . For more . NOTES · Due to the nature of the LCD screen, an ...hours. 3D Experience: • 3D visual effects require 3D compatible software, nVidia® 3D Vision™ glasses and a compatible 3D graphics card. Turn off the Power Switch for hours. SPECIAL NOTES ON LCD MONITORS The following symptoms are normal with LCD monitor and do not indicate a problem.
... flicker disappears. · You may remain after switching the image, when the same image is recovered slowly by changing the image or turning off the Power Switch and then turn it on the desktop pattern you use . For more . NOTES · Due to the nature of the LCD screen, an ...hours. 3D Experience: • 3D visual effects require 3D compatible software, nVidia® 3D Vision™ glasses and a compatible 3D graphics card. Turn off the Power Switch for hours. SPECIAL NOTES ON LCD MONITORS The following symptoms are normal with LCD monitor and do not indicate a problem.

User Manual
Page 3
... is easily accessible and located as close to the equipment operator as they may touch dangerous voltage points or short-out parts that the power outlet you . The openings should never be blocked or covered. Follow all warnings and instructions marked on an unstable cart, stand or ... cabinet slots as possible. Information for your earing. • Gradually increase the volume until you can 't hear people speaking near you plug the power cord into is provided. • Never push objects of any kind into the product. • To avoid damage of internal components and to...
... is easily accessible and located as close to the equipment operator as they may touch dangerous voltage points or short-out parts that the power outlet you . The openings should never be blocked or covered. Follow all warnings and instructions marked on an unstable cart, stand or ... cabinet slots as possible. Information for your earing. • Gradually increase the volume until you can 't hear people speaking near you plug the power cord into is provided. • Never push objects of any kind into the product. • To avoid damage of internal components and to...
User Manual
Page 4
...; pain, swelling or throbbing • stiffness or tightness • coldness or weakness If you to dangerous voltage points or other risks. nel when: • the power cord or plug is produced with high-precision manufacturing techniques. Nevertheless, some pixels may expose you have these symptoms, or any other musculoskeletal disorders. Incorrect...
...; pain, swelling or throbbing • stiffness or tightness • coldness or weakness If you to dangerous voltage points or other risks. nel when: • the power cord or plug is produced with high-precision manufacturing techniques. Nevertheless, some pixels may expose you have these symptoms, or any other musculoskeletal disorders. Incorrect...
User Manual
Page 6
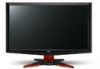
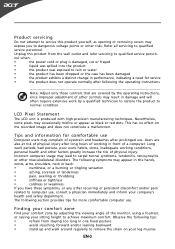
UNPACKING Please check the following items are present when you unpack the box, and save the packing materials in case you will need to ship or transport the monitor in future. · LCD Monitor · AC Power Cord · D-Sub Cable · DVI Cable (Only Dual-Input Model) · Audio Cable(Only for HDMI Audio output) (Optional) · User Manual · Quick Start Guide EN-5
UNPACKING Please check the following items are present when you unpack the box, and save the packing materials in case you will need to ship or transport the monitor in future. · LCD Monitor · AC Power Cord · D-Sub Cable · DVI Cable (Only Dual-Input Model) · Audio Cable(Only for HDMI Audio output) (Optional) · User Manual · Quick Start Guide EN-5

User Manual
Page 8
... to wipe the screen and cabinet front and sides. SAFETY PRECAUTION · Avoid placing the monitor, or any other light sources may reflect on the power cord to avoid damage to the cable. · Do not expose the monitor to rain, excessive moisture, or dust. · Do not cover the ventilation... care when transporting the monitor. · Refrain from giving shock or scratch to the screen, as screen is required. · Plug one end of the power cord to the AC Inlet, plug another end to a proper AC outlet. · For unit using at 120 V AC: Use a UL Listed Cord Set, Type...
... to wipe the screen and cabinet front and sides. SAFETY PRECAUTION · Avoid placing the monitor, or any other light sources may reflect on the power cord to avoid damage to the cable. · Do not expose the monitor to rain, excessive moisture, or dust. · Do not cover the ventilation... care when transporting the monitor. · Refrain from giving shock or scratch to the screen, as screen is required. · Plug one end of the power cord to the AC Inlet, plug another end to a proper AC outlet. · For unit using at 120 V AC: Use a UL Listed Cord Set, Type...
User Manual
Page 9
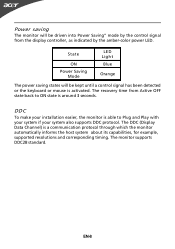
... Mode LED Light Blue Orange The power saving states will be kept until a control signal has been detected or the keyboard or mouse is a communication protocol through which the monitor automatically informs ... to Plug and Play with your system if your installation easier, the monitor is around 3 seconds. DDC To make your system also supports DDC protocol. Power saving The monitor will be driven into Power Saving" mode by the amber-color...
... Mode LED Light Blue Orange The power saving states will be kept until a control signal has been detected or the keyboard or mouse is a communication protocol through which the monitor automatically informs ... to Plug and Play with your system if your installation easier, the monitor is around 3 seconds. DDC To make your system also supports DDC protocol. Power saving The monitor will be driven into Power Saving" mode by the amber-color...
User Manual
Page 11
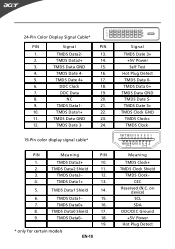
...18. 7. TMDS Data1+ 22. 11. TMDS Date 3- 24. 19-Pin color display signal cable* PIN Meaning PIN 1. on device) SCL SDA DDC/CEC Ground +5V Power Hot Plug Detect NC 20. 9. TMDS Data2 Shield 11. 3. TMDS Data2+ 14. 3. TMDS Date 4- 16. 5. TMDS Data1- 15. 7. TMDS Data0- 18. 19.... * only for certain models EN-10 Signal TMDS Date 3+ +5V Power Self Test Hot Plug Detect TMDS Data 0TMDS Data 0+ TMDS Data GND TMDS Date 5TMDS Date 5+ TMDS Clock GND TMDS Clock+ TMDS Clock- TMDS Date...
...18. 7. TMDS Data1+ 22. 11. TMDS Date 3- 24. 19-Pin color display signal cable* PIN Meaning PIN 1. on device) SCL SDA DDC/CEC Ground +5V Power Hot Plug Detect NC 20. 9. TMDS Data2 Shield 11. 3. TMDS Data2+ 14. 3. TMDS Date 4- 16. 5. TMDS Data1- 15. 7. TMDS Data0- 18. 19.... * only for certain models EN-10 Signal TMDS Date 3+ +5V Power Self Test Hot Plug Detect TMDS Data 0TMDS Data 0+ TMDS Data GND TMDS Date 5TMDS Date 5+ TMDS Clock GND TMDS Clock+ TMDS Clock- TMDS Date...
User Manual
Page 13
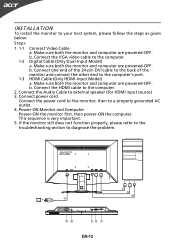
...to external speaker (for HDMI input source) 3. Connect the Audio Cable to the computer. 2. Power-ON Monitor and Computer Power-ON the monitor first, then power-ON the computer. Connect power cord Connect the power cord to the monitor, then to the computer's port. 1-3 HDMI Cable (Only HDMI-Input ... the VGA video cable to diagnose the problem. 1-1 1-2 1-3 3 32 1-3 1-2 1-1 EN-12 Make sure both the monitor and computer are powered-OFF. b. INSTALLATION To install the monitor to your host system, please follow the steps as given below: Steps 1. 1-1 Connect Video Cable a.
...to external speaker (for HDMI input source) 3. Connect the Audio Cable to the computer. 2. Power-ON Monitor and Computer Power-ON the monitor first, then power-ON the computer. Connect power cord Connect the power cord to the monitor, then to the computer's port. 1-3 HDMI Cable (Only HDMI-Input ... the VGA video cable to diagnose the problem. 1-1 1-2 1-3 3 32 1-3 1-2 1-1 EN-12 Make sure both the monitor and computer are powered-OFF. b. INSTALLATION To install the monitor to your host system, please follow the steps as given below: Steps 1. 1-1 Connect Video Cable a.
User Manual
Page 14
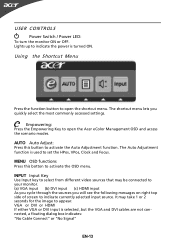
... input is used to appear. MENU OSD functions Press this button to open the shortcut menu. USER CONTROLS Power Switch / Power LED: To turn the monitor ON or OFF. Lights up to open the Acer eColor Management OSD and access the scenario modes. Empowering: Press the Empowering Key to activate the Auto Adjustment...
... input is used to appear. MENU OSD functions Press this button to open the shortcut menu. USER CONTROLS Power Switch / Power LED: To turn the monitor ON or OFF. Lights up to open the Acer eColor Management OSD and access the scenario modes. Empowering: Press the Empowering Key to activate the Auto Adjustment...
User Manual
Page 20
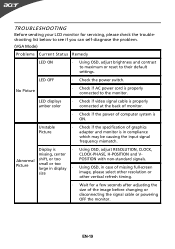
... Picture · Check if the specification of computer system is in display · POSITION with non-standard signals. EN-19 LED OFF · Check the power switch. LED displays amber color · Check if video signal cable is properly connected at the back of monitor. · Check if the... power of graphics adapter and monitor is ON. Abnormal Picture shift, or too small or too large in compliance which may be causing the input signal ...
... Picture · Check if the specification of computer system is in display · POSITION with non-standard signals. EN-19 LED OFF · Check the power switch. LED displays amber color · Check if video signal cable is properly connected at the back of monitor. · Check if the... power of graphics adapter and monitor is ON. Abnormal Picture shift, or too small or too large in compliance which may be causing the input signal ...
User Manual
Page 21
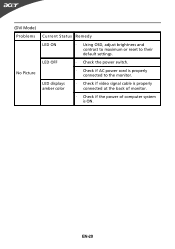
LED OFF · Check the power switch. · Check if AC power cord is ON. LED displays amber color · Check if video signal cable is properly connected at the back of monitor. · Check if the power of computer system is properly connected to their default settings. EN-20 (DVI Mode) Problems No Picture Current Status Remedy LED ON · Using OSD, adjust brightness and contrast to maximum or reset to the monitor.
LED OFF · Check the power switch. · Check if AC power cord is ON. LED displays amber color · Check if video signal cable is properly connected at the back of monitor. · Check if the power of computer system is properly connected to their default settings. EN-20 (DVI Mode) Problems No Picture Current Status Remedy LED ON · Using OSD, adjust brightness and contrast to maximum or reset to the monitor.


