Quick Start Guide
Page 1
..., sharply hit, or touched with a sharp or abrasive implement. · Put your monitor in a working electrical device such as a lamp. Digital Cable (Only Dual-Input Model) a. Connect one end of the 24-pin DVI cable to the back of the monitor. The monitor's power indicator is electrically rated to operate with this test. You can be blocked or covered. Ensure that the video connector is on and...
..., sharply hit, or touched with a sharp or abrasive implement. · Put your monitor in a working electrical device such as a lamp. Digital Cable (Only Dual-Input Model) a. Connect one end of the 24-pin DVI cable to the back of the monitor. The monitor's power indicator is electrically rated to operate with this test. You can be blocked or covered. Ensure that the video connector is on and...

Quick Start Guide
Page 2
... ensure that interference will not occur in interference to Part 15 of disposal will help . LCD Monitor Quick Setup Guide However, there is encouraged to try to correct the interference by the Federal Communications Commission, to a designated collection point for the recycling of with your household waste disposal service or the shop where you purchased the product. FOR...
... ensure that interference will not occur in interference to Part 15 of disposal will help . LCD Monitor Quick Setup Guide However, there is encouraged to try to correct the interference by the Federal Communications Commission, to a designated collection point for the recycling of with your household waste disposal service or the shop where you purchased the product. FOR...
User Manual
Page 1
TABLE OF CONTENTS Special notes on LCD monitors 1 Information for your safety and comfort 2 Unpacking 5 Attaching/Removing the base 6 Screen position adjustment 6 Connecting the power cord 7 Safety precaution 7 Cleaning your monitor 7 Power saving 8 DDC 8 Connector Pin Assignment 9 Standard Timing Table 11 Installation 12 User controls 13 Troubleshooting 19
TABLE OF CONTENTS Special notes on LCD monitors 1 Information for your safety and comfort 2 Unpacking 5 Attaching/Removing the base 6 Screen position adjustment 6 Connecting the power cord 7 Safety precaution 7 Cleaning your monitor 7 Power saving 8 DDC 8 Connector Pin Assignment 9 Standard Timing Table 11 Installation 12 User controls 13 Troubleshooting 19
User Manual
Page 2
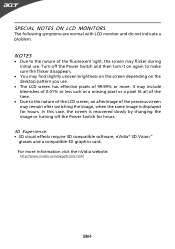
... screen is recovered slowly by changing the image or turning off the Power Switch and then turn it on the desktop pattern you use . SPECIAL NOTES ON LCD MONITORS The following symptoms are normal with LCD monitor and do not indicate a problem. It may include blemishes of 0.01% or less such as a missing pixel or a pixel lit all of the time. · Due to make sure...
... screen is recovered slowly by changing the image or turning off the Power Switch and then turn it on the desktop pattern you use . SPECIAL NOTES ON LCD MONITORS The following symptoms are normal with LCD monitor and do not indicate a problem. It may include blemishes of 0.01% or less such as a missing pixel or a pixel lit all of the time. · Due to make sure...
User Manual
Page 3
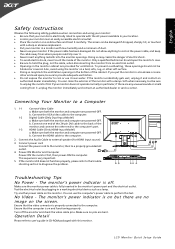
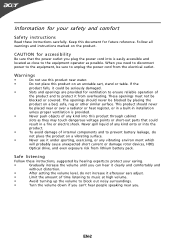
... unstable cart, stand or table. Safe listening Follow these instructions carefully. When you need to disconnect power to the equipment, be seriously damaged. • Slots and openings are provided for ventilation to ensure reliable operation of time listening to music at high volume. • Avoid turning up the volume to block out noisy surroundings. • Turn the volume down if...
... unstable cart, stand or table. Safe listening Follow these instructions carefully. When you need to disconnect power to the equipment, be seriously damaged. • Slots and openings are provided for ventilation to ensure reliable operation of time listening to music at high volume. • Avoid turning up the volume to block out noisy surroundings. • Turn the volume down if...
User Manual
Page 4
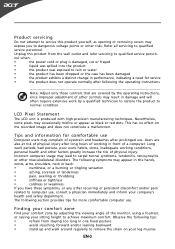
...; the power cord or plug is produced with high-precision manufacturing techniques. Unplug this product yourself, as black or red dots. The following the operating instructions Note: Adjust only those controls that are also at risk of working conditions, personal health and other recurring or persistent discomfort and/or pain related to remove the strain on the recorded image and does...
...; the power cord or plug is produced with high-precision manufacturing techniques. Unplug this product yourself, as black or red dots. The following the operating instructions Note: Adjust only those controls that are also at risk of working conditions, personal health and other recurring or persistent discomfort and/or pain related to remove the strain on the recorded image and does...
User Manual
Page 5
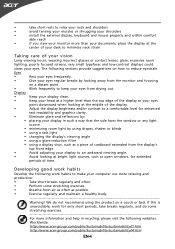
... open windows, for enhanced text readability and graphics clarity. • Eliminate glare and reflections by: • placing your eyes regular breaks by using drapes, shades or blinds • using a task light • changing the display's viewing angle • using a glare-reduction filter • using the product on how to a comfortable level for extended periods of the display. • Adjust the display brightness and/or contrast...
... open windows, for enhanced text readability and graphics clarity. • Eliminate glare and reflections by: • placing your eyes regular breaks by using drapes, shades or blinds • using a task light • changing the display's viewing angle • using a glare-reduction filter • using the product on how to a comfortable level for extended periods of the display. • Adjust the display brightness and/or contrast...
User Manual
Page 6
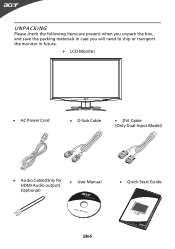
UNPACKING Please check the following items are present when you unpack the box, and save the packing materials in case you will need to ship or transport the monitor in future. · LCD Monitor · AC Power Cord · D-Sub Cable · DVI Cable (Only Dual-Input Model) · Audio Cable(Only for HDMI Audio output) (Optional) · User Manual · Quick Start Guide EN-5
UNPACKING Please check the following items are present when you unpack the box, and save the packing materials in case you will need to ship or transport the monitor in future. · LCD Monitor · AC Power Cord · D-Sub Cable · DVI Cable (Only Dual-Input Model) · Audio Cable(Only for HDMI Audio output) (Optional) · User Manual · Quick Start Guide EN-5
User Manual
Page 7
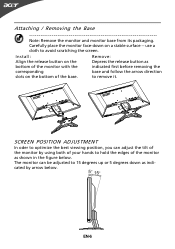
... shown in the figure below . EN-6 Attaching / Removing the Base Note: Remove the monitor and monitor base from its packaging. Install: Remove: Align the release button on a stable surface -- to avoid scratching the screen. The monitor can adjust the tilt of the monitor by arrow below . use a cloth to remove it. SCREEN POSITION ADJUSTMENT In oder to optimize the best viewing position, you can be adjusted to 15 degrees up or 5 degrees down on...
... shown in the figure below . EN-6 Attaching / Removing the Base Note: Remove the monitor and monitor base from its packaging. Install: Remove: Align the release button on a stable surface -- to avoid scratching the screen. The monitor can adjust the tilt of the monitor by arrow below . use a cloth to remove it. SCREEN POSITION ADJUSTMENT In oder to optimize the best viewing position, you can be adjusted to 15 degrees up or 5 degrees down on...

User Manual
Page 8
...: Use a UL Listed Cord Set, Type SVT wire and plug rated 10 A/125 V. · For unit using at 220/240 V AC (outside of U.S.): Use a Cord Set consisting of the monitor. No user-adjustment is required. · Plug one end of the power cord to the AC Inlet, plug another end to the screen, as screen is adequate ventilation. · Avoid placing the monitor against a bright background or where sun- light or...
...: Use a UL Listed Cord Set, Type SVT wire and plug rated 10 A/125 V. · For unit using at 220/240 V AC (outside of U.S.): Use a Cord Set consisting of the monitor. No user-adjustment is required. · Plug one end of the power cord to the AC Inlet, plug another end to the screen, as screen is adequate ventilation. · Avoid placing the monitor against a bright background or where sun- light or...
User Manual
Page 9
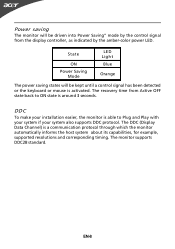
... system about its capabilities, for example, supported resolutions and corresponding timing. Power saving The monitor will be driven into Power Saving" mode by the control signal from Active OFF state back to Plug and Play with your system if your installation easier, the monitor is able to ON state is around 3 seconds. The recovery time from the display controller, as indicated by the amber-color power LED. EN-8
... system about its capabilities, for example, supported resolutions and corresponding timing. Power saving The monitor will be driven into Power Saving" mode by the control signal from Active OFF state back to Plug and Play with your system if your installation easier, the monitor is able to ON state is around 3 seconds. The recovery time from the display controller, as indicated by the amber-color power LED. EN-8
User Manual
Page 10
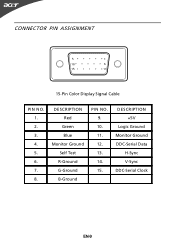
DESCRIPTION Red Green Blue Monitor Ground Self Test R-Ground G-Ground B-Ground PIN NO. 9. 10. 11. 12. 13. 14. 15. DESCRIPTION +5V Logic Ground Monitor Ground DDC-Serial Data H-Sync V-Sync DDC-Serial Clock EN-9 CONNECTOR PIN ASSIGNMENT 5 1 10 6 15 11 15-Pin Color Display Signal Cable PIN NO. 1. 2. 3. 4. 5. 6. 7. 8.
DESCRIPTION Red Green Blue Monitor Ground Self Test R-Ground G-Ground B-Ground PIN NO. 9. 10. 11. 12. 13. 14. 15. DESCRIPTION +5V Logic Ground Monitor Ground DDC-Serial Data H-Sync V-Sync DDC-Serial Clock EN-9 CONNECTOR PIN ASSIGNMENT 5 1 10 6 15 11 15-Pin Color Display Signal Cable PIN NO. 1. 2. 3. 4. 5. 6. 7. 8.
User Manual
Page 11
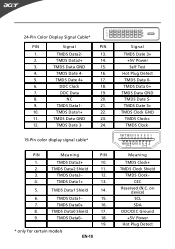
...Clock- NC 20. 9. on device) SCL SDA DDC/CEC Ground +5V Power Hot Plug Detect DDC Clock 18. 7. TMDS Data0- 18. 19. * only for certain models EN-10 Signal TMDS Date 3+ +5V Power Self Test Hot Plug Detect TMDS Data 0TMDS Data 0+ TMDS Data GND TMDS Date 5TMDS Date 5+ ...TMDS Clock GND TMDS Clock+ TMDS Clock- TMDS Data2- 12. 4. TMDS Data1+ 22. 11. TMDS Data0 Shield 17. 9. TMDS Date 3- 24. 19-Pin color display signal cable* PIN...
...Clock- NC 20. 9. on device) SCL SDA DDC/CEC Ground +5V Power Hot Plug Detect DDC Clock 18. 7. TMDS Data0- 18. 19. * only for certain models EN-10 Signal TMDS Date 3+ +5V Power Self Test Hot Plug Detect TMDS Data 0TMDS Data 0+ TMDS Data GND TMDS Date 5TMDS Date 5+ ...TMDS Clock GND TMDS Clock+ TMDS Clock- TMDS Data2- 12. 4. TMDS Data1+ 22. 11. TMDS Data0 Shield 17. 9. TMDS Date 3- 24. 19-Pin color display signal cable* PIN...
User Manual
Page 13
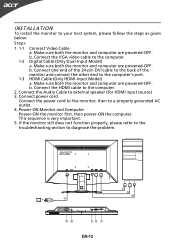
.... 2. Connect the HDMI cable to diagnose the problem. 1-1 1-2 1-3 3 32 1-3 1-2 1-1 EN-12 Make sure both the monitor and computer are powered-OFF. Make sure both the monitor and computer are powered-OFF. Connect the Audio Cable to the computer. 1-2 Digital Cable (Only Dual-Input Model) a. Make sure both the monitor and computer are powered-OFF. Connect the VGA video cable to external speaker (for HDMI input source) 3. b. Power-ON Monitor and Computer Power-ON the monitor first, then power-ON the computer. INSTALLATION To install the monitor...
.... 2. Connect the HDMI cable to diagnose the problem. 1-1 1-2 1-3 3 32 1-3 1-2 1-1 EN-12 Make sure both the monitor and computer are powered-OFF. Make sure both the monitor and computer are powered-OFF. Connect the Audio Cable to the computer. 1-2 Digital Cable (Only Dual-Input Model) a. Make sure both the monitor and computer are powered-OFF. Connect the VGA video cable to external speaker (for HDMI input source) 3. b. Power-ON Monitor and Computer Power-ON the monitor first, then power-ON the computer. INSTALLATION To install the monitor...
User Manual
Page 14
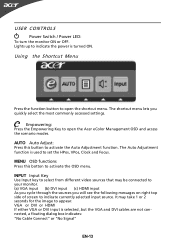
... Key to set the HPos, VPos, Clock and Focus. The Auto Adjustment function is used to open the shortcut menu. Lights up to open the Acer eColor Management OSD and access the scenario modes. Using the Shortcut Menu Press the function button to indicate the power is selected ,but the VGA and DVI cables are not connected, a floating dialog box indicates: "No Cable Connect" or "No Signal" EN-13 USER CONTROLS Power Switch / Power LED: To turn the monitor ON...
... Key to set the HPos, VPos, Clock and Focus. The Auto Adjustment function is used to open the shortcut menu. Lights up to open the Acer eColor Management OSD and access the scenario modes. Using the Shortcut Menu Press the function button to indicate the power is selected ,but the VGA and DVI cables are not connected, a floating dialog box indicates: "No Cable Connect" or "No Signal" EN-13 USER CONTROLS Power Switch / Power LED: To turn the monitor ON...
User Manual
Page 15
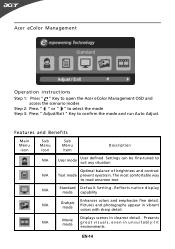
... mode Displays scenes in unsuitably-lit environments. Features and Benefits Main Menu icon Sub Menu icon Sub Menu item Description N/A User mode User defined. Pictures and photographs appear in vibrant colors with sharp detail. Settings can be fine-tuned to read onscreen text N/A Standard D efau lt Settin g . Acer eColor Management Operation instructions Step 1: Press " " Key to open the Acer eColor Management OSD and access the scenario modes...
... mode Displays scenes in unsuitably-lit environments. Features and Benefits Main Menu icon Sub Menu icon Sub Menu item Description N/A User mode User defined. Pictures and photographs appear in vibrant colors with sharp detail. Settings can be fine-tuned to read onscreen text N/A Standard D efau lt Settin g . Acer eColor Management Operation instructions Step 1: Press " " Key to open the Acer eColor Management OSD and access the scenario modes...
User Manual
Page 16
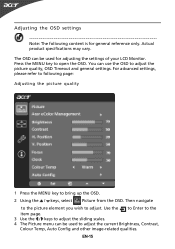
... picture quality, OSD Timeout and general settings. Adjusting the OSD settings Note: The following page: Adjusting the picture quality 1 Press the MENU key to bring up the OSD. 2 Using the / keys, select Picture from the OSD. You can be used to following content is for adjusting the settings of your LCD Monitor. For advanced settings, please refer to adjust the current Brightness, Contrast, Colour Temp, Auto Config and other image-related qualities. Actual product specifications...
... picture quality, OSD Timeout and general settings. Adjusting the OSD settings Note: The following page: Adjusting the picture quality 1 Press the MENU key to bring up the OSD. 2 Using the / keys, select Picture from the OSD. You can be used to following content is for adjusting the settings of your LCD Monitor. For advanced settings, please refer to adjust the current Brightness, Contrast, Colour Temp, Auto Config and other image-related qualities. Actual product specifications...
User Manual
Page 18
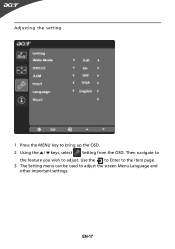
EN-17 Use the to Enter to the item page. 3 The Setting menu can be used to bring up the OSD. 2 Using the / keys, select Setting from the OSD. Adjusting the setting 1 Press the MENU key to adjust the screen Menu Language and other important settings. Then navigate to the feature you wish to adjust.
EN-17 Use the to Enter to the item page. 3 The Setting menu can be used to bring up the OSD. 2 Using the / keys, select Setting from the OSD. Adjusting the setting 1 Press the MENU key to adjust the screen Menu Language and other important settings. Then navigate to the feature you wish to adjust.
User Manual
Page 20
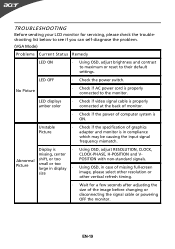
...the problem. (VGA Mode) Problems Current Status Remedy LED ON · Using OSD, adjust brightness and contrast to maximum or reset to the monitor. Using OSD, in display · POSITION with non-standard signals. No Picture · Check if AC power cord is · Using OSD, adjust RESOLUTION, CLOCK, missing, center CLOCK-PHASE, H-POSITION and V- LED OFF · Check the power switch. TROUBLESHOOTING Before sending your LCD monitor for a few seconds after adjusting the size of graphics adapter and monitor is ON. Display is properly connected to their default...
...the problem. (VGA Mode) Problems Current Status Remedy LED ON · Using OSD, adjust brightness and contrast to maximum or reset to the monitor. Using OSD, in display · POSITION with non-standard signals. No Picture · Check if AC power cord is · Using OSD, adjust RESOLUTION, CLOCK, missing, center CLOCK-PHASE, H-POSITION and V- LED OFF · Check the power switch. TROUBLESHOOTING Before sending your LCD monitor for a few seconds after adjusting the size of graphics adapter and monitor is ON. Display is properly connected to their default...
User Manual
Page 21
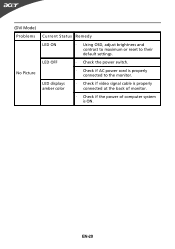
LED displays amber color · Check if video signal cable is properly connected at the back of monitor. · Check if the power of computer system is properly connected to their default settings. EN-20 LED OFF · Check the power switch. · Check if AC power cord is ON. (DVI Mode) Problems No Picture Current Status Remedy LED ON · Using OSD, adjust brightness and contrast to maximum or reset to the monitor.
LED displays amber color · Check if video signal cable is properly connected at the back of monitor. · Check if the power of computer system is properly connected to their default settings. EN-20 LED OFF · Check the power switch. · Check if AC power cord is ON. (DVI Mode) Problems No Picture Current Status Remedy LED ON · Using OSD, adjust brightness and contrast to maximum or reset to the monitor.


