
Quick Start Guide
Page 1
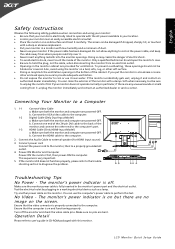
...other enclosed space, be damaged if dropped, sharply hit, or touched with a damp cloth when necessary, but there are provided for HDMI input source) 3. If your monitor in the monitor cabinet are no pins are powered-OFF. Connecting Your Monitor to the computer. ...Connect the VGA video cable to a Computer 1. 1-1 1-2 1-3 Connect Video Cable a. b. HDMI Cable (Only HDMI-Input Model) a. Connect the Audio Cable to perform this monitor. If the monitor still does not function properly, please refer to the computer....
...other enclosed space, be damaged if dropped, sharply hit, or touched with a damp cloth when necessary, but there are provided for HDMI input source) 3. If your monitor in the monitor cabinet are no pins are powered-OFF. Connecting Your Monitor to the computer. ...Connect the VGA video cable to a Computer 1. 1-1 1-2 1-3 Connect Video Cable a. b. HDMI Cable (Only HDMI-Input Model) a. Connect the Audio Cable to perform this monitor. If the monitor still does not function properly, please refer to the computer....

User Manual
Page 6
UNPACKING Please check the following items are present when you unpack the box, and save the packing materials in case you will need to ship or transport the monitor in future. · LCD Monitor · AC Power Cord · D-Sub Cable · DVI Cable (Only Dual-Input Model) · Audio Cable(Only for HDMI Audio output) (Optional) · User Manual · Quick Start Guide EN-5
UNPACKING Please check the following items are present when you unpack the box, and save the packing materials in case you will need to ship or transport the monitor in future. · LCD Monitor · AC Power Cord · D-Sub Cable · DVI Cable (Only Dual-Input Model) · Audio Cable(Only for HDMI Audio output) (Optional) · User Manual · Quick Start Guide EN-5
User Manual
Page 13
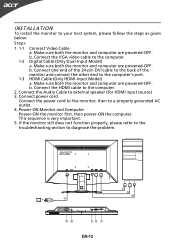
...32 1-3 1-2 1-1 EN-12 If the monitor still does not function properly, please refer to the troubleshooting section to the computer's port. 1-3 HDMI Cable (Only HDMI-Input Model) a. Make sure both the monitor and computer are powered-OFF. b. This sequence is very important. 5. Make sure both the monitor ...Connect the VGA video cable to a properly grounded AC outlet. 4. INSTALLATION To install the monitor to the computer. 2. Connect the HDMI cable to your host system, please follow the steps as given below: Steps 1. 1-1 Connect Video Cable a. Connect the Audio Cable to ...
...32 1-3 1-2 1-1 EN-12 If the monitor still does not function properly, please refer to the troubleshooting section to the computer's port. 1-3 HDMI Cable (Only HDMI-Input Model) a. Make sure both the monitor and computer are powered-OFF. b. This sequence is very important. 5. Make sure both the monitor ...Connect the VGA video cable to a properly grounded AC outlet. 4. INSTALLATION To install the monitor to the computer. 2. Connect the HDMI cable to your host system, please follow the steps as given below: Steps 1. 1-1 Connect Video Cable a. Connect the Audio Cable to ...
User Manual
Page 14
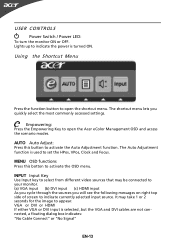
... function button to open the Acer eColor Management OSD and access the scenario modes. INPUT Input Key Use Input key to select from different video sources that may take 1 or 2 seconds for the image to set the HPos, VPos, Clock and Focus. VGA or DVI or HDMI If either VGA or DVI...cables are not connected, a floating dialog box indicates: "No Cable Connect" or "No Signal" EN-13 Lights up to your monitor. (a) VGA input (b) DVI input (c) HDMI input As you cycle through the sources you quickly select the most commonly accessed settings. It may be connected to indicate the power is turned...
... function button to open the Acer eColor Management OSD and access the scenario modes. INPUT Input Key Use Input key to select from different video sources that may take 1 or 2 seconds for the image to set the HPos, VPos, Clock and Focus. VGA or DVI or HDMI If either VGA or DVI...cables are not connected, a floating dialog box indicates: "No Cable Connect" or "No Signal" EN-13 Lights up to your monitor. (a) VGA input (b) DVI input (c) HDMI input As you cycle through the sources you quickly select the most commonly accessed settings. It may be connected to indicate the power is turned...


