Extensa 4620Z / 4220 User's Guide EN
Page 66
...in the case of beeps). Please consult http://global.acer.com. English 46 To start the recovery process: 1 Restart the system. 2 While the Acer logo is backed by your computer, write them down as they appear on the screen (or the number and sequence in the flap ... are traveling in contact with your hard disk. Requesting service International Travelers Warranty (ITW) Your computer is showing, press + at your problems efficiently. Before you call Please have your ITW passport on your computer. You are required to provide the following information available when you...
...in the case of beeps). Please consult http://global.acer.com. English 46 To start the recovery process: 1 Restart the system. 2 While the Acer logo is backed by your computer, write them down as they appear on the screen (or the number and sequence in the flap ... are traveling in contact with your hard disk. Requesting service International Travelers Warranty (ITW) Your computer is showing, press + at your problems efficiently. Before you call Please have your ITW passport on your computer. You are required to provide the following information available when you...
Extensa 4620Z / 4220 User's Guide EN
Page 81
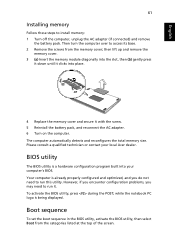
...cover and secure it . Your computer is being displayed. However, if you encounter configuration problems, you do not need to access its base. 2 Remove the screws from the categories listed at the top of the screen. then lift up and remove the memory cover. 3 (a) Insert the memory module diagonally... into the slot, then (b) gently press it down until it clicks into your local Acer dealer. while the notebook PC logo is already properly configured...
...cover and secure it . Your computer is being displayed. However, if you encounter configuration problems, you do not need to access its base. 2 Remove the screws from the categories listed at the top of the screen. then lift up and remove the memory cover. 3 (a) Insert the memory module diagonally... into the slot, then (b) gently press it down until it clicks into your local Acer dealer. while the notebook PC logo is already properly configured...
TravelMate 4320/4720 and Extensa 4220/4620 Service Guide
Page 5
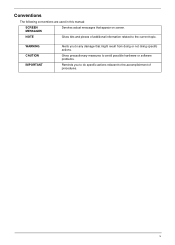
NOTE Gives bits and pieces of procedures. WARNING CAUTION IMPORTANT Alerts you to do specific actions relevant to the accomplishment of additional information related to any damage that appear on screen. Gives precautionary measures to avoid possible hardware or software problems. Reminds you to the current topic. v Conventions The following conventions are used in this manual: SCREEN MESSAGES Denotes actual messages that might result from doing or not doing specific actions.
NOTE Gives bits and pieces of procedures. WARNING CAUTION IMPORTANT Alerts you to do specific actions relevant to the accomplishment of additional information related to any damage that appear on screen. Gives precautionary measures to avoid possible hardware or software problems. Reminds you to the current topic. v Conventions The following conventions are used in this manual: SCREEN MESSAGES Denotes actual messages that might result from doing or not doing specific actions.

TravelMate 4320/4720 and Extensa 4220/4620 Service Guide
Page 49
... brackets. NOTE: You must press F2 while the system is subject to Chapter 4 Troubleshooting when problem arises. BIOS Setup Primary Menus There are several tabs on the screens shown in boldface are the default and suggested parameter settings. BIOS Setup Navigation Keys Note the following... each of the screen illustrations, settings in this utility if you encounter configuration problems. Refer to different models. NOTE: When a parameter is preceeded by an arrow or (>), it means ...
... brackets. NOTE: You must press F2 while the system is subject to Chapter 4 Troubleshooting when problem arises. BIOS Setup Primary Menus There are several tabs on the screens shown in boldface are the default and suggested parameter settings. BIOS Setup Navigation Keys Note the following... each of the screen illustrations, settings in this utility if you encounter configuration problems. Refer to different models. NOTE: When a parameter is preceeded by an arrow or (>), it means ...
TravelMate 4320/4720 and Extensa 4220/4620 Service Guide
Page 106
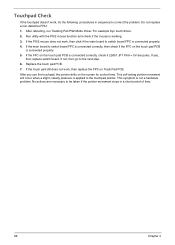
... driver. 2. If the touch pad still does not work, then replace the FPC on the screen for a short time. This symptom is working. 3. Replace the touch pad PCB. 7. If... non-defective FRU: 1. Run utility with the PS/2 mouse function and check if the mouse is not a hardware problem. If the PS/2 mouse does not work, then click if the main board to the touchpad pointer. If yes,...the following procedures in a short period of time. 96 Chapter 4 If the main board to correct the problem. If not, then go to be taken if the pointer movement stops in sequence to switch board FPC is...
... driver. 2. If the touch pad still does not work, then replace the FPC on the screen for a short time. This symptom is working. 3. Replace the touch pad PCB. 7. If... non-defective FRU: 1. Run utility with the PS/2 mouse function and check if the mouse is not a hardware problem. If the PS/2 mouse does not work, then click if the main board to the touchpad pointer. If yes,...the following procedures in a short period of time. 96 Chapter 4 If the main board to correct the problem. If not, then go to be taken if the pointer movement stops in sequence to switch board FPC is...
TravelMate 4320/4720 and Extensa 4220/4620 Service Guide
Page 107
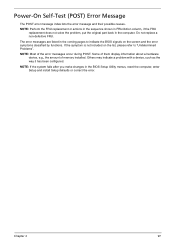
... causes. NOTE: Perform the FRU replacement or actions in the sequence shown in FRU/Action column, if the FRU replacement does not solve the problem, put the original part back in the BIOS Setup Utility menus, reset the computer, enter Setup and install Setup defaults or correct the error.... during POST. If the symptom is not included on the list, please refer to indicate the BIOS signals on the screen and the error symptoms classified by functions. Others may indicate a problem with a device, such as the way it has been configured. Chapter 4 97 Do not replace a non-defective FRU....
... causes. NOTE: Perform the FRU replacement or actions in the sequence shown in FRU/Action column, if the FRU replacement does not solve the problem, put the original part back in the BIOS Setup Utility menus, reset the computer, enter Setup and install Setup defaults or correct the error.... during POST. If the symptom is not included on the list, please refer to indicate the BIOS signals on the screen and the error symptoms classified by functions. Others may indicate a problem with a device, such as the way it has been configured. Chapter 4 97 Do not replace a non-defective FRU....


