Acer Aspire S3-391 Notebook Service Guide
Page 5
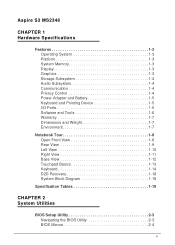
Aspire S3 MS2346 CHAPTER 1 Hardware Specifications Features 1-3 Operating System 1-3 Platform 1-3 System Memory 1-3 Display 1-3 Graphics 1-3 Storage Subsystem 1-4 Audio Subsystem 1-4 Communication 1-4 Privacy Control 1-4 Power Adapter and Battery 1-5 ... 1-7 Environment 1-7 Notebook Tour 1-8 Open Front View 1-8 Rear View 1-9 Left View 1-10 Right View 1-11 Base View 1-12 Touchpad Basics 1-13 Keyboard 1-14 D2D Recovery 1-18 System Block Diagram 1-18 Specification Tables 1-19 CHAPTER 2 System Utilities BIOS Setup Utility 2-3 Navigating the BIOS Utility 2-3 BIOS Menus 2-4 v
Aspire S3 MS2346 CHAPTER 1 Hardware Specifications Features 1-3 Operating System 1-3 Platform 1-3 System Memory 1-3 Display 1-3 Graphics 1-3 Storage Subsystem 1-4 Audio Subsystem 1-4 Communication 1-4 Privacy Control 1-4 Power Adapter and Battery 1-5 ... 1-7 Environment 1-7 Notebook Tour 1-8 Open Front View 1-8 Rear View 1-9 Left View 1-10 Right View 1-11 Base View 1-12 Touchpad Basics 1-13 Keyboard 1-14 D2D Recovery 1-18 System Block Diagram 1-18 Specification Tables 1-19 CHAPTER 2 System Utilities BIOS Setup Utility 2-3 Navigating the BIOS Utility 2-3 BIOS Menus 2-4 v
Acer Aspire S3-391 Notebook Service Guide
Page 8
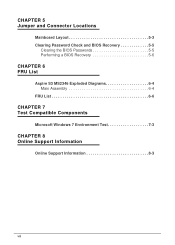
CHAPTER 5 Jumper and Connector Locations Mainboard Layout 5-3 Clearing Password Check and BIOS Recovery 5-5 Clearing the BIOS Passwords 5-5 Performing a BIOS Recovery 5-6 CHAPTER 6 FRU List Aspire S3 MS2346 Exploded Diagrams 6-4 Main Assembly 6-4 FRU List 6-6 CHAPTER 7 Test Compatible Components Microsoft Windows 7 Environment Test 7-3 CHAPTER 8 Online Support Information Online Support Information 8-3 viii
CHAPTER 5 Jumper and Connector Locations Mainboard Layout 5-3 Clearing Password Check and BIOS Recovery 5-5 Clearing the BIOS Passwords 5-5 Performing a BIOS Recovery 5-6 CHAPTER 6 FRU List Aspire S3 MS2346 Exploded Diagrams 6-4 Main Assembly 6-4 FRU List 6-6 CHAPTER 7 Test Compatible Components Microsoft Windows 7 Environment Test 7-3 CHAPTER 8 Online Support Information Online Support Information 8-3 viii
Acer Aspire S3-391 Notebook Service Guide
Page 10
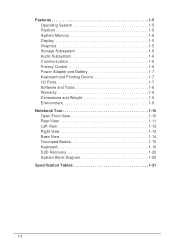
Features 1-5 Operating System 1-5 Platform 1-5 System Memory 1-5 Display 1-5 Graphics 1-5 Storage Subsystem 1-6 Audio Subsystem 1-6 Communication 1-6 Privacy Control 1-6 Power Adapter and Battery 1-7 Keyboard and Pointing Device 1-7 I/O Ports 1-7 Software and Tools 1-8 Warranty 1-9 Dimensions and Weight 1-9 Environment 1-9 Notebook Tour 1-10 Open Front View 1-10 Rear View 1-11 Left View 1-12 Right View 1-13 Base View 1-14 Touchpad Basics 1-15 Keyboard 1-16 D2D Recovery 1-20 System Block Diagram 1-20 Specification Tables 1-21 1-2
Features 1-5 Operating System 1-5 Platform 1-5 System Memory 1-5 Display 1-5 Graphics 1-5 Storage Subsystem 1-6 Audio Subsystem 1-6 Communication 1-6 Privacy Control 1-6 Power Adapter and Battery 1-7 Keyboard and Pointing Device 1-7 I/O Ports 1-7 Software and Tools 1-8 Warranty 1-9 Dimensions and Weight 1-9 Environment 1-9 Notebook Tour 1-10 Open Front View 1-10 Rear View 1-11 Left View 1-12 Right View 1-13 Base View 1-14 Touchpad Basics 1-15 Keyboard 1-16 D2D Recovery 1-20 System Block Diagram 1-20 Specification Tables 1-21 1-2
Acer Aspire S3-391 Notebook Service Guide
Page 26
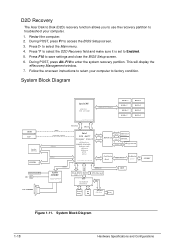
Restart the computer. 2. Press to select the D2D Recovery field and make sure it is set to select the Main menu. 4. This will display the eRecovery Management window. 7. Follow the onscreen instructions to return ... 8MB 60 LPC debug port 71 KBC NUVOTON SMBus NPCE885P 27 HDD 56 Touch PAD 69 Int. During POST, press F1 to enter the system recovery partition. Press F10 to save settings and close the BIOS Setup screen. 6. System Block Diagram 1-18 Hardware Specifications and Configurations D2D...
Restart the computer. 2. Press to select the D2D Recovery field and make sure it is set to select the Main menu. 4. This will display the eRecovery Management window. 7. Follow the onscreen instructions to return ... 8MB 60 LPC debug port 71 KBC NUVOTON SMBus NPCE885P 27 HDD 56 Touch PAD 69 Int. During POST, press F1 to enter the system recovery partition. Press F10 to save settings and close the BIOS Setup screen. 6. System Block Diagram 1-18 Hardware Specifications and Configurations D2D...

Acer Aspire S3-391 Notebook Service Guide
Page 44
... of the typical POST screen Option to boot system from LAN F12 Boot Menu Option to enter the Boot menu during POST D2D Recovery Option to use the D2D Recovery function SATA Mode Option to set the SATA controller mode Format/Option Format: HH:MM:SS (hour:minute:second) Format MM/DD...) - - BIOS Main Table 2-2. Main 0 Use this tab to set the system time and date, enable or disable boot options, and enable or disable the D2D recovery feature.
... of the typical POST screen Option to boot system from LAN F12 Boot Menu Option to enter the Boot menu during POST D2D Recovery Option to use the D2D Recovery function SATA Mode Option to set the SATA controller mode Format/Option Format: HH:MM:SS (hour:minute:second) Format MM/DD...) - - BIOS Main Table 2-2. Main 0 Use this tab to set the system time and date, enable or disable boot options, and enable or disable the D2D recovery feature.

Acer Aspire S3-391 Notebook Service Guide
Page 50
... used . If battery pack does not contain power to any USB port. 5. Insert the USB device containing the renamed BIOS file and the Crisis Recovery disk files to finish loading BIOS Flash, do not boot system. Perform the following conditions: New versions of system programs ...computer. 4. NOTE: NOTE: Flash utility has auto execution function. 2-12 System Utilities Rename the BIOS file as "XXXXXXX.FD". 2. NOTE: NOTE: If a Crisis Recovery Disc is not available, create one before Flash utility is used . Press and hold the Fn + Esc keys (this is the BIOS...
... used . If battery pack does not contain power to any USB port. 5. Insert the USB device containing the renamed BIOS file and the Crisis Recovery disk files to finish loading BIOS Flash, do not boot system. Perform the following conditions: New versions of system programs ...computer. 4. NOTE: NOTE: Flash utility has auto execution function. 2-12 System Utilities Rename the BIOS file as "XXXXXXX.FD". 2. NOTE: NOTE: If a Crisis Recovery Disc is not available, create one before Flash utility is used . Press and hold the Fn + Esc keys (this is the BIOS...

Acer Aspire S3-391 Notebook Service Guide
Page 152
... (SMM) area 6Ah Display external L2 cache size 6Bh Load custom defaults (optional) 6Ch Display shadow-area message 6Eh Display possible high address for UMB recovery 70h Display error messages 72h Check for configuration errors 76h Check for keyboard errors 7Ch Set up hardware interrupt vectors 7Eh Initialize coprocessor if present...
... (SMM) area 6Ah Display external L2 cache size 6Bh Load custom defaults (optional) 6Ch Display shadow-area message 6Eh Display possible high address for UMB recovery 70h Display error messages 72h Check for configuration errors 76h Check for keyboard errors 7Ch Set up hardware interrupt vectors 7Eh Initialize coprocessor if present...

Acer Aspire S3-391 Notebook Service Guide
Page 154
... Unknown interrupt E0h Initialize the chipset E1h Initialize the bridge E2h Initialize the CPU E3h Initialize the system timer E4h Initialize system I/O E5h Check force recovery boot E6h Checksum BIOS ROM E7h Go to BIOS E8h Set Huge Segment E9h Initialize Multi Processor EAh Initialize OEM special code EBh Initialize PIC...
... Unknown interrupt E0h Initialize the chipset E1h Initialize the bridge E2h Initialize the CPU E3h Initialize the system timer E4h Initialize system I/O E5h Check force recovery boot E6h Checksum BIOS ROM E7h Go to BIOS E8h Set Huge Segment E9h Initialize Multi Processor EAh Initialize OEM special code EBh Initialize PIC...
Acer Aspire S3-391 Notebook Service Guide
Page 158
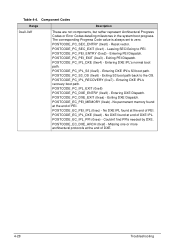
...found at the end of PEI. No DXE IPL found at the end of PEI. POSTCODE_EC_DXE_ARCH (0xef) - Entering DXE IPL's recovery boot path. POSTCODE_PC_IPL_EXIT (0xe8) POSTCODE_PC_DXE_ENTRY (0xe9) - Entering DXE Dispatch. POSTCODE_PC_DXE_EXIT (0xea) - POSTCODE_EC_PEI_MEMORY (0xeb) - Component Codes Range... detailing milestones in the system boot progress. POSTCODE_PC_SEC_ENTRY (0xe0) - Leaving SEC/Going to the OS. POSTCODE_PC_S3_OS (0xe6) - Exiting S3 boot path back to PEI. POSTCODE_EC_PEI_IPL (0xec) - No DXE found at the end of DXE IPL. POSTCODE_PC_PEI_ENTRY (0xe2) - Entering...
...found at the end of PEI. No DXE IPL found at the end of PEI. POSTCODE_EC_DXE_ARCH (0xef) - Entering DXE IPL's recovery boot path. POSTCODE_PC_IPL_EXIT (0xe8) POSTCODE_PC_DXE_ENTRY (0xe9) - Entering DXE Dispatch. POSTCODE_PC_DXE_EXIT (0xea) - POSTCODE_EC_PEI_MEMORY (0xeb) - Component Codes Range... detailing milestones in the system boot progress. POSTCODE_PC_SEC_ENTRY (0xe0) - Leaving SEC/Going to the OS. POSTCODE_PC_S3_OS (0xe6) - Exiting S3 boot path back to PEI. POSTCODE_EC_PEI_IPL (0xec) - No DXE found at the end of DXE IPL. POSTCODE_PC_PEI_ENTRY (0xe2) - Entering...

Acer Aspire S3-391 Notebook Service Guide
Page 162
Mainboard Layout 5-3 Clearing Password Check and BIOS Recovery 5-5 Clearing the BIOS Passwords 5-5 Performing a BIOS Recovery 5-6 5-2
Mainboard Layout 5-3 Clearing Password Check and BIOS Recovery 5-5 Clearing the BIOS Passwords 5-5 Performing a BIOS Recovery 5-6 5-2

Acer Aspire S3-391 Notebook Service Guide
Page 165
... cleared. Perform the "Replacing the Thermal Module" procedure described on page 3-39. 3. Clearing Password Check and BIOS Recovery 0 This section provides procedures for: Clearing the BIOS passwords Performing a BIOS recovery Clearing the BIOS Passwords 0 To clear a lost BIOS password (user or supervisor password), you made and close the...
... cleared. Perform the "Replacing the Thermal Module" procedure described on page 3-39. 3. Clearing Password Check and BIOS Recovery 0 This section provides procedures for: Clearing the BIOS passwords Performing a BIOS recovery Clearing the BIOS Passwords 0 To clear a lost BIOS password (user or supervisor password), you made and close the...

Acer Aspire S3-391 Notebook Service Guide
Page 166
...can be used to boot up a computer running the Windows XP, Vista, or 7 OS. 1. Creating the Crisis Disk 0 NOTE: NOTE: The BIOS crisis recovery disk should be cleared during a BIOS flash procedure (e.g. For example, the USB key prompt is fs0. Open the Notepad program and create a new file. 4. ...will be prepared in the USB flash drive will cause the system to reboot the computer and recover the regular BIOS code. Performing a BIOS Recovery 0 Boot Block 0 An interruption during the creation of the crisis disk. 2. Save this file as startup.nsh in the fs0: root ...
...can be used to boot up a computer running the Windows XP, Vista, or 7 OS. 1. Creating the Crisis Disk 0 NOTE: NOTE: The BIOS crisis recovery disk should be cleared during a BIOS flash procedure (e.g. For example, the USB key prompt is fs0. Open the Notepad program and create a new file. 4. ...will be prepared in the USB flash drive will cause the system to reboot the computer and recover the regular BIOS code. Performing a BIOS Recovery 0 Boot Block 0 An interruption during the creation of the crisis disk. 2. Save this file as startup.nsh in the fs0: root ...

Acer Aspire S3-391 Notebook Service Guide
Page 167
... the "BIOS Flash Utilities" section on page 2-12 for detailed instructions. Jumper and Connector Locations 5-7 Connect the USB flash drive containing the Crisis Recovery disk files to the computer. 3. Press and hold the Fn+Esc keys, then press the power button . If this function is enabled, the... system will automatically reboot. 4. Performing a BIOS recovery 0 NOTE: NOTE: Make sure the battery pack is installed to the system and that the computer is connected to a UPS unit during BIOS POST.
... the "BIOS Flash Utilities" section on page 2-12 for detailed instructions. Jumper and Connector Locations 5-7 Connect the USB flash drive containing the Crisis Recovery disk files to the computer. 3. Press and hold the Fn+Esc keys, then press the power button . If this function is enabled, the... system will automatically reboot. 4. Performing a BIOS recovery 0 NOTE: NOTE: Make sure the battery pack is installed to the system and that the computer is connected to a UPS unit during BIOS POST.


