Aspire M5811 Desktop Series Service Guide
Page 9
...SATA connector • Six SATA ports: • 4 for HDD • 2 for ODD • Storage Type support: 1.HDD : Support RAID 0/1/5/10 2.Blue Ray ODD 3.AHCI mode supported for internal SATA port • Slot Type :e-SATA connector : • Controller: JMB362-QGEZ0A • 2x e-SATA... HT Connectors support: • Rear 6 jack follow HD audio definition including optical S/PDIF output • Audio jacks color coding: should meet Microsoft Windows Logo Program Device Requirements: Audio-0002 • 1 S/PDIF internal port • 1 front panel audio header (2*5) LAN • • Controller...
...SATA connector • Six SATA ports: • 4 for HDD • 2 for ODD • Storage Type support: 1.HDD : Support RAID 0/1/5/10 2.Blue Ray ODD 3.AHCI mode supported for internal SATA port • Slot Type :e-SATA connector : • Controller: JMB362-QGEZ0A • 2x e-SATA... HT Connectors support: • Rear 6 jack follow HD audio definition including optical S/PDIF output • Audio jacks color coding: should meet Microsoft Windows Logo Program Device Requirements: Audio-0002 • 1 S/PDIF internal port • 1 front panel audio header (2*5) LAN • • Controller...

Aspire M5811 Desktop Series Service Guide
Page 17
... mode(for ATA standard interface). • Disable V-sync to control the VESA DPMS monitor. • Resume method:device activated (keyboard for DOS, keyboard &mouse for Windows. • Resume recovery time 3-5sec Global Standby Mode • Global power management timer(2-120minutes,time step=10minute). • Hard disk drive goes into Standby mode...; ACPI specification 1.0b • S0,S1,S2 and S5 sleep state support. • On board device power management support. • On board device configuration support. 10 Chapter 1
... mode(for ATA standard interface). • Disable V-sync to control the VESA DPMS monitor. • Resume method:device activated (keyboard for DOS, keyboard &mouse for Windows. • Resume recovery time 3-5sec Global Standby Mode • Global power management timer(2-120minutes,time step=10minute). • Hard disk drive goes into Standby mode...; ACPI specification 1.0b • S0,S1,S2 and S5 sleep state support. • On board device power management support. • On board device configuration support. 10 Chapter 1

Aspire M5811 Desktop Series Service Guide
Page 54
...all PnP and PCI boot devices. General Device Initialization (function 5). ACPI Runtime Checkpoints Checkpoint AC AA 01, 02, 03, 04, 05 10, 20, 30, 40, 50 Description First ASL check point. Function 1 initializes all remaining PnP and PCI devices. Function 3 searches for... has standard keyboard controller. Function 5 configures all onboard peripherals that include manual configured onboard peripherals, memory and I/O decode windows in ACPI mode. IPL Device Initialization (function 4); DIM Code Checkpoints Checkpoint 2A 38 Description Initialize different buses and perform the...
...all PnP and PCI boot devices. General Device Initialization (function 5). ACPI Runtime Checkpoints Checkpoint AC AA 01, 02, 03, 04, 05 10, 20, 30, 40, 50 Description First ASL check point. Function 1 initializes all remaining PnP and PCI devices. Function 3 searches for... has standard keyboard controller. Function 5 configures all onboard peripherals that include manual configured onboard peripherals, memory and I/O decode windows in ACPI mode. IPL Device Initialization (function 4); DIM Code Checkpoints Checkpoint 2A 38 Description Initialize different buses and perform the...

Aspire M5811 Desktop Series Service Guide
Page 95
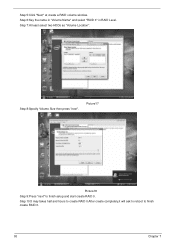
... half and hours to create RAID0.After create completely,it will ask to reboot to create a RAID volume. Step 5:Click "Next" at create a RAID volume window. Step 4:Click on the by 'Create RAID Volume from Existing HDD Drive ' to finish create RAID0. 2-2:Create a"RAID Ready" System into" RAID 1" with ... 1:Install WIN7 OS with two Hard Drives by 'Create RAID Volume from Existing HDD Drive '. Step 9:Specify Volume Size then press "next". Picture8 Step 10:Press "next" to OS desktop, open the Intel® Matrix Storage Console. Step 3:Boot to finish setup and start create RAID0.
... half and hours to create RAID0.After create completely,it will ask to reboot to create a RAID volume. Step 5:Click "Next" at create a RAID volume window. Step 4:Click on the by 'Create RAID Volume from Existing HDD Drive ' to finish create RAID0. 2-2:Create a"RAID Ready" System into" RAID 1" with ... 1:Install WIN7 OS with two Hard Drives by 'Create RAID Volume from Existing HDD Drive '. Step 9:Specify Volume Size then press "next". Picture8 Step 10:Press "next" to OS desktop, open the Intel® Matrix Storage Console. Step 3:Boot to finish setup and start create RAID0.

Aspire M5811 Desktop Series Service Guide
Page 96
Picture10 Step 7:Select minimum HDD as "Source Hard Drive". Step 5:Click "Next" at create a RAID volume window. Step 8:Select Menber Hard Drive(s). Step 6:Key the name in "Volume Name" and select "RAID 1" in the system. Step 1:Install WIN7 OS with three Hard ... HDD. Step 11:It may takes half and hours to create RAID1.After create completely,it will ask to reboot to create a RAID volume. Step 10:Press "next" to OS desktop, open the Intel® Matrix Storage Console. Step 9:Specify Volume Size then press "next". Step 3:Boot to finish setup and...
Picture10 Step 7:Select minimum HDD as "Source Hard Drive". Step 5:Click "Next" at create a RAID volume window. Step 8:Select Menber Hard Drive(s). Step 6:Key the name in "Volume Name" and select "RAID 1" in the system. Step 1:Install WIN7 OS with three Hard ... HDD. Step 11:It may takes half and hours to create RAID1.After create completely,it will ask to reboot to create a RAID volume. Step 10:Press "next" to OS desktop, open the Intel® Matrix Storage Console. Step 9:Specify Volume Size then press "next". Step 3:Boot to finish setup and...

Aspire M5811 Desktop Series Service Guide
Page 98
Picture13 Step 9:Specify Volume Size then press "next". Step 10:Press "next" to OS desktop, open the Intel® Matrix Storage Console. Step 11:It may takes half and hours to create RAID5.After create ... Existing HDD Drive '. Step 4:Click on the by 'Create RAID Volume from Existing HDD Drive ' to finish create RAID5. 2-4:Create a"RAID Ready" System into" RAID 10" with one SATA HDD. Step 3:Boot to finish setup and start create RAID5. Step 5:Click "Next" at create a RAID volume...
Picture13 Step 9:Specify Volume Size then press "next". Step 10:Press "next" to OS desktop, open the Intel® Matrix Storage Console. Step 11:It may takes half and hours to create RAID5.After create ... Existing HDD Drive '. Step 4:Click on the by 'Create RAID Volume from Existing HDD Drive ' to finish create RAID5. 2-4:Create a"RAID Ready" System into" RAID 10" with one SATA HDD. Step 3:Boot to finish setup and start create RAID5. Step 5:Click "Next" at create a RAID volume...
Aspire M5811 Desktop Series Service Guide
Page 100
Step 6:Key the name in "Volume Name" and select "RAID 0" in RAID Level. Picture17 Picture18 Step 9:Press "next" to finish create RAID 0. 93 Chapter 7 Step 8:Specify Volume Size then press "next". Step 7:At least select two HDDs as "Volume Location". Step 10:It may takes half and hours to create RAID 0.After create completely,it will ask to reboot to finish setup and start create RAID 0. Step 5:Click "Next" at create a RAID volume window.
Step 6:Key the name in "Volume Name" and select "RAID 0" in RAID Level. Picture17 Picture18 Step 9:Press "next" to finish create RAID 0. 93 Chapter 7 Step 8:Specify Volume Size then press "next". Step 7:At least select two HDDs as "Volume Location". Step 10:It may takes half and hours to create RAID 0.After create completely,it will ask to reboot to finish setup and start create RAID 0. Step 5:Click "Next" at create a RAID volume window.

Aspire M5811 Desktop Series Service Guide
Page 101
... Storage Console. Step 7:At least select three HDDs as "Volume Location". Step 5:Click "Next" at create a RAID volume window. Step 8:Specify Volume Size then press "next". Step 10:It may takes half and hours to create RAID 5.After create completely,it will ask to reboot to finish create RAID...press "next". Step 9:Press "next" to OS desktop, open the Intel® Matrix Storage Console. Step 5:Click "Next" at create a RAID volume window. Step 2:Shut down the system,then add another three serial ATA hard drives in RAID Level. Step 6:Key the name in "Volume Name" and select...
... Storage Console. Step 7:At least select three HDDs as "Volume Location". Step 5:Click "Next" at create a RAID volume window. Step 8:Specify Volume Size then press "next". Step 10:It may takes half and hours to create RAID 5.After create completely,it will ask to reboot to finish create RAID...press "next". Step 9:Press "next" to OS desktop, open the Intel® Matrix Storage Console. Step 5:Click "Next" at create a RAID volume window. Step 2:Shut down the system,then add another three serial ATA hard drives in RAID Level. Step 6:Key the name in "Volume Name" and select...


