
User Manual
Page 3
...50 Taking care of your AC adapter 18 Cleaning and servicing 18 Battery pack 51 Battery pack characteristics 51 Your Acer notebook tour 19 Charging the battery 51 Screen and front view 20 Optimizing battery life 53 Keyboard view 22 Checking the battery level 54 Rear view 23 ... 58 Hotkeys 31 Setting up a home office 58 Windows keys 33 Traveling with the computer 59 Recovery 35 Preparing the computer 59 Acer Recovery Management 35 Creating recovery discs 36 Recovering your system 39 Types of recovery 41 What to take with you 59 Special considerations 59...
...50 Taking care of your AC adapter 18 Cleaning and servicing 18 Battery pack 51 Battery pack characteristics 51 Your Acer notebook tour 19 Charging the battery 51 Screen and front view 20 Optimizing battery life 53 Keyboard view 22 Checking the battery level 54 Rear view 23 ... 58 Hotkeys 31 Setting up a home office 58 Windows keys 33 Traveling with the computer 59 Recovery 35 Preparing the computer 59 Acer Recovery Management 35 Creating recovery discs 36 Recovering your system 39 Types of recovery 41 What to take with you 59 Special considerations 59...
User Manual
Page 14
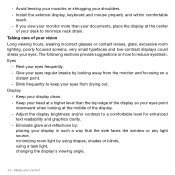
... on how to reduce eyestrain. Taking care of your vision Long viewing hours, wearing incorrect glasses or contact lenses, glare, excessive room lighting, poorly focused screens, very small typefaces and low-contrast displays could stress your eyes. The following sections provide suggestions on a distant point. Blink frequently to keep your...
... on how to reduce eyestrain. Taking care of your vision Long viewing hours, wearing incorrect glasses or contact lenses, glare, excessive room lighting, poorly focused screens, very small typefaces and low-contrast displays could stress your eyes. The following sections provide suggestions on a distant point. Blink frequently to keep your...

User Manual
Page 20
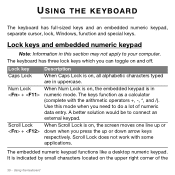
Your Acer notebook tour Screen and front view 1 2 3 45 # Icon Item Description 1 Webcam Web camera for video communication. 2 Display Displays computer output. 3 Microphone Internal microphone for sound recording. 4 Power button Turns the computer on and off. 20 -
Your Acer notebook tour Screen and front view 1 2 3 45 # Icon Item Description 1 Webcam Web camera for video communication. 2 Display Displays computer output. 3 Microphone Internal microphone for sound recording. 4 Power button Turns the computer on and off. 20 -
User Manual
Page 30
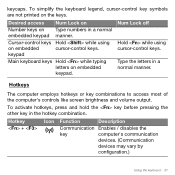
Lock key Caps Lock Num Lock + Scroll Lock + Description When Caps Lock is on, the screen moves one line up or down when you can toggle on and off. A better solution would be to do a lot of the 30 - USING THE ...
Lock key Caps Lock Num Lock + Scroll Lock + Description When Caps Lock is on, the screen moves one line up or down when you can toggle on and off. A better solution would be to do a lot of the 30 - USING THE ...
User Manual
Page 31
... keyboard keys Hold while typing letters on the keys. Hotkeys The computer employs hotkeys or key combinations to access most of the computer's controls like screen brightness and volume output. Desired access Num Lock on Num Lock off Number keys on embedded cursor-control keys. Type the letters in a normal manner...
... keyboard keys Hold while typing letters on the keys. Hotkeys The computer employs hotkeys or key combinations to access most of the computer's controls like screen brightness and volume output. Desired access Num Lock on Num Lock off Number keys on embedded cursor-control keys. Type the letters in a normal manner...

User Manual
Page 32
... monitor (if connected) and both. Press any key to save power. Decreases the screen brightness. Using the keyboard Increases the sound volume. Display off Turns the display screen backlight off (only for certain models). Speaker toggle Turns the speakers on and off. + + < ...+ < > + < > NumLk Brightness up Brightness down Volume up Volume down Turns the embedded numeric keypad on and off. Increases the screen brightness. Touchpad toggle Turns the built-in Sleep mode. Hotkey + + + + + Icon Function Description Sleep Puts the computer in touchpad on...
... monitor (if connected) and both. Press any key to save power. Decreases the screen brightness. Using the keyboard Increases the sound volume. Display off Turns the display screen backlight off (only for certain models). Speaker toggle Turns the speakers on and off. + + < ...+ < > + < > NumLk Brightness up Brightness down Volume up Volume down Turns the embedded numeric keypad on and off. Increases the screen brightness. Touchpad toggle Turns the built-in Sleep mode. Hotkey + + + + + Icon Function Description Sleep Puts the computer in touchpad on...
User Manual
Page 36
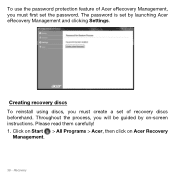
The password is set by on Acer Recovery Management. 36 - Throughout the process, you will be guided by launching Acer eRecovery Management and clicking Settings. Creating recovery discs To reinstall using discs, you must first set the password. Click on Start > All Programs > Acer, then click on -screen instructions. To use the password protection feature of Acer eRecovery Management, you must create a set of recovery discs beforehand. Please read them carefully! 1. Recovery
The password is set by on Acer Recovery Management. 36 - Throughout the process, you will be guided by launching Acer eRecovery Management and clicking Settings. Creating recovery discs To reinstall using discs, you must first set the password. Click on Start > All Programs > Acer, then click on -screen instructions. To use the password protection feature of Acer eRecovery Management, you must create a set of recovery discs beforehand. Please read them carefully! 1. Recovery
User Manual
Page 39
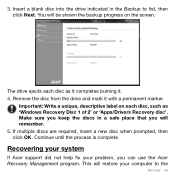
..., you keep the discs in the Backup to the Recovery - 39 Continue until the process is complete. Important: Write a unique, descriptive label on the screen. Remove the disc from the drive and mark it . 4. If multiple discs are required, insert a new disc when prompted, then click OK. Recovering ...your system If Acer support did not help fix your computer to list, then click Next. This will remember. 5. The drive ejects each disc, such as it completes ...
..., you keep the discs in the Backup to the Recovery - 39 Continue until the process is complete. Important: Write a unique, descriptive label on the screen. Remove the disc from the drive and mark it . 4. If multiple discs are required, insert a new disc when prompted, then click OK. Recovering ...your system If Acer support did not help fix your computer to list, then click Next. This will remember. 5. The drive ejects each disc, such as it completes ...

User Manual
Page 42
... on Contents. In most cases of hard-toresolve software problems, you install software or device drivers. 42 - A list of your system running again. Click on -screen prompts to reinstall. Windows automatically creates an additional restore point each day, and also each item you want to complete the installation. Returning to get...
... on Contents. In most cases of hard-toresolve software problems, you install software or device drivers. 42 - A list of your system running again. Click on -screen prompts to reinstall. Windows automatically creates an additional restore point each day, and also each item you want to complete the installation. Returning to get...
User Manual
Page 44
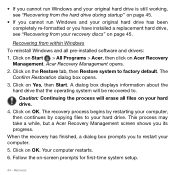
... for first-time system setup. 44 - Follow the on OK. Recovering from your recovery discs" on page 45. This process may take a while, but a Acer Recovery Management screen shows you to factory default. Your computer restarts. 6. • If you cannot run Windows and your original hard drive is still working, see "Recovering...
... for first-time system setup. 44 - Follow the on OK. Recovering from your recovery discs" on page 45. This process may take a while, but a Acer Recovery Management screen shows you to factory default. Your computer restarts. 6. • If you cannot run Windows and your original hard drive is still working, see "Recovering...

User Manual
Page 48
... browse the files and folder on the right. Browse to the file you can play , then double-click to your computer, select one of the screen to explore. Note: You must activate sharing on the device that stores the files, select Edit then make sure Share my library on local network... is selected, you want to play , pause or stop playback, and adjust the volume. Acer clear.fi Shared files Devices connected to start playback. For example, when music is active. 48 - Open clear.fi on the device that stores the...
... browse the files and folder on the right. Browse to the file you can play , then double-click to your computer, select one of the screen to explore. Note: You must activate sharing on the device that stores the files, select Edit then make sure Share my library on local network... is selected, you want to play , pause or stop playback, and adjust the volume. Acer clear.fi Shared files Devices connected to start playback. For example, when music is active. 48 - Open clear.fi on the device that stores the...
User Manual
Page 49
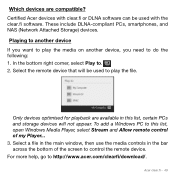
... devices are available in the bar across the bottom of my Player... 3. In the bottom right corner, select Play to http://www.acer.com/clearfi/download/. Acer clear.fi - 49 These include DLNA-compliant PCs, smartphones, and NAS (Network Attached Storage) devices. Select the remote device that will...window, then use the media controls in this list, open Windows Media Player, select Stream and Allow remote control of the screen to play the file. Certified Acer devices with the clear.fi software. To add a Windows PC to this list, certain PCs and storage devices will be...
... devices are available in the bar across the bottom of my Player... 3. In the bottom right corner, select Play to http://www.acer.com/clearfi/download/. Acer clear.fi - 49 These include DLNA-compliant PCs, smartphones, and NAS (Network Attached Storage) devices. Select the remote device that will...window, then use the media controls in this list, open Windows Media Player, select Stream and Allow remote control of the screen to play the file. Certified Acer devices with the clear.fi software. To add a Windows PC to this list, certain PCs and storage devices will be...
User Manual
Page 57
... home, take the following items with your desktop, follow these steps to prepare the computer for the trip home: • Check that can damage the screen. Pressure against the top cover can prevent the computer from sliding around and cushion it if it should fall. Caution: Avoid packing items next to...
... home, take the following items with your desktop, follow these steps to prepare the computer for the trip home: • Check that can damage the screen. Pressure against the top cover can prevent the computer from sliding around and cushion it if it should fall. Caution: Avoid packing items next to...

User Manual
Page 58
.... If you use your computer while traveling to and from home. Setting up a home office If you may want to room temperature, and inspect the screen for use at home, you frequently work on the computer. If the temperature change is greater than 10° C (18° F), allow the computer to...
.... If you use your computer while traveling to and from home. Setting up a home office If you may want to room temperature, and inspect the screen for use at home, you frequently work on the computer. If the temperature change is greater than 10° C (18° F), allow the computer to...

User Manual
Page 62
... hold the power button for four seconds to enter a password. Entering passwords When a password is set, a password prompt appears in the center of the display screen. • When the Supervisor Password is set and the password on the computer again, and try again. 62 - If you press to enter the BIOS...
... hold the power button for four seconds to enter a password. Entering passwords When a password is set, a password prompt appears in the center of the display screen. • When the Supervisor Password is set and the password on the computer again, and try again. 62 - If you press to enter the BIOS...
User Manual
Page 69
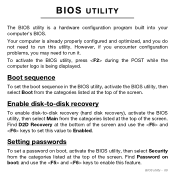
... set the boot sequence in the BIOS utility, activate the BIOS utility, then select Boot from the categories listed at the top of the screen and use the and keys to run this feature. BIOS utility - 69 Boot sequence To set this value to Enabled. Find Password on boot..., activate the BIOS utility, then select Security from the categories listed at the bottom of the screen. To activate the BIOS utility, press during the POST while the computer logo is a hardware configuration program built into your computer's BIOS. Enable ...
... set the boot sequence in the BIOS utility, activate the BIOS utility, then select Boot from the categories listed at the top of the screen and use the and keys to run this feature. BIOS utility - 69 Boot sequence To set this value to Enabled. Find Password on boot..., activate the BIOS utility, then select Security from the categories listed at the bottom of the screen. To activate the BIOS utility, press during the POST while the computer logo is a hardware configuration program built into your computer's BIOS. Enable ...

User Manual
Page 70
... sure that may be low and unable to power the computer. FREQUENTLY ASKED QUESTIONS The following is a list of your computer? I turned on the screen. Look at the power indicator: • If it is not lit, no power is being supplied to the power outlet. • If it is... arise during the use of possible situations that the AC adapter is properly plugged into your computer. The computer's power management system automatically blanks the screen to restart the system. • Do you are provided for each one. Unplug it and press + + to turn the display back on the ...
... sure that may be low and unable to power the computer. FREQUENTLY ASKED QUESTIONS The following is a list of your computer? I turned on the screen. Look at the power indicator: • If it is not lit, no power is being supplied to the power outlet. • If it is... arise during the use of possible situations that the AC adapter is properly plugged into your computer. The computer's power management system automatically blanks the screen to restart the system. • Do you are provided for each one. Unplug it and press + + to turn the display back on the ...

User Manual
Page 74
If there are required to provide the following information available when you call Acer for online service, and please be at your computer when you call takes and help solve your problems efficiently. Frequently asked questions Before you call ...: Name: Address: Telephone number: Machine and model type: Serial number: Date of purchase: 74 - With your computer, write them down as they appear on the screen (or the number and sequence in the case of time a call . You are error messages or beeps reported by your support, we can reduce the...
If there are required to provide the following information available when you call Acer for online service, and please be at your computer when you call takes and help solve your problems efficiently. Frequently asked questions Before you call ...: Name: Address: Telephone number: Machine and model type: Serial number: Date of purchase: 74 - With your computer, write them down as they appear on the screen (or the number and sequence in the case of time a call . You are error messages or beeps reported by your support, we can reduce the...

