
Aspire G7710 Series User's Guide - EN
Page 9
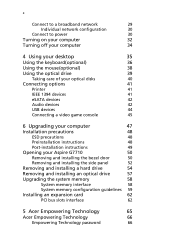
... 1 Specifications 2 Package contents 5 Accessing the User Guide 5 2 System tour 7 External and internal structure 8 Closed front panel 8 Front panel 10 Using the memory card reader 12 Rear panel 14 System board 17 Mainboard 17 System board switches and connectors 20 IDE connector (for selected models) 20 Serial ATA connector: SATA1~6 21 Fan power connectors 21 Front panel connectors 22 Serial port connector (for selected models) 22 System LED indicators 23 Front and rear panel LED indicators 23 3 Setting up your computer 25 Arranging a comfortable work...
... 1 Specifications 2 Package contents 5 Accessing the User Guide 5 2 System tour 7 External and internal structure 8 Closed front panel 8 Front panel 10 Using the memory card reader 12 Rear panel 14 System board 17 Mainboard 17 System board switches and connectors 20 IDE connector (for selected models) 20 Serial ATA connector: SATA1~6 21 Fan power connectors 21 Front panel connectors 22 Serial port connector (for selected models) 22 System LED indicators 23 Front and rear panel LED indicators 23 3 Setting up your computer 25 Arranging a comfortable work...
Aspire G7710 Series User's Guide - EN
Page 10
...devices 42 USB devices 44 Connecting a video game console 45 6 Upgrading your computer 47 Installation precautions 48 ESD precautions 48 Preinstallation instructions 48 Post-installation instructions 49 Opening your Aspire G7710 50 Removing and installing the bezel door 50 Removing and installing the side panel 52 Removing and installing a hard drive 54 Removing and installing an optical drive 57 Upgrading the system memory 58 System memory interface 58 System memory configuration guidelines 59 Installing an expansion card 62 PCI bus slots interface 62 5 Acer...
...devices 42 USB devices 44 Connecting a video game console 45 6 Upgrading your computer 47 Installation precautions 48 ESD precautions 48 Preinstallation instructions 48 Post-installation instructions 49 Opening your Aspire G7710 50 Removing and installing the bezel door 50 Removing and installing the side panel 52 Removing and installing a hard drive 54 Removing and installing an optical drive 57 Upgrading the system memory 58 System memory interface 58 System memory configuration guidelines 59 Installing an expansion card 62 PCI bus slots interface 62 5 Acer...

Aspire G7710 Series User's Guide - EN
Page 23
11 English No Icon 1 2 3 4 5 6 7 8 9 10 11 12 13 Component USB 2.0 ports Microphone/line-in jack Headphone/line-out jack Power button/power indicator Optical disk drives XD (eXtreme Digital) slot USB 2.0 port IEEE 1394 port (4-pin) CF I/II (CompactFlash Type I/II) slot Drive bay door Easy-swap hard disk cartridge (1~4) MS/MS Pro (Memory Stick/Memory Stick Pro Duo) slot SD/MMC (SecureDigital/MultimediaCard) slot 14 Optical disk drive eject buttons
11 English No Icon 1 2 3 4 5 6 7 8 9 10 11 12 13 Component USB 2.0 ports Microphone/line-in jack Headphone/line-out jack Power button/power indicator Optical disk drives XD (eXtreme Digital) slot USB 2.0 port IEEE 1394 port (4-pin) CF I/II (CompactFlash Type I/II) slot Drive bay door Easy-swap hard disk cartridge (1~4) MS/MS Pro (Memory Stick/Memory Stick Pro Duo) slot SD/MMC (SecureDigital/MultimediaCard) slot 14 Optical disk drive eject buttons

Aspire G7710 Series User's Guide - EN
Page 31
19 Back panel I/O English Code Mouse Keyboard CLR_CMOS eSATA 1394 LAN USB ports CS-Out RS-Out S/PDIF Line-In Line-Out Mic Color Component Green PS/2 mouse port Purple PS/2 keyboard port Clear CMOS button eSATA ports IEEE 1394 port (6-pin) Network ports USB ports Orange Center speaker/subwoofer jack (in 5.1/7.1 channel mode) Black Rear speaker/surround out jack (in 4/5.1/7.1 channel mode) S/PDIF jack Blue Audio-in/line-in/side-surround out jack (in jack This jack connects to an...
19 Back panel I/O English Code Mouse Keyboard CLR_CMOS eSATA 1394 LAN USB ports CS-Out RS-Out S/PDIF Line-In Line-Out Mic Color Component Green PS/2 mouse port Purple PS/2 keyboard port Clear CMOS button eSATA ports IEEE 1394 port (6-pin) Network ports USB ports Orange Center speaker/subwoofer jack (in 5.1/7.1 channel mode) Black Rear speaker/surround out jack (in 4/5.1/7.1 channel mode) S/PDIF jack Blue Audio-in/line-in/side-surround out jack (in jack This jack connects to an...

Aspire G7710 Series User's Guide - EN
Page 32
English 20 2 System tour System board switches and connectors The System board switches are easy to master / slave mode by the vendors for selected models) The IDE connector supports IDE hard disk drives, optical disk drives, and other IDE devices. IDE connector (for jumper setting instructions. Refer to IDE device's documentation supplied by setting jumpers. Important: If you install two IDE devices on the same cable, you must configure the drives separately to turn off or reset the computer when user testing the system.
English 20 2 System tour System board switches and connectors The System board switches are easy to master / slave mode by the vendors for selected models) The IDE connector supports IDE hard disk drives, optical disk drives, and other IDE devices. IDE connector (for jumper setting instructions. Refer to IDE device's documentation supplied by setting jumpers. Important: If you install two IDE devices on the same cable, you must configure the drives separately to turn off or reset the computer when user testing the system.

Aspire G7710 Series User's Guide - EN
Page 34
... Hard disk active LED 4 FP PWR/SLP MSG LED pull-up 8 PWR_SW- Do not use 10 None No pin Serial port connector (for electrical connection to the front panel switches and LEDs. Power Switch high reference pull-down to GND 9 RSVD_DNU Reserved. Reset Switch low reference pull-down to GND 6 PWR_SW+ Power Switch low reference pull-up 7 RST_SW + Reset Switch high reference pull-up 5 RST_SW - F_PANEL1 front panel pin definition PIN SIGNAL DESCRIPTION 1 Storage_LED + Hard disk LED...
... Hard disk active LED 4 FP PWR/SLP MSG LED pull-up 8 PWR_SW- Do not use 10 None No pin Serial port connector (for electrical connection to the front panel switches and LEDs. Power Switch high reference pull-down to GND 9 RSVD_DNU Reserved. Reset Switch low reference pull-down to GND 6 PWR_SW+ Power Switch low reference pull-up 7 RST_SW + Reset Switch high reference pull-up 5 RST_SW - F_PANEL1 front panel pin definition PIN SIGNAL DESCRIPTION 1 Storage_LED + Hard disk LED...
Aspire G7710 Series User's Guide - EN
Page 42
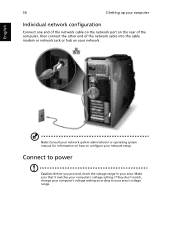
Make sure that it matches your network. If they don't match, change your computer's voltage setting according to power Caution: Before you proceed, check the voltage range in your area. English 30 3 Setting up your computer Individual network configuration Connect one end of the network cable on the network port on the rear of the computer, then connect the other end of the network cable into the cable modem...
Make sure that it matches your network. If they don't match, change your computer's voltage setting according to power Caution: Before you proceed, check the voltage range in your area. English 30 3 Setting up your computer Individual network configuration Connect one end of the network cable on the network port on the rear of the computer, then connect the other end of the network cable into the cable modem...

Aspire G7710 Series User's Guide - EN
Page 46
Quickly pressing the button may put the computer in suspend mode only. For other OS shutdown procedures, refer to the related user documentation. 1 On the Windows Vista taskbar, click on the Start button, and click , then click Shut Down. 2 Turn off your computer The software procedure below applies to your computer normally, press and hold the power button for at least four seconds. If you cannot shut down your computer. 34 3 Setting up your computer English Turning off all peripherals connected to system running a Windows OS.
Quickly pressing the button may put the computer in suspend mode only. For other OS shutdown procedures, refer to the related user documentation. 1 On the Windows Vista taskbar, click on the Start button, and click , then click Shut Down. 2 Turn off your computer The software procedure below applies to your computer normally, press and hold the power button for at least four seconds. If you cannot shut down your computer. 34 3 Setting up your computer English Turning off all peripherals connected to system running a Windows OS.
Aspire G7710 Series User's Guide - EN
Page 48
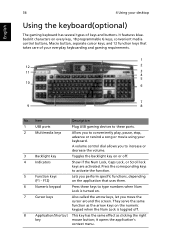
... volume. 3 Backlight key Toggles the backlight key on . 7 Cursor keys Also called the arrow keys, let you move the cursor around the screen. it opens the application's context menu. English 36 4 Using your everyday keyboarding and gaming requirements. 1 12 2 11 3 4 5 10 6 7 9 8 No. They serve the same function as clicking the right key mouse button; A volume control dial allows you to type numbers when Num Lock...
... volume. 3 Backlight key Toggles the backlight key on . 7 Cursor keys Also called the arrow keys, let you move the cursor around the screen. it opens the application's context menu. English 36 4 Using your everyday keyboarding and gaming requirements. 1 12 2 11 3 4 5 10 6 7 9 8 No. They serve the same function as clicking the right key mouse button; A volume control dial allows you to type numbers when Num Lock...
Aspire G7710 Series User's Guide - EN
Page 53
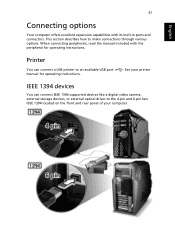
... an available USB port manual for operating instructions. Printer You can connect IEEE 1394 supported devices like a digital video camera, external storage devices, or external optical drives to the 4-pin and 6-pin fast IEEE 1394 located on the front and rear panel of your printer IEEE 1394 devices You can connect a USB printer to make connections through various options. When connecting peripherals, read the manual included with its built-in ports and connectors. See your computer. 41 English Connecting options Your...
... an available USB port manual for operating instructions. Printer You can connect IEEE 1394 supported devices like a digital video camera, external storage devices, or external optical drives to the 4-pin and 6-pin fast IEEE 1394 located on the front and rear panel of your printer IEEE 1394 devices You can connect a USB printer to make connections through various options. When connecting peripherals, read the manual included with its built-in ports and connectors. See your computer. 41 English Connecting options Your...

Aspire G7710 Series User's Guide - EN
Page 56
...-in USB port which permits you to connect additional USB devices to connect more USB devices. To connect a USB device, simply plug the device cable into any of the USB ports located on the rear panel. With USB, complex cable connections can be eliminated. Note: The USB devices shown below are for reference only. English 44 4 Using your desktop USB devices Universal Serial Bus (USB) is a serial bus design capable of your computer without using up its resources. These ports support USB 2.0 high-performance external devices such...
...-in USB port which permits you to connect additional USB devices to connect more USB devices. To connect a USB device, simply plug the device cable into any of the USB ports located on the rear panel. With USB, complex cable connections can be eliminated. Note: The USB devices shown below are for reference only. English 44 4 Using your desktop USB devices Universal Serial Bus (USB) is a serial bus design capable of your computer without using up its resources. These ports support USB 2.0 high-performance external devices such...
Aspire G7710 Series User's Guide - EN
Page 60
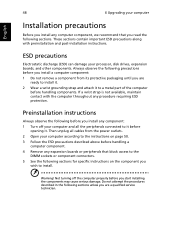
... the peripherals connected to it before opening it to a metal part of the computer before handling components. ESD precautions Electrostatic discharge (ESD) can damage your processor, disk drives, expansion boards, and other components. Not turning off the computer properly before you install any component: 1 Turn off your computer and all cables from its protective packaging until you wish to install. Preinstallation instructions Always...
... the peripherals connected to it before opening it to a metal part of the computer before handling components. ESD precautions Electrostatic discharge (ESD) can damage your processor, disk drives, expansion boards, and other components. Not turning off the computer properly before you install any component: 1 Turn off your computer and all cables from its protective packaging until you wish to install. Preinstallation instructions Always...
Aspire G7710 Series User's Guide - EN
Page 66
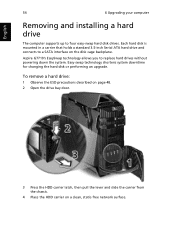
English 54 6 Upgrading your computer Removing and installing a hard drive The computer supports up to a SATA interface on a clean, static-free network surface. Easy-swap technology shortens system downtime for changing the hard disk or performing an upgrade. To remove a hard drive: 1 Observe the ESD precautions described on page 48. 2 Open the drive bay door. 3 Press the HDD carrier latch, then pull the lever and slide the carrier from the...
English 54 6 Upgrading your computer Removing and installing a hard drive The computer supports up to a SATA interface on a clean, static-free network surface. Easy-swap technology shortens system downtime for changing the hard disk or performing an upgrade. To remove a hard drive: 1 Observe the ESD precautions described on page 48. 2 Open the drive bay door. 3 Press the HDD carrier latch, then pull the lever and slide the carrier from the...
Aspire G7710 Series User's Guide - EN
Page 72
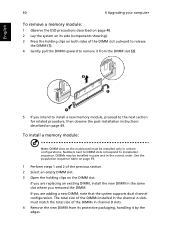
If you are replacing an existing DIMM, install the new DIMM in channel B slots. 4 Remove the new DIMM from the DIMM slot (2). 5 If you are adding a new DIMM, note that the system supports dual channel configuration. English 60 6 Upgrading your computer To remove a memory module: 1 Observe the ESD precautions described on page 48. 2 Lay the system on its protective packaging, handling it from its side (components...
If you are replacing an existing DIMM, install the new DIMM in channel B slots. 4 Remove the new DIMM from the DIMM slot (2). 5 If you are adding a new DIMM, note that the system supports dual channel configuration. English 60 6 Upgrading your computer To remove a memory module: 1 Observe the ESD precautions described on page 48. 2 Lay the system on its protective packaging, handling it from its side (components...
Aspire G7710 Series User's Guide - EN
Page 82
... if you properly plugged the power cable into the ODD and press + + to its original default factory settings. However, if the diagnostic utility still reports a problem, then you may be damaged or missing. Your computer's power management function automatically blanks the screen to turn the display back on. Note: For more information about recovering your computer. Just press any key to save power. English 70 7 Frequently...
... if you properly plugged the power cable into the ODD and press + + to its original default factory settings. However, if the diagnostic utility still reports a problem, then you may be damaged or missing. Your computer's power management function automatically blanks the screen to turn the display back on. Note: For more information about recovering your computer. Just press any key to save power. English 70 7 Frequently...

Aspire G7710 Series User's Guide - EN
Page 83
... your USB keyboard to toggle from the computer. Check the following : • Make sure the printer is connected to the printer's documentation. If your drive by using the correct type of disk. • Make sure the disk is inserted into the drive correctly. • Check if the disk is turned on the icon and deselect the Mute option. Check the following : • Make sure the hard disk...
... your USB keyboard to toggle from the computer. Check the following : • Make sure the printer is connected to the printer's documentation. If your drive by using the correct type of disk. • Make sure the disk is inserted into the drive correctly. • Check if the disk is turned on the icon and deselect the Mute option. Check the following : • Make sure the hard disk...
Aspire G7710 Series User's Guide - EN
Page 84
... BIOS to recovery your system. One is from system backup. This utility has same password protection with Acer eRecovery. You can press Alt + F10 after the BIOS finishes running will restore your system's original factory default settings or last system backup. Warning: Initiating the recovery operation while the operating system is from system's original settings and another is running the Power On Self Test (POST). Follow all onscreen instructions...
... BIOS to recovery your system. One is from system backup. This utility has same password protection with Acer eRecovery. You can press Alt + F10 after the BIOS finishes running will restore your system's original factory default settings or last system backup. Warning: Initiating the recovery operation while the operating system is from system's original settings and another is running the Power On Self Test (POST). Follow all onscreen instructions...
Aspire G7710 Series User's Guide - EN
Page 93
... beginning of another device connected to the same line. 9 Under power failure conditions this appliance may not provide for the effective hand-over of a call to another . 5 This equipment shall not be set to operate within the limits for compliance with Telecom's specifications, the associated equipment shall be set to ensure that automatic calls to different numbers are spaced...
... beginning of another device connected to the same line. 9 Under power failure conditions this appliance may not provide for the effective hand-over of a call to another . 5 This equipment shall not be set to operate within the limits for compliance with Telecom's specifications, the associated equipment shall be set to ensure that automatic calls to different numbers are spaced...

Aspire G7710 Series User's Guide - EN
Page 101
... Index A accessing the online User's Guide 5 Acer Empowering Technology password setup 66 Acer eRecovery Management 66 B bezel door install 51 remove 50 C connecting options 1394 device 41 audio devices 42 analog speakers 42 external speakers 42 microphone 42 eSATA devices 42 network 41 printer 41 USB devices 44 D disk drives CD-ROM/DVD-ROM/CD-RW/BD/ HD-DVD drive taking care CDs/DVDs/BDs/ HD-DVDs 40 F Frequently-asked questions 70 blank screen 70 no audio 71 no sound 71 printer not working 71...
... Index A accessing the online User's Guide 5 Acer Empowering Technology password setup 66 Acer eRecovery Management 66 B bezel door install 51 remove 50 C connecting options 1394 device 41 audio devices 42 analog speakers 42 external speakers 42 microphone 42 eSATA devices 42 network 41 printer 41 USB devices 44 D disk drives CD-ROM/DVD-ROM/CD-RW/BD/ HD-DVD drive taking care CDs/DVDs/BDs/ HD-DVDs 40 F Frequently-asked questions 70 blank screen 70 no audio 71 no sound 71 printer not working 71...

Aspire G7710 Series User's Guide - EN
Page 102
English 90 modem notices 79 setting up computer 26, 28 area 26 chair 26 connect broadband network 29 external monitor 29 keyboard 28 mouse 28 connecting power cable 30 keyboard 27 monitor 27 mouse 27 side panel install 53 remove 53 system board audio card 20 connectors 20 mainboard 17 Index switches 20 system memory install 60 T turning off computer 34 software shutdown 34 suspend mode 34 turning on computer 32 power button 32 power switch 32 U upgrade computer 58 installation precautions post-installation 49 open computer 50 remove computer cover 50 replace components memory 58
English 90 modem notices 79 setting up computer 26, 28 area 26 chair 26 connect broadband network 29 external monitor 29 keyboard 28 mouse 28 connecting power cable 30 keyboard 27 monitor 27 mouse 27 side panel install 53 remove 53 system board audio card 20 connectors 20 mainboard 17 Index switches 20 system memory install 60 T turning off computer 34 software shutdown 34 suspend mode 34 turning on computer 32 power button 32 power switch 32 U upgrade computer 58 installation precautions post-installation 49 open computer 50 remove computer cover 50 replace components memory 58


