

Quick Start Guide
Page 5
...both. English 5 # Icon Item Description 2 Display screen Also called Liquid-Crystal Display (LCD), displays computer output. 3 Touchpad toggle Turns the internal touchpad on and off. Power button Turns the computer on and off to save power. Hotkeys The computer employs hotkeys or key...LAN communication. 4 Speakers Left and right speakers deliver stereo audio output. 5 Keyboard For entering data into your computer. 6 Touchpad Touch-sensitive pointing device which functions like a computer mouse. 7 Click buttons (left The left and right buttons function like screen brightness...
...both. English 5 # Icon Item Description 2 Display screen Also called Liquid-Crystal Display (LCD), displays computer output. 3 Touchpad toggle Turns the internal touchpad on and off. Power button Turns the computer on and off to save power. Hotkeys The computer employs hotkeys or key...LAN communication. 4 Speakers Left and right speakers deliver stereo audio output. 5 Keyboard For entering data into your computer. 6 Touchpad Touch-sensitive pointing device which functions like a computer mouse. 7 Click buttons (left The left and right buttons function like screen brightness...
Quick Start Guide
Page 10
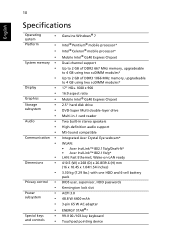
... double-layer drive Multi-in-1 card reader Two built-in stereo speakers High-definition audio support MS-Sound compatible Integrated Acer Crystal Eye webcam* WLAN: • Acer InviLink™ 802.11b/g/Draft-N* • Acer InviLink™ 802.11b/g* LAN: Fast Ethernet; Wake-on-LAN ready 410.5 (W) x 268 (D) x 26.8/39.6 (H) mm (16 x 10.45... pack BIOS user, supervisor, HDD passwords Kensington lock slot ACPI 3.0 48.8 W 4400 mAh 3-pin 65 W AC adapter ENERGY STAR®* 99-/100-/103-key keyboard Touchpad pointing device
... double-layer drive Multi-in-1 card reader Two built-in stereo speakers High-definition audio support MS-Sound compatible Integrated Acer Crystal Eye webcam* WLAN: • Acer InviLink™ 802.11b/g/Draft-N* • Acer InviLink™ 802.11b/g* LAN: Fast Ethernet; Wake-on-LAN ready 410.5 (W) x 268 (D) x 26.8/39.6 (H) mm (16 x 10.45... pack BIOS user, supervisor, HDD passwords Kensington lock slot ACPI 3.0 48.8 W 4400 mAh 3-pin 65 W AC adapter ENERGY STAR®* 99-/100-/103-key keyboard Touchpad pointing device

Service Guide
Page 7
Table of Contents System Specifications 1 Features 1 System Block Diagram 3 Your Acer Notebook tour 4 Front View 4 Closed Front View 5 Rear View 6 Left View 6 Right View 7 Bottom View 7 Indicators 8 TouchPad Basics 9 Using the Keyboard 10 Lock Keys and embedded numeric keypad 10 Windows Keys 11 Hot Keys 12 Hardware Specifications and Configurations 13 System Utilities...
Table of Contents System Specifications 1 Features 1 System Block Diagram 3 Your Acer Notebook tour 4 Front View 4 Closed Front View 5 Rear View 6 Left View 6 Right View 7 Bottom View 7 Indicators 8 TouchPad Basics 9 Using the Keyboard 10 Lock Keys and embedded numeric keypad 10 Windows Keys 11 Hot Keys 12 Hardware Specifications and Configurations 13 System Utilities...

Service Guide
Page 8
...Reassembly Procedure 99 Replacing the CPU 99 Replacing the CPU Fan 100 Replacing the Thermal Module 100 Replacing the Mainboard 101 Replacing the TouchPad Bracket 102 Replacing the Right Speaker Module 104 Replacing the Left Speaker Module 105 Replacing the Power Board 106 Replacing the Upper Cover...123 Power On Issue 124 No Display Issue 125 Random Loss of BIOS Settings 126 LCD Failure 127 Built-In Keyboard Failure 127 TouchPad Failure 128 Internal Speaker Failure 128 HDD Not Operating Correctly 130 ODD Failure 131 Wireless Function Failure 134 Thermal Unit Failure 134 ...
...Reassembly Procedure 99 Replacing the CPU 99 Replacing the CPU Fan 100 Replacing the Thermal Module 100 Replacing the Mainboard 101 Replacing the TouchPad Bracket 102 Replacing the Right Speaker Module 104 Replacing the Left Speaker Module 105 Replacing the Power Board 106 Replacing the Upper Cover...123 Power On Issue 124 No Display Issue 125 Random Loss of BIOS Settings 126 LCD Failure 127 Built-In Keyboard Failure 127 TouchPad Failure 128 Internal Speaker Failure 128 HDD Not Operating Correctly 130 ODD Failure 131 Wireless Function Failure 134 Thermal Unit Failure 134 ...
Service Guide
Page 12
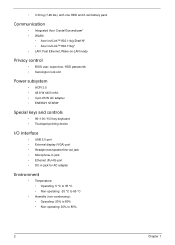
• 3.30 kg (7.29 lbs.) with one HDD and 6-cell battery pack Communication • Integrated Acer Crystal Eye webcam* • WLAN: • Acer InviLink™ 802.11b/g/Draft-N* • Acer InviLink™ 802.11b/g* • LAN: Fast Ethernet; Wake-on-LAN ready Privacy control •...W 4400 mAh • 3-pin 65 W AC adapter • ENERGY STAR®* Special keys and controls • 99-/100-/103-key keyboard • Touchpad pointing device I/O interface • USB 2.0 port • External display (VGA) port • Headphones/speaker/line-out jack • Microphone-in jack •...
• 3.30 kg (7.29 lbs.) with one HDD and 6-cell battery pack Communication • Integrated Acer Crystal Eye webcam* • WLAN: • Acer InviLink™ 802.11b/g/Draft-N* • Acer InviLink™ 802.11b/g* • LAN: Fast Ethernet; Wake-on-LAN ready Privacy control •...W 4400 mAh • 3-pin 65 W AC adapter • ENERGY STAR®* Special keys and controls • 99-/100-/103-key keyboard • Touchpad pointing device I/O interface • USB 2.0 port • External display (VGA) port • Headphones/speaker/line-out jack • Microphone-in jack •...

Service Guide
Page 14
Turns the internal touchpad on and off . Left and right speakers deliver stereo audio output. Touch-sensitive pointing device which functions like a computer mouse. Power button Turns the...-Crystal Display (LCD), displays computer output. Indicates the status of wireless LAN communication. For entering data into your computer. Your Acer Notebook tour Front View No. 1 2 3 4 5 6 4 Icon Item Acer Crystal Eye webcam Display screen Touchpad toggle Description Web camera for video communication (for selected models). Wireless LAN communication button/indicator Speakers Keyboard...
Turns the internal touchpad on and off . Left and right speakers deliver stereo audio output. Touch-sensitive pointing device which functions like a computer mouse. Power button Turns the...-Crystal Display (LCD), displays computer output. Indicates the status of wireless LAN communication. For entering data into your computer. Your Acer Notebook tour Front View No. 1 2 3 4 5 6 4 Icon Item Acer Crystal Eye webcam Display screen Touchpad toggle Description Web camera for video communication (for selected models). Wireless LAN communication button/indicator Speakers Keyboard...
Service Guide
Page 19
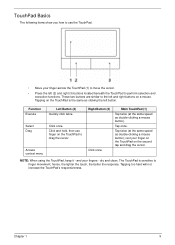
Function Execute Select Drag Access context menu Left Button (2) Quickly click twice. Click and hold, then use the TouchPad: • Move your finger across the TouchPad (1) to move the cursor. • Press the left and right buttons on a mouse. dry and clean. Right Button (3) Click once. ...Tap once. Tap twice (at the same speed as double-clicking a mouse button); The TouchPad is the same as clicking the left button. rest your finger on the TouchPad on the TouchPad to drag the cursor. hence, the lighter the touch, the better the response. NOTE: When using...
Function Execute Select Drag Access context menu Left Button (2) Quickly click twice. Click and hold, then use the TouchPad: • Move your finger across the TouchPad (1) to move the cursor. • Press the left and right buttons on a mouse. dry and clean. Right Button (3) Click once. ...Tap once. Tap twice (at the same speed as double-clicking a mouse button); The TouchPad is the same as clicking the left button. rest your finger on the TouchPad on the TouchPad to drag the cursor. hence, the lighter the touch, the better the response. NOTE: When using...
Service Guide
Page 66
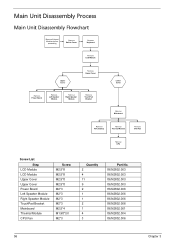
...ove LCD Module Upper Cover Rem ove Upper Cover Rem ove Power Board Rem ove Left Speaker Module Rem ove Right Speaker Module Rem ove TouchPad Bracket Lower Cover Rem ove Mainboard Rem ove RTC Battery Rem ove Thermal Module Rem ove CPU Fan Rem ove CPU Screw List Step LCD... Module LCD Module Upper Cover Upper Cover Power Board Left Speaker Module Right Speaker Module TouchPad Bracket Mainboard Thermal Module CPU Fan Screw M2.5*8 M2.5*8 M2.5*8 M2.5*8 M2*3 M2*3 M2*3 M2*3 M2.5*4 M1.98*3.0 M2*3 Quantity 2 4 11 9 2 1 1 2 1 4 3 Part No. 86....
...ove LCD Module Upper Cover Rem ove Upper Cover Rem ove Power Board Rem ove Left Speaker Module Rem ove Right Speaker Module Rem ove TouchPad Bracket Lower Cover Rem ove Mainboard Rem ove RTC Battery Rem ove Thermal Module Rem ove CPU Fan Rem ove CPU Screw List Step LCD... Module LCD Module Upper Cover Upper Cover Power Board Left Speaker Module Right Speaker Module TouchPad Bracket Mainboard Thermal Module CPU Fan Screw M2.5*8 M2.5*8 M2.5*8 M2.5*8 M2*3 M2*3 M2*3 M2*3 M2.5*4 M1.98*3.0 M2*3 Quantity 2 4 11 9 2 1 1 2 1 4 3 Part No. 86....
Service Guide
Page 68
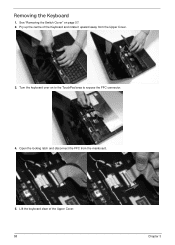
Turn the keyboard over on page 57. 2. Lift the keyboard clear of the Keyboard and rotate it upward away from the mainboard. 5. Removing the Keyboard 1. Pry up the centre of the Upper Cover. 58 Chapter 3 Open the locking latch and disconnect the FFC from the Upper Cover. 3. See "Removing the Switch Cover" on to the TouchPad area to expose the FFC connector. 4.
Turn the keyboard over on page 57. 2. Lift the keyboard clear of the Keyboard and rotate it upward away from the mainboard. 5. Removing the Keyboard 1. Pry up the centre of the Upper Cover. 58 Chapter 3 Open the locking latch and disconnect the FFC from the Upper Cover. 3. See "Removing the Switch Cover" on to the TouchPad area to expose the FFC connector. 4.
Service Guide
Page 82
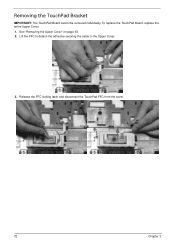
Lift the FFC to detach the adhesive securing the cable to the Upper Cover. 3. Release the FFC locking latch and disconnect the TouchPad FFC from the cover. 72 Chapter 3 To replace the TouchPad Board, replace the entire Upper Cover. 1. See "Removing the Upper Cover" on page 63. 2. Removing the TouchPad Bracket IMPORTANT: The TouchPad Board cannot be removed individually.
Lift the FFC to detach the adhesive securing the cable to the Upper Cover. 3. Release the FFC locking latch and disconnect the TouchPad FFC from the cover. 72 Chapter 3 To replace the TouchPad Board, replace the entire Upper Cover. 1. See "Removing the Upper Cover" on page 63. 2. Removing the TouchPad Bracket IMPORTANT: The TouchPad Board cannot be removed individually.

Service Guide
Page 83
Chapter 3 73 4. Step TouchPad Bracket Size M2*3 Quantity 2 Screw Type 5. Lift the rear edge of the TouchPad bracket first to clear the securing clips and remove it as shown. Remove the two screws from TouchPad bracket.
Chapter 3 73 4. Step TouchPad Bracket Size M2*3 Quantity 2 Screw Type 5. Lift the rear edge of the TouchPad bracket first to clear the securing clips and remove it as shown. Remove the two screws from TouchPad bracket.

Service Guide
Page 112
Replace the TouchPad FFC and close the locking latch on the connector. 102 Chapter 3 Press the bracket down to engage the securing clips. 2. Replacing the TouchPad Bracket 1. Replace the TouchPad bracket top edge first to engage the securing clips. 3. Replace the two screws to secure the TouchPad Bracket to the Upper Cover. 4.
Replace the TouchPad FFC and close the locking latch on the connector. 102 Chapter 3 Press the bracket down to engage the securing clips. 2. Replacing the TouchPad Bracket 1. Replace the TouchPad bracket top edge first to engage the securing clips. 3. Replace the two screws to secure the TouchPad Bracket to the Upper Cover. 4.

Service Guide
Page 133
...185. Obtain the failing symptoms in as much detail as a guide for computer problems. NOTE: The diagnostic tests are intended to test only Acer products. Symptoms (Verified) Go To Power On Issue Page 124 No Display Issue Page 125 LCD Failure Page 127 Internal Keyboard Failure Page 127... TouchPad Failure Page 128 Internal Speaker Failure Page 128 ODD Failure Page 131 WLAN Failure Page 134 Thermal Unit Failure Page 134 Other Functions ...
...185. Obtain the failing symptoms in as much detail as a guide for computer problems. NOTE: The diagnostic tests are intended to test only Acer products. Symptoms (Verified) Go To Power On Issue Page 124 No Display Issue Page 125 LCD Failure Page 127 Internal Keyboard Failure Page 127... TouchPad Failure Page 128 Internal Speaker Failure Page 128 ODD Failure Page 131 WLAN Failure Page 134 Thermal Unit Failure Page 134 Other Functions ...

Service Guide
Page 138
TouchPad Failure If the TouchPad doesn't work, perform the following actions one at a time to correct the problem. Do not replace a non-defective FRUs: 128 Chapter 4 Do not replace a non-defective FRUs: Internal Speaker Failure If the internal Speakers fail, perform the following actions one at a time to correct the problem.
TouchPad Failure If the TouchPad doesn't work, perform the following actions one at a time to correct the problem. Do not replace a non-defective FRUs: 128 Chapter 4 Do not replace a non-defective FRUs: Internal Speaker Failure If the internal Speakers fail, perform the following actions one at a time to correct the problem.

Service Guide
Page 199
Thermal Unit Failure 134 TouchPad Removing 72 TouchPad Bracket Removing 72 Replacing 102 TouchPad Failure 128 Troubleshooting Built-in KB Failure 127 EasyTouch Buttons 134 HDTV Switch 135 Internal Microphone 129 Internal Speakers 128 LCD Failure 127 No Display 125 ODD 131 Other Failures 135 Power On 124 Thermal Unit 134 TouchPad 128 WLAN 134 U Undetermined Problems 136 Upper Cover Removing 63 Replacing 106 utility BIOS 21-33 W Windows 2000 Environment Test 182 Wireless Function Failure 134 WLAN Module Removing 52 Replacing 118 189
Thermal Unit Failure 134 TouchPad Removing 72 TouchPad Bracket Removing 72 Replacing 102 TouchPad Failure 128 Troubleshooting Built-in KB Failure 127 EasyTouch Buttons 134 HDTV Switch 135 Internal Microphone 129 Internal Speakers 128 LCD Failure 127 No Display 125 ODD 131 Other Failures 135 Power On 124 Thermal Unit 134 TouchPad 128 WLAN 134 U Undetermined Problems 136 Upper Cover Removing 63 Replacing 106 utility BIOS 21-33 W Windows 2000 Environment Test 182 Wireless Function Failure 134 WLAN Module Removing 52 Replacing 118 189


