Acer Aspire 5810T, Aspire 5810TZ Notebook Series Start Guide
Page 12
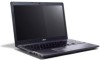
...; • Dimensions • and weight • Power • subsystem • • • • • Special keys • and controls • I/O interface • • • • • • • • Environment • • Integrated Acer Crystal Eye webcam* WLAN: • Intel® ... (VGA) port Headphones/speaker/line-out jack with S/PDIF support Microphone-in jack Ethernet (RJ-45) port DC-in jack for AC adapter Temperature: • Operating: 5 °C to 35 °C • Non-operating: -20 °C to 65 °C Humidity...
...; • Dimensions • and weight • Power • subsystem • • • • • Special keys • and controls • I/O interface • • • • • • • • Environment • • Integrated Acer Crystal Eye webcam* WLAN: • Intel® ... (VGA) port Headphones/speaker/line-out jack with S/PDIF support Microphone-in jack Ethernet (RJ-45) port DC-in jack for AC adapter Temperature: • Operating: 5 °C to 35 °C • Non-operating: -20 °C to 65 °C Humidity...

Aspire 5810TZ Service Guide
Page 43
...Flash utility to any USB port. 5. NOTE: Please connect the AC adapter power supply when you use the Flash utility. Follow the steps below to finish BIOS flash, you use the ...Flash. Power on page 117) before you may not boot the system because the BIOS is ...not install memory-related drivers (XMS, EMS, DPMI) when you run the Flash utility: 1. Make sure the AC adapter is connected to a power outlet and plugged in to a bootable USB device containing the Crisis Disk. 3. cold boot) while holding down the ...
...Flash utility to any USB port. 5. NOTE: Please connect the AC adapter power supply when you use the Flash utility. Follow the steps below to finish BIOS flash, you use the ...Flash. Power on page 117) before you may not boot the system because the BIOS is ...not install memory-related drivers (XMS, EMS, DPMI) when you run the Flash utility: 1. Make sure the AC adapter is connected to a power outlet and plugged in to a bootable USB device containing the Crisis Disk. 3. cold boot) while holding down the ...

Aspire 5810TZ Service Guide
Page 48
...Place the system on a flat, stable surface. 4. Disassembly Process The disassembly process is divided into the following : 1. Turn off the power to remove the main board, you do the following stages: • External module disassembly • Main unit disassembly • LCD module... the entire disassembly sequence. Observe the order of the hardware components. For example, if you want to the system and all power and signal cables from the system. 3. Unplug the AC adapter and all peripherals. 2. Main Screw List Item A B C D E F G H Screw M2.5 x L6 M2 x L4 M3 x L4 M2 x L3 M2 x ...
...Place the system on a flat, stable surface. 4. Disassembly Process The disassembly process is divided into the following : 1. Turn off the power to remove the main board, you do the following stages: • External module disassembly • Main unit disassembly • LCD module... the entire disassembly sequence. Observe the order of the hardware components. For example, if you want to the system and all power and signal cables from the system. 3. Unplug the AC adapter and all peripherals. 2. Main Screw List Item A B C D E F G H Screw M2.5 x L6 M2 x L4 M3 x L4 M2 x L3 M2 x ...
Aspire 5810TZ Service Guide
Page 87
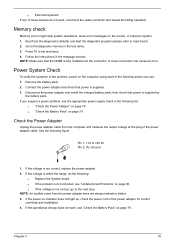
... errors might stop system operations, show error messages on page 79 Check the Power Adapter Unplug the power adapter cable from the power adapter does not always indicate a defect. 3. Follow the instructions in the test items. 4. q If the problem is not correct, replace the power adapter. 2. NOTE: An audible noise from the computer and measure the output voltage...
... errors might stop system operations, show error messages on page 79 Check the Power Adapter Unplug the power adapter cable from the power adapter does not always indicate a defect. 3. Follow the instructions in the test items. 4. q If the problem is not correct, replace the power adapter. 2. NOTE: An audible noise from the computer and measure the output voltage...
Aspire 5810TZ Service Guide
Page 88
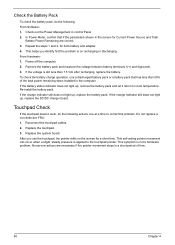
...both battery and adapter. 4. After you identify first the problem is still less than 50% of time. 80 Chapter 4 This helps you use a discharged battery pack or a battery pack that if the parameters shown in the screen for Current Power Source and Total Battery Power Remaining are ...install the battery pack. If the charge indicator still does not light up , replace the battery pack. Replace the system board. Check out the Power Management in the computer. Repeat the steps 1 and 2, for a short time. Reconnect the touchpad cables. 2. Remove the battery pack and measure...
...both battery and adapter. 4. After you identify first the problem is still less than 50% of time. 80 Chapter 4 This helps you use a discharged battery pack or a battery pack that if the parameters shown in the screen for Current Power Source and Total Battery Power Remaining are ...install the battery pack. If the charge indicator still does not light up , replace the battery pack. Replace the system board. Check out the Power Management in the computer. Repeat the steps 1 and 2, for a short time. Reconnect the touchpad cables. 2. Remove the battery pack and measure...
Aspire 5810TZ Service Guide
Page 93
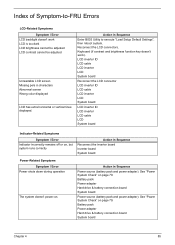
... LCD System board Indicator-Related Symptoms Symptom / Error Indicator incorrectly remains off or on . Battery pack Power adapter Hard drive & battery connection board System board Power source (battery pack and power adapter). See "Power System Check" on page 79. See "Power System Check" on page 79. Reconnect the LCD connectors. Action in Sequence Enter BIOS Utility to...
... LCD System board Indicator-Related Symptoms Symptom / Error Indicator incorrectly remains off or on . Battery pack Power adapter Hard drive & battery connection board System board Power source (battery pack and power adapter). See "Power System Check" on page 79. See "Power System Check" on page 79. Reconnect the LCD connectors. Action in Sequence Enter BIOS Utility to...
Aspire 5810TZ Service Guide
Page 94
...comes from the keyboard) Hard disk drive System board Press Fn+o and see if the computer enters hibernation mode. Hold and press the power switch for more than 4 seconds. The system doesn't enter standby mode after closing the LCD Action in Sequence See "Save to Disk... BIOS Setup Utility to Disk (S4)" on page 24. Action in Sequence Power source (battery pack and power adapter). Keyboard (if control is damaged. LCD cover switch System board 86 Chapter 4 Action in Sequence Power Management-Related Symptoms Symptom / Error The system will not enter hibernation The system...
...comes from the keyboard) Hard disk drive System board Press Fn+o and see if the computer enters hibernation mode. Hold and press the power switch for more than 4 seconds. The system doesn't enter standby mode after closing the LCD Action in Sequence See "Save to Disk... BIOS Setup Utility to Disk (S4)" on page 24. Action in Sequence Power source (battery pack and power adapter). Keyboard (if control is damaged. LCD cover switch System board 86 Chapter 4 Action in Sequence Power Management-Related Symptoms Symptom / Error The system will not enter hibernation The system...
Aspire 5810TZ Service Guide
Page 98
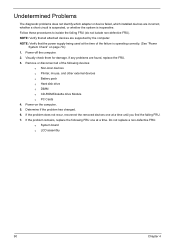
... problem does not recur, reconnect the removed devices one at a time until you find the failing FRU. 7. Power-off the computer. 2. If the problem remains, replace the following devices: q Non-Acer devices q Printer, mouse, and other external devices q Battery pack q Hard disk drive q DIMM q CD...following FRU one at a time. Power-on page 79.): 1. Determine if the problem has changed. 6. Do not replace a non-defective FRU: q System board q LCD assembly 90 Chapter 4 Undetermined Problems The diagnostic problems does not identify which adapter or device failed, which installed devices...
... problem does not recur, reconnect the removed devices one at a time until you find the failing FRU. 7. Power-off the computer. 2. If the problem remains, replace the following devices: q Non-Acer devices q Printer, mouse, and other external devices q Battery pack q Hard disk drive q DIMM q CD...following FRU one at a time. Power-on page 79.): 1. Determine if the problem has changed. 6. Do not replace a non-defective FRU: q System board q LCD assembly 90 Chapter 4 Undetermined Problems The diagnostic problems does not identify which adapter or device failed, which installed devices...
Aspire 5810TZ Service Guide
Page 104
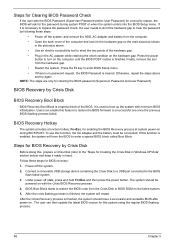
... . • Use an electric conductivity tool to turn on with minimum BIOS initialization. Follow these steps: • Power off the system, and remove the HDD, AC adapter and battery from the computer. • Open the back cover of the computer and look for the password during BIOS... hotkey: Fn+Esc, for this system using the regular BIOS flashing process. 96 Chapter 5 If this function, the AC adapter and the battery must be powered on the computer until the BIOS POST routine is finished, the system should be connected. After the Crisis Recovery process is finished...
... . • Use an electric conductivity tool to turn on with minimum BIOS initialization. Follow these steps: • Power off the system, and remove the HDD, AC adapter and battery from the computer. • Open the back cover of the computer and look for the password during BIOS... hotkey: Fn+Esc, for this system using the regular BIOS flashing process. 96 Chapter 5 If this function, the AC adapter and the battery must be powered on the computer until the BIOS POST routine is finished, the system should be connected. After the Crisis Recovery process is finished...

Aspire 5810TZ Service Guide
Page 144
... 13 O Online Support Information 133 136 P password changing 32 removing 31 port Ethernet (RJ-45) 8 external display (VGA) 7 HDMI 7 USB 2.0 7, 8 power button board removing 55 Power System Check 79 Battery Pack 79 Power Adapter 79 Processor 19 R release latch battery 10 S slot Kensington lock 7 slots ventilation 7,10 Special Key 15 SSD module removing 48...
... 13 O Online Support Information 133 136 P password changing 32 removing 31 port Ethernet (RJ-45) 8 external display (VGA) 7 HDMI 7 USB 2.0 7, 8 power button board removing 55 Power System Check 79 Battery Pack 79 Power Adapter 79 Processor 19 R release latch battery 10 S slot Kensington lock 7 slots ventilation 7,10 Special Key 15 SSD module removing 48...


