Quick Start Guide
Page 5
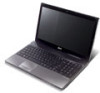
... information on the screen to thank you for making an Acer notebook your choice for meeting your mobile computing needs. Follow the instructions on such subjects as using the keyboard and audio, etc. The Aspire Series Generic User Guide contains useful information applying to access ...: 1 Click on Start > All Programs > AcerSystem. 2 Click on how your notebook. It covers basic topics such as system utilities, data recovery, expansion options and troubleshooting. Such instances are only contained in certain models of guides: First off, the poster helps you to be more on ...
... information on the screen to thank you for making an Acer notebook your choice for meeting your mobile computing needs. Follow the instructions on such subjects as using the keyboard and audio, etc. The Aspire Series Generic User Guide contains useful information applying to access ...: 1 Click on Start > All Programs > AcerSystem. 2 Click on how your notebook. It covers basic topics such as system utilities, data recovery, expansion options and troubleshooting. Such instances are only contained in certain models of guides: First off, the poster helps you to be more on ...
Service Guide
Page 9
.../B Board 152 CR/B Board 152 Clearing Password Check and BIOS Recovery 153 Clearing Password Check 153 Clear CMOS Jumper 153 BIOS Recovery by Crisis Disk 154 FRU (Field Replaceable Unit) List 155 Aspire 5741/5741G Exploded Diagrams 156 Main Assembly 156 Upper Assembly 157 LCD ...Assembly 158 Aspire 5741/5741G FRU List 160 Screw List 168 Model Definition and Configuration 170 Aspire 5741 171 Aspire 5741G 191 ...
.../B Board 152 CR/B Board 152 Clearing Password Check and BIOS Recovery 153 Clearing Password Check 153 Clear CMOS Jumper 153 BIOS Recovery by Crisis Disk 154 FRU (Field Replaceable Unit) List 155 Aspire 5741/5741G Exploded Diagrams 156 Main Assembly 156 Upper Assembly 157 LCD ...Assembly 158 Aspire 5741/5741G FRU List 160 Screw List 168 Model Definition and Configuration 170 Aspire 5741 171 Aspire 5741G 191 ...
Service Guide
Page 33
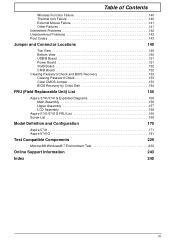
... server). Information Main InsydeH20 Setup Utility Security Boot Exit System Time: System Date: Total Memory: Video Memory: Quiet Boot Network Boot F12 Boot Menu D2D Recovery SATA Mode Display Mode [19:10:59] [2/22/2010] 4096 MB 128 MB [Enabled] [Enabled] [Disabled] [Enabled] [AHCI Mode] [Switchable Graphics...] Rev. 3.5 Item Specific Help This is displayed as enable and disable boot options and recovery. Valid range is for your reference only. Main The Main screen allows the user to set the system time and date as well as an...
... server). Information Main InsydeH20 Setup Utility Security Boot Exit System Time: System Date: Total Memory: Video Memory: Quiet Boot Network Boot F12 Boot Menu D2D Recovery SATA Mode Display Mode [19:10:59] [2/22/2010] 4096 MB 128 MB [Enabled] [Enabled] [Disabled] [Enabled] [AHCI Mode] [Switchable Graphics...] Rev. 3.5 Item Specific Help This is displayed as enable and disable boot options and recovery. Valid range is for your reference only. Main The Main screen allows the user to set the system time and date as well as an...
Service Guide
Page 39
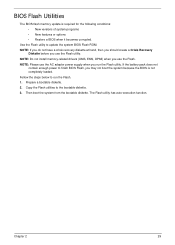
... a bootable diskette. 2. The Flash utility has auto-execution function. NOTE: Please use the Flash. NOTE: If you do not have a crisis recovery diskette at hand, then you should create a Crisis Recovery Diskette before you use the AC adaptor power supply when you may not boot the system because the BIOS is required...
... a bootable diskette. 2. The Flash utility has auto-execution function. NOTE: Please use the Flash. NOTE: If you do not have a crisis recovery diskette at hand, then you should create a Crisis Recovery Diskette before you use the AC adaptor power supply when you may not boot the system because the BIOS is required...
Service Guide
Page 146
... cables and jumpers on page 41. 136 Chapter 4 Select Startup Repair. b. f. When prompted, press any recently added hardware and associated software. 8. Click Next. The System Recovery Options screen displays. Check the BIOS settings are required. Run the Windows Disk Defragmenter. If the issue is set correctly. 7.
... cables and jumpers on page 41. 136 Chapter 4 Select Startup Repair. b. f. When prompted, press any recently added hardware and associated software. 8. Click Next. The System Recovery Options screen displays. Check the BIOS settings are required. Run the Windows Disk Defragmenter. If the issue is set correctly. 7.

Service Guide
Page 154
... Early Initialization Clock Generator Initialization Internal Graphic device early Initialization HECI Initialization Watchdog timer Initialization Memory Initial for physical memory Recovery device Initialization Found Recovery image Recovery image not found Load Recovery Image completed Start Flash BIOS with Recovery image Loading BIOS image to use Memory Set cache for Normal boot. Memory Initial for Crisis...
... Early Initialization Clock Generator Initialization Internal Graphic device early Initialization HECI Initialization Watchdog timer Initialization Memory Initial for physical memory Recovery device Initialization Found Recovery image Recovery image not found Load Recovery Image completed Start Flash BIOS with Recovery image Loading BIOS image to use Memory Set cache for Normal boot. Memory Initial for Crisis...

Service Guide
Page 157
Functionality Name (Include\ PostCode.h) BDS_RECOVERY_START_FLASH Phase BDS Post Code 35 Description Fast Recovery Start Flash. PostBDS POST Code Table Functionality Name (Include\ PostCode.h) POST_BDS_NO_BOOT_DEVICE POST_BDS_START_IMAGE POST_BDS_ENTER_INT19 POST_BDS_JUMP_BOOT_SECTOR Phase POST_BDS POST_BDS POST_BDS POST_BDS Post Code F9 FB FD FE ...
Functionality Name (Include\ PostCode.h) BDS_RECOVERY_START_FLASH Phase BDS Post Code 35 Description Fast Recovery Start Flash. PostBDS POST Code Table Functionality Name (Include\ PostCode.h) POST_BDS_NO_BOOT_DEVICE POST_BDS_START_IMAGE POST_BDS_ENTER_INT19 POST_BDS_JUMP_BOOT_SECTOR Phase POST_BDS POST_BDS POST_BDS POST_BDS Post Code F9 FB FD FE ...

Service Guide
Page 163
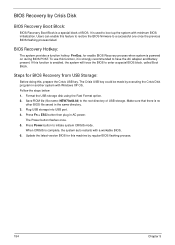
... BIOS Password (Supervisor Password and User Password). Plug in AC, keeping the HW Gap shorted. NOTE: These steps are only for the Aspire 5741/5741G. Clearing Password Check and BIOS Recovery This section provides you with the standard operating procedures of the HW Gap. 4. The machine provides one Hardware Open Gap on main... try again. Clearing Password Check Steps for Clearing BIOS Password Check If users set BIOS Password (Supervisor Password and/or User Password) for enabling BIOS Recovery. Restart the system.
... BIOS Password (Supervisor Password and User Password). Plug in AC, keeping the HW Gap shorted. NOTE: These steps are only for the Aspire 5741/5741G. Clearing Password Check and BIOS Recovery This section provides you with the standard operating procedures of the HW Gap. 4. The machine provides one Hardware Open Gap on main... try again. Clearing Password Check Steps for Clearing BIOS Password Check If users set BIOS Password (Supervisor Password and/or User Password) for enabling BIOS Recovery. Restart the system.
Service Guide
Page 164
... If this function is used to the root directory of BIOS. Follow the steps below: 1. When CRISIS is powered on during BIOS POST. BIOS Recovery Hotkey: The system provides a function hotkey: Fn+Esc, for this function, it is no other BIOS file saved in AC power. The Crisis ...strongly recommended to initiate system CRISIS mode. Format the USB storage disk using the Fast Format option. 2. Update the latest version BIOS for enable BIOS Recovery process when system is complete, the system auto restarts with Windows XP OS. Press Fn + ESC button then plug in the same directory. 3....
... If this function is used to the root directory of BIOS. Follow the steps below: 1. When CRISIS is powered on during BIOS POST. BIOS Recovery Hotkey: The system provides a function hotkey: Fn+Esc, for this function, it is no other BIOS file saved in AC power. The Crisis ...strongly recommended to initiate system CRISIS mode. Format the USB storage disk using the Fast Format option. 2. Update the latest version BIOS for enable BIOS Recovery process when system is complete, the system auto restarts with Windows XP OS. Press Fn + ESC button then plug in the same directory. 3....


