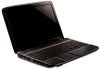
Aspire 5738ZG Bios Change - Acer
Aspire 5738ZG Bios Change
View Results Below
Free Acer Aspire 5738ZG manuals!
Problems with Acer Aspire 5738ZG?
Ask a Question
Free Acer Aspire 5738ZG manuals!
Problems with Acer Aspire 5738ZG?
Ask a Question
Related Manual Pages

Similar Questions

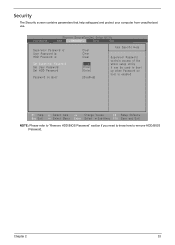
Hacked And Changed Password/bios
Locked for the last 4.6 years, it was hacked it/bios & changed the password.I've purchased a FLA...
Locked for the last 4.6 years, it was hacked it/bios & changed the password.I've purchased a FLA...
(Posted by dnlr11474 1 year ago)
Related Terms
The following terms were also used when searching for Aspire 5738ZG Bios Change - Acer:- acer aspire 5738zg
- aspire 5738zg
- acer aspire 5738zg drivers
- aspire 5738zg drivers
- acer aspire 5738zg laptop
- acer aspire 5738zg video
- aspire 5738zg price
- aspire 5738zg recovery
- acer aspire 5738zg price
- acer aspire 5738zg bluetooth
- aspire 5738zg review
- acer aspire 5738zg driver's
- aspire 5738zg bluetooth
- acer aspire 5738zg battery
- acer aspire 5738zg notebook
- acer aspire 5738zg-444g50mn
- aspire 5738zg 424g50mn
- acer aspire 5738zg review
- acer aspire 5738zg specs
- aspire 5738zg driver's
- aspire 5738zg laptop
- aspire 5738zg notebook
- aspire 5738zg webcam
- acer aspire 5738zg 423g32mn
- acer aspire 5738zg drivers for windows 7
- acer aspire 5738zg manual
- acer aspire 5738zg vista drivers
- aspire 5738zg 422g25mn
- aspire 5738zg 423g32mn
- aspire 5738zg battery
- aspire 5738zg charger
- aspire 5738zg drivers for windows 7
- aspire 5738zg manual
- aspire 5738zg specs
- aspire 5738zg video
- aspire 5738zg vista drivers
- aspire 5738zg-444g50mn
- acer aspire 5738g
- acer aspire 5738pzg
- acer aspire 5738z
- acer aspire 5738z booting
- acer aspire 5738z compatible windows 7
- acer aspire 5738z dc jack
- acer aspire 5738z laptop
- acer aspire 5738z manual
- acer aspire 5738z parts
- acer aspire 5738z ram
- acer aspire 5738z review
- acer aspire 5738z service guide
- acer aspire 5738z spec
- acer aspire 5738z specs
- acer aspire 5738z webcam
- acer aspire 5738z-4333
- acer aspire 5738zg 15.6
- acer aspire 5738zg 424g50mn
- acer aspire 5738zg adapter
- acer aspire 5738zg and review
- acer aspire 5738zg battery price
- acer aspire 5738zg bios
- acer aspire 5738zg bios password
- acer aspire 5738zg bios reset
- acer aspire 5738zg bios update
- acer aspire 5738zg black screen
- acer aspire 5738zg bluetooth driver
- acer aspire 5738zg charger
- acer aspire 5738zg cpu upgrade
- acer aspire 5738zg disassembly
- acer aspire 5738zg driver
- acer aspire 5738zg driver + windows vista
- acer aspire 5738zg driver 64 bits
- acer aspire 5738zg drivers for xp
- acer aspire 5738zg drivers windows 7
- acer aspire 5738zg drivers windows 8
- acer aspire 5738zg factory reset
- acer aspire 5738zg hackintosh
- acer aspire 5738zg hard drive
- acer aspire 5738zg inverter
- acer aspire 5738zg keyboard
- acer aspire 5738zg keyboard replacement
- acer aspire 5738zg lcd
- acer aspire 5738zg lcd screen
- acer aspire 5738zg manual download
- acer aspire 5738zg microphone driver for xp
- acer aspire 5738zg motherboard
- acer aspire 5738zg overheating
- acer aspire 5738zg power adapter
- acer aspire 5738zg price 2009
- acer aspire 5738zg price in india
- acer aspire 5738zg problems
- acer aspire 5738zg ram
- acer aspire 5738zg ram upgrade
- acer aspire 5738zg recovery
- acer aspire 5738zg recovery windows 7
- acer aspire 5738zg release
- acer aspire 5738zg safe mode
- acer aspire 5738zg screen
- acer aspire 5738zg screen replacement
- acer aspire 5738zg service manual
- acer aspire 5738zg service manual pdf
- acer aspire 5738zg sleep
- acer aspire 5738zg spec
- acer aspire 5738zg specification
- acer aspire 5738zg specifications
- acer aspire 5738zg support
- acer aspire 5738zg touchpad drivers
- acer aspire 5738zg user manual
- acer aspire 5738zg vga driver problem
- acer aspire 5738zg weight
- acer aspire 5738zg windows 7 laptop
- acer aspire 5738zg wireless driver
- acer aspire 5738zg wireless drivers
- acer aspire 5738zg xp drivers
- acer aspire 5738zg-423g32mn
- acer aspire 5738zg.041
- aspire 5738g
- aspire 5738g battery
- aspire 5738pzg
- aspire 5738z
- aspire 5738z booting
- aspire 5738z compatible windows 7
- aspire 5738z dc jack
- aspire 5738z laptop
- aspire 5738z manual
- aspire 5738z parts
- aspire 5738z ram
- aspire 5738z review
- aspire 5738z service guide
- aspire 5738z spec
- aspire 5738z specs
- aspire 5738z webcam
- aspire 5738z-4333
- aspire 5738zg 15.6
- aspire 5738zg acer
- aspire 5738zg acer review
- aspire 5738zg adapter
- aspire 5738zg and review
- aspire 5738zg battery price
- aspire 5738zg bios
- aspire 5738zg bios change
- aspire 5738zg bios download
- aspire 5738zg bios password
- aspire 5738zg bios reset
- aspire 5738zg bios support
- aspire 5738zg bios update
- aspire 5738zg black screen
- aspire 5738zg bluetooth activate
- aspire 5738zg bluetooth driver
- aspire 5738zg boot menu
- aspire 5738zg camera software
- aspire 5738zg cpu upgrade
- aspire 5738zg disassembly
- aspire 5738zg downloads
- aspire 5738zg driver
- aspire 5738zg driver + windows vista
- aspire 5738zg driver 64 bits
- aspire 5738zg driver download
- aspire 5738zg driver windows 7
- aspire 5738zg driver xp
- aspire 5738zg drivers download
- aspire 5738zg drivers for xp
- aspire 5738zg drivers windows 10
- aspire 5738zg drivers windows 7
- aspire 5738zg drivers windows 7 32bit
- aspire 5738zg drivers windows 8
- aspire 5738zg factory reset
- aspire 5738zg hackintosh
- aspire 5738zg hard drive
- aspire 5738zg inverter
- aspire 5738zg keyboard
- aspire 5738zg keyboard replacement
- aspire 5738zg lan driver
- aspire 5738zg lcd
- aspire 5738zg lcd screen
- aspire 5738zg manual download
- aspire 5738zg microphone driver for xp
- aspire 5738zg motherboard
- aspire 5738zg overheating
- aspire 5738zg power adapter
- aspire 5738zg price 2009
- aspire 5738zg price in india
- aspire 5738zg price india
- aspire 5738zg problems
- aspire 5738zg ram
- aspire 5738zg ram upgrade
- aspire 5738zg recovery windows 7
- aspire 5738zg release
- aspire 5738zg safe mode
- aspire 5738zg screen
- aspire 5738zg screen replacement
- aspire 5738zg service manual
- aspire 5738zg service manual pdf
- aspire 5738zg sleep
- aspire 5738zg spec
- aspire 5738zg specification
- aspire 5738zg specifications
- aspire 5738zg support
- aspire 5738zg touchpad drivers
- aspire 5738zg user manual
- aspire 5738zg vga driver problem
- aspire 5738zg weight
- aspire 5738zg windows 7
- aspire 5738zg windows 7 drivers acer.com
- aspire 5738zg windows 7 laptop
- aspire 5738zg windows 8
- aspire 5738zg wireless driver
- aspire 5738zg wireless drivers
- aspire 5738zg xp drivers
- aspire 5738zg-423g32mn
- aspire 5738zg-424g25mn
- aspire 5738zg.041
- aspire5738zg webcam camera
- battery aspire 5738zg