
Aspire 5235 / 5535 Series User's Guide EN
Page 10
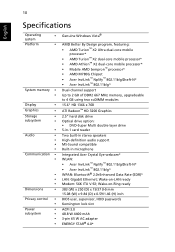
Wake-on -Ring ready 383 (W) x 250 (D) x 15/37 (H) mm 15.08 (W) x 9.84 (D) x 0.59/1.46 (H) inch BIOS user, supervisor, HDD passwords Kensington lock slot ACPI 3.0 48.8 W 4400 mAh 3-pin 65 W AC adapter ENERGY STAR® 4.0* Wake-on -LAN ready Modem: 56K ITU V.... processor* • AMD Athlon™ X2 dual-core mobile processor* • Mobile AMD Sempron™ processor* • AMD M780G Chipset • Acer InviLink™ Nplify™ 802.11b/g/Draft-N* • Acer InviLink™ 802.11b/g* Dual-channel support Up to 2 GB of DDR2 667 MHz memory, upgradeable to 4 GB using two soDIMM...
Wake-on -Ring ready 383 (W) x 250 (D) x 15/37 (H) mm 15.08 (W) x 9.84 (D) x 0.59/1.46 (H) inch BIOS user, supervisor, HDD passwords Kensington lock slot ACPI 3.0 48.8 W 4400 mAh 3-pin 65 W AC adapter ENERGY STAR® 4.0* Wake-on -LAN ready Modem: 56K ITU V.... processor* • AMD Athlon™ X2 dual-core mobile processor* • Mobile AMD Sempron™ processor* • AMD M780G Chipset • Acer InviLink™ Nplify™ 802.11b/g/Draft-N* • Acer InviLink™ 802.11b/g* Dual-channel support Up to 2 GB of DDR2 667 MHz memory, upgradeable to 4 GB using two soDIMM...

Aspire 5235 / 5535 Service Guide
Page 7
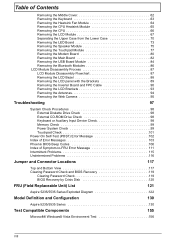
... for certain models 17 Acer ePower Management 18 Acer eDataSecurity Management (only for certain models 19 Acer eRecovery Management 20 Acer eSettings Management 22 Windows Mobility Center 23 Using the System Utilities 24 Acer GridVista (dual-display compatible 24 Hardware Specifications and Configurations 26 System Utilities 33 BIOS Setup Utility 33 Navigating the BIOS Utility 34 Information...
... for certain models 17 Acer ePower Management 18 Acer eDataSecurity Management (only for certain models 19 Acer eRecovery Management 20 Acer eSettings Management 22 Windows Mobility Center 23 Using the System Utilities 24 Acer GridVista (dual-display compatible 24 Hardware Specifications and Configurations 26 System Utilities 33 BIOS Setup Utility 33 Navigating the BIOS Utility 34 Information...
Aspire 5235 / 5535 Service Guide
Page 8
... System Check 99 Touchpad Check 101 Power-On Self-Test (POST) Error Message 102 Index of Error Messages 103 Phoenix BIOS Beep Codes 106 Index of Symptom-to-FRU Error Message 111 Intermittent Problems 115 Undetermined Problems 116 Jumper and Connector Locations... Bottom View 117 Clearing Password Check and BIOS Recovery 119 Clearing Password Check 119 BIOS Recovery by Crisis Disk 120 FRU (Field Replaceable Unit) List 121 Aspire 5235/5535 Series Exploded Diagram 122 Model Definition and Configuration 130 Aspire 5235/5535 Series 130 Test Compatible Components 155 Microsoft&#...
... System Check 99 Touchpad Check 101 Power-On Self-Test (POST) Error Message 102 Index of Error Messages 103 Phoenix BIOS Beep Codes 106 Index of Symptom-to-FRU Error Message 111 Intermittent Problems 115 Undetermined Problems 116 Jumper and Connector Locations... Bottom View 117 Clearing Password Check and BIOS Recovery 119 Clearing Password Check 119 BIOS Recovery by Crisis Disk 120 FRU (Field Replaceable Unit) List 121 Aspire 5235/5535 Series Exploded Diagram 122 Model Definition and Configuration 130 Aspire 5235/5535 Series 130 Test Compatible Components 155 Microsoft&#...

Aspire 5235 / 5535 Service Guide
Page 13
... LAN Giga LAN BCM5764 26 New card 28 TXFM 27 RJ45 27 PWR SW TPS223128 Mini Card Kedron a/b/g/n 28 LPC BUS KBC Winbond WPC773L 31 BIOS MXIC MX25L1605 32 LPC DEBUG CONN.32 Touch INT. Pad 31 KB 31 CardReader Realtek RTS5158E 25 MS/MS Pro/xD /MMC/SD 5 in 1 25...
... LAN Giga LAN BCM5764 26 New card 28 TXFM 27 RJ45 27 PWR SW TPS223128 Mini Card Kedron a/b/g/n 28 LPC BUS KBC Winbond WPC773L 31 BIOS MXIC MX25L1605 32 LPC DEBUG CONN.32 Touch INT. Pad 31 KB 31 CardReader Realtek RTS5158E 25 MS/MS Pro/xD /MMC/SD 5 in 1 25...
Aspire 5235 / 5535 Service Guide
Page 23
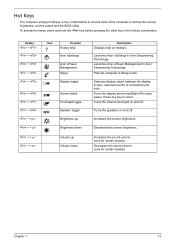
... the screen brightness. To activate hot keys, press and hold the key before pressing the other key in Acer Empowering Technology. Turns the internal touchpad on hotkeys. Hot Keys The computer employs hotkeys or key combinations to access... most of the computer's controls like screen brightness, volume output and the BIOS utility. Hotkey + + + + + + + + + < > + < > + < > + < > Icon Function Hotkey help Acer eSettings Acer ePower Management Sleep Display toggle Screen blank Touchpad toggle Speaker toggle Brightness up Brightness down Volume...
... the screen brightness. To activate hot keys, press and hold the key before pressing the other key in Acer Empowering Technology. Turns the internal touchpad on hotkeys. Hot Keys The computer employs hotkeys or key combinations to access... most of the computer's controls like screen brightness, volume output and the BIOS utility. Hotkey + + + + + + + + + < > + < > + < > + < > Icon Function Hotkey help Acer eSettings Acer ePower Management Sleep Display toggle Screen blank Touchpad toggle Speaker toggle Brightness up Brightness down Volume...
Aspire 5235 / 5535 Service Guide
Page 32
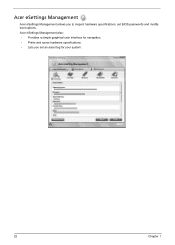
Acer eSettings Management Acer eSettings Management allows you set BIOS passwords and modify boot options. Acer eSettings Management also: • Provides a simple graphical user interface for navigation. • Prints and saves hardware specifications. • Lets you to inspect hardware specifications, set an asset tag for your system. 22 Chapter 1
Acer eSettings Management Acer eSettings Management allows you set BIOS passwords and modify boot options. Acer eSettings Management also: • Provides a simple graphical user interface for navigation. • Prints and saves hardware specifications. • Lets you to inspect hardware specifications, set an asset tag for your system. 22 Chapter 1
Aspire 5235 / 5535 Service Guide
Page 37
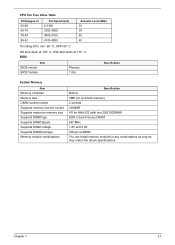
H/W shot down at 110° .C BIOS Item BIOS vendor BIOS Version Phoenix 1.04c Specification System Memory Item Memory controller Memory size DIMM socket number Supports memory size per socket Supports maximum memory size Supports DIMM ...
H/W shot down at 110° .C BIOS Item BIOS vendor BIOS Version Phoenix 1.04c Specification System Memory Item Memory controller Memory size DIMM socket number Supports memory size per socket Supports maximum memory size Supports DIMM ...
Aspire 5235 / 5535 Service Guide
Page 41
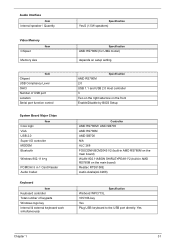
... model) depends on setup setting Specification AMD RS780M 2.0 USB 1.1 and USB 2.0 Host controller 3 Two on the right side/one on the front Enable/Disable by BIOS Setup Controller AMD RS780M+ AMD SB700 AMD RS780M AMD SB700 N/A ALC 268 FOXCONN BCM2045 V2 (built-in AMD RS780M on the main board) WLAN 802...
... model) depends on setup setting Specification AMD RS780M 2.0 USB 1.1 and USB 2.0 Host controller 3 Two on the right side/one on the front Enable/Disable by BIOS Setup Controller AMD RS780M+ AMD SB700 AMD RS780M AMD SB700 N/A ALC 268 FOXCONN BCM2045 V2 (built-in AMD RS780M on the main board) WLAN 802...
Aspire 5235 / 5535 Service Guide
Page 45
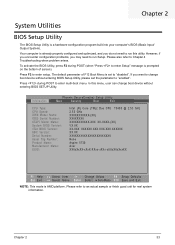
....XXX.XXXXXX XX.XX XXXXXXXXXXXXXXXXXXXXXXX None Aspire 5730 Acer XXXxXxXX-xXxX-XXxx-xXXx-xXXxXXxXxxXX F1 Help Esc Exit Select Item -/+ Change Values F9 Setup Defaults Select Menu Enter Select Sub-Menu F10 Save and Exit NOTE: This mode is a hardware configuration program built into your computer's BIOS (Basic Input/ Output System). Chapter 2 33...
....XXX.XXXXXX XX.XX XXXXXXXXXXXXXXXXXXXXXXX None Aspire 5730 Acer XXXxXxXX-xXxX-XXxx-xXXx-xXXxXXxXxxXX F1 Help Esc Exit Select Item -/+ Change Values F9 Setup Defaults Select Menu Enter Select Sub-Menu F10 Save and Exit NOTE: This mode is a hardware configuration program built into your computer's BIOS (Basic Input/ Output System). Chapter 2 33...
Aspire 5235 / 5535 Service Guide
Page 46
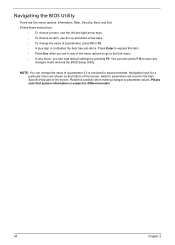
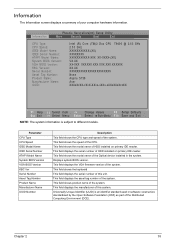
... system information is enclosed in the Item Specific Help part of the screen. Navigation keys for parameters are in any changes made and exit the BIOS Setup Utility. NOTE: You can change the value of a parameter, press F5 or F6. • A plus sign (+) indicates the item has sub-items. ... can load default settings by pressing F9. Read this item. • Press Esc while you can also press F10 to parameter values. Navigating the BIOS Utility There are shown on the bottom of the screen. Help for a particular menu are five menu options: Information, Main, Security, Boot, and Exit...
... system information is enclosed in the Item Specific Help part of the screen. Navigation keys for parameters are in any changes made and exit the BIOS Setup Utility. NOTE: You can change the value of a parameter, press F5 or F6. • A plus sign (+) indicates the item has sub-items. ... can load default settings by pressing F9. Read this item. • Press Esc while you can also press F10 to parameter values. Navigating the BIOS Utility There are shown on the bottom of the screen. Help for a particular menu are five menu options: Information, Main, Security, Boot, and Exit...
Aspire 5235 / 5535 Service Guide
Page 47
... SecureCore(tm) Setup Utility Main Security Boot Exit CPU Type: CPU Speed: IDE0 Model Name: IDE0 Serial Number: ATAPI Model Name: System BIOS Version: VGA BIOS Version: KBC Version: Serial Number: Asset Tag Number: Product Name: Manufacturer Name: UUID: Intel (R) Core (TM)2 Duo CPU T9400 @... 2.53 GHz 2.53 GHz XXXXXXXXXXX-(XX) XXXXXXXX XXXXXXXXXXX-XXX XX-XXXX-(XX) VX.XX XX-XXX XXXXXX.XXX.XXX.XXX.XXXXXX XX.XX XXXXXXXXXXXXXXXXXXXXXXX None Aspire 5730 Acer...
... SecureCore(tm) Setup Utility Main Security Boot Exit CPU Type: CPU Speed: IDE0 Model Name: IDE0 Serial Number: ATAPI Model Name: System BIOS Version: VGA BIOS Version: KBC Version: Serial Number: Asset Tag Number: Product Name: Manufacturer Name: UUID: Intel (R) Core (TM)2 Duo CPU T9400 @... 2.53 GHz 2.53 GHz XXXXXXXXXXX-(XX) XXXXXXXX XXXXXXXXXXX-XXX XX-XXXX-(XX) VX.XX XX-XXX XXXXXX.XXX.XXX.XXX.XXXXXX XX.XX XXXXXXXXXXXXXXXXXXXXXXX None Aspire 5730 Acer...

Aspire 5235 / 5535 Service Guide
Page 50
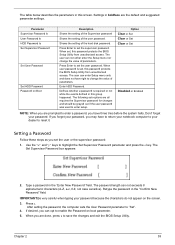
... Item -/+ Change Values F9 Setup Defaults Select Menu Enter Select Sub-Menu F10 Save and Exit NOTE: Please refer to "Remove HDD/BIOS Password" section if you need to know how to boot up when Password on boot is : Set Supervisor Password Set User Password Set...] [Enter] [Enter] [Disabled] Item Specific Help Supervisor Password controls access of the whole setup utility. It can be used to remove HDD/BIOS Password. 38 Chapter 2 Security The Security screen contains parameters that help safeguard and protect your computer from unauthorized use. Information Phoenix SecureCore(tm) Setup...
... Item -/+ Change Values F9 Setup Defaults Select Menu Enter Select Sub-Menu F10 Save and Exit NOTE: Please refer to "Remove HDD/BIOS Password" section if you need to know how to boot up when Password on boot is : Set Supervisor Password Set User Password Set...] [Enter] [Enter] [Disabled] Item Specific Help Supervisor Password controls access of the whole setup utility. It can be used to remove HDD/BIOS Password. 38 Chapter 2 Security The Security screen contains parameters that help safeguard and protect your computer from unauthorized use. Information Phoenix SecureCore(tm) Setup...
Aspire 5235 / 5535 Service Guide
Page 51
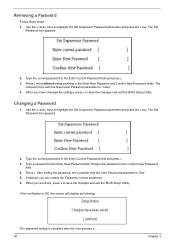
...not appear on Boot Description Shows the setting of the Supervisor password Shows the setting of parameters. Type a password in this password protects the BIOS Setup Utility from unauthorized access. Retype the password in the "Confirm New Password" field. IMPORTANT:Be very careful when typing your password. ... enter Setup menu only and does not have three tries before the system halts. The user can opt to save the changes and exit the BIOS Setup Utility. Use the "w" and "y" keys to change the value of the hard disk password. Press Enter to set the user password....
...not appear on Boot Description Shows the setting of the Supervisor password Shows the setting of parameters. Type a password in this password protects the BIOS Setup Utility from unauthorized access. Retype the password in the "Confirm New Password" field. IMPORTANT:Be very careful when typing your password. ... enter Setup menu only and does not have three tries before the system halts. The user can opt to save the changes and exit the BIOS Setup Utility. Use the "w" and "y" keys to change the value of the hard disk password. Press Enter to set the user password....
Aspire 5235 / 5535 Service Guide
Page 52
...in the Enter Current Password field and press e. 3. If desired, you have changed the settings, press u to save the changes and exit the BIOS Setup Utility. The password setting is OK, the screen will display as following. The Set Password box appears: 2. Press e. When you are done..., press u to save the changes and exit the BIOS Setup Utility. Removing a Password Follow these steps: 1. When you can enable the Password on boot parameter. 6. If the verification is complete after ...
...in the Enter Current Password field and press e. 3. If desired, you have changed the settings, press u to save the changes and exit the BIOS Setup Utility. The password setting is OK, the screen will display as following. The Set Password box appears: 2. Press e. When you are done..., press u to save the changes and exit the BIOS Setup Utility. Removing a Password Follow these steps: 1. When you can enable the Password on boot parameter. 6. If the verification is complete after ...
Aspire 5235 / 5535 Service Guide
Page 55
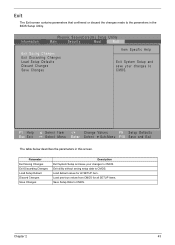
... Select Item -/+ Change Values F9 Setup Defaults Select Menu Enter Select Sub-Menu F10 Save and Exit The table below describes the parameters in the BIOS Setup Utility. Exit The Exit screen contains parameters that confirmed or discard the changes made to CMOS. Chapter 2 43 Information Phoenix SecureCore(tm) Setup Utility...
... Select Item -/+ Change Values F9 Setup Defaults Select Menu Enter Select Sub-Menu F10 Save and Exit The table below describes the parameters in the BIOS Setup Utility. Exit The Exit screen contains parameters that confirmed or discard the changes made to CMOS. Chapter 2 43 Information Phoenix SecureCore(tm) Setup Utility...
Aspire 5235 / 5535 Service Guide
Page 56
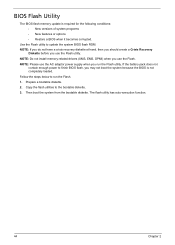
... the AC adaptor power supply when you use the Flash utility. Use the Flash utility to the bootable diskette. 3. Fellow the steps below to finish BIOS flash, you use the Flash. NOTE: Do not install memory-related drivers (XMS, EMS, DPMI) when you run the Flash. 1. Prepare a ...bootable diskette. 2. The flash utility has auto-execution function. 44 Chapter 2 Copy the flash utilities to update the system BIOS flash ROM. NOTE: If you do not have a crisis recovery diskette at hand, then you should create a Crisis Recovery Diskette before you may not ...
... the AC adaptor power supply when you use the Flash utility. Use the Flash utility to the bootable diskette. 3. Fellow the steps below to finish BIOS flash, you use the Flash. NOTE: Do not install memory-related drivers (XMS, EMS, DPMI) when you run the Flash. 1. Prepare a ...bootable diskette. 2. The flash utility has auto-execution function. 44 Chapter 2 Copy the flash utilities to update the system BIOS flash ROM. NOTE: If you do not have a crisis recovery diskette at hand, then you should create a Crisis Recovery Diskette before you may not ...
Aspire 5235 / 5535 Service Guide
Page 57
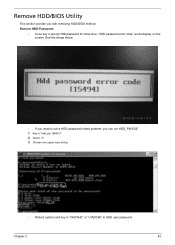
Key in "0KJFN42" or "UVEIQ96" to solve HDD password locked problem, you can run HDD_PW.EXE 1. See the image below. • If you key in wrong HDD password for three time, "HDD password error code" would display on the screen. Select "2" 3. Choose one upper-case string • Reboot system and key in "hdd_pw 15494 0" 2. Chapter 2 45 Remove HDD/BIOS Utility This section provide you with removing HDD/BIOS method: Remove HDD Password: • If you need to HDD user password.
Key in "0KJFN42" or "UVEIQ96" to solve HDD password locked problem, you can run HDD_PW.EXE 1. See the image below. • If you key in wrong HDD password for three time, "HDD password error code" would display on the screen. Select "2" 3. Choose one upper-case string • Reboot system and key in "hdd_pw 15494 0" 2. Chapter 2 45 Remove HDD/BIOS Utility This section provide you with removing HDD/BIOS method: Remove HDD Password: • If you need to HDD user password.

Aspire 5235 / 5535 Service Guide
Page 114
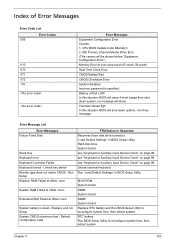
...Some of them display information about a hardware device, e.g., the amount of the error messages occur during POST. The following lists the error messages that the BIOS displays on page 116. NOTE: Most of memory installed. Others may indicate a problem with a device, such as the way it has been configured.... in the sequence shown in FRU/Action column, if the FRU replacement does not solve the problem, put the original part back in the BIOS Setup Utility menus, reset the computer, enter Setup and install Setup defaults or correct the error. 102 Chapter 4 This index can also help...
...Some of them display information about a hardware device, e.g., the amount of the error messages occur during POST. The following lists the error messages that the BIOS displays on page 116. NOTE: Most of memory installed. Others may indicate a problem with a device, such as the way it has been configured.... in the sequence shown in FRU/Action column, if the FRU replacement does not solve the problem, put the original part back in the BIOS Setup Utility menus, reset the computer, enter Setup and install Setup defaults or correct the error. 102 Chapter 4 This index can also help...
Aspire 5235 / 5535 Service Guide
Page 115
...xxxxh (R:xxxxh, W:xxxxh) Real Time Clock Error CMOS Battery Bad CMOS Checksum Error System disabled. Battery critical LOW In this situation BIOS will shut down system, no message will be shown before "Equipment Configuration Error") Memory Error at offset: nnnn System battery is ... issue 4 short beeps then shut down system, not show . Default configuration used FRU/Action in BIOS Setup Utility. "Load Default Settings" in BIOS Setup Utility. RTC battery Run BIOS Setup Utility to reconfigure system time, then reboot system. Incorrect password is dead - see "Keyboard or ...
...xxxxh (R:xxxxh, W:xxxxh) Real Time Clock Error CMOS Battery Bad CMOS Checksum Error System disabled. Battery critical LOW In this situation BIOS will shut down system, no message will be shown before "Equipment Configuration Error") Memory Error at offset: nnnn System battery is ... issue 4 short beeps then shut down system, not show . Default configuration used FRU/Action in BIOS Setup Utility. "Load Default Settings" in BIOS Setup Utility. RTC battery Run BIOS Setup Utility to reconfigure system time, then reboot system. Incorrect password is dead - see "Keyboard or ...
Aspire 5235 / 5535 Service Guide
Page 116
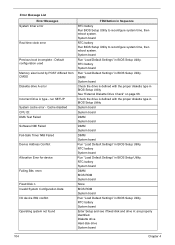
...time, then reboot system. RTC battery System board Run "Load Default Settings" in BIOS Setup Utility. System board Run "Load Default Settings" in BIOS Setup Utility. RTC battery System board Run "Load Default Settings" in BIOS Setup Utility. run SETUP System cache error - Check the drive is defined with ... Error Messages System timer error Real time clock error Previous boot incomplete - Default configuration used Memory size found FRU/Action in BIOS Setup Utility See "External Diskette Drive Check" on page 98. Diskette drive Hard disk drive System board 104 Chapter 4
...time, then reboot system. RTC battery System board Run "Load Default Settings" in BIOS Setup Utility. System board Run "Load Default Settings" in BIOS Setup Utility. RTC battery System board Run "Load Default Settings" in BIOS Setup Utility. run SETUP System cache error - Check the drive is defined with ... Error Messages System timer error Real time clock error Previous boot incomplete - Default configuration used Memory size found FRU/Action in BIOS Setup Utility See "External Diskette Drive Check" on page 98. Diskette drive Hard disk drive System board 104 Chapter 4


