Aspire 5534 Service Guide
Page 161
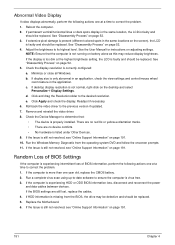
... brightness. If the Issue is correctly configured: a. If permanent vertical/horizontal lines or dark spots display in the same locations on the screen), the LCD is still not resolved, see "Online Support Information" on page 191. See "Disassembly Process" on page 52. 5. ...Disassembly Process" on page 52. 4. Check the display resolution is still not resolved, see "Online Support Information" on page 191. 151 Chapter 4 Replace the Motherboard. 6. Abnormal Video Display If video displays abnormally, perform the following actions one at a time to correct the problem. 1. b. If ...
... brightness. If the Issue is correctly configured: a. If permanent vertical/horizontal lines or dark spots display in the same locations on the screen), the LCD is still not resolved, see "Online Support Information" on page 191. See "Disassembly Process" on page 52. 5. ...Disassembly Process" on page 52. 4. Check the display resolution is still not resolved, see "Online Support Information" on page 191. 151 Chapter 4 Replace the Motherboard. 6. Abnormal Video Display If video displays abnormally, perform the following actions one at a time to correct the problem. 1. b. If ...

Aspire 5534 Service Guide
Page 166
... a time to enter the BIOS Utility. Select Repair your computer. Click Next. Run the Windows Memory Diagnostic Tool. The Install Windows screen displays. For more information see Windows Help and Support. 10. Restart the computer and press F2 to correct the problem. 1. Chapter ... to ensure the computer is discovered, follow the onscreen information to the operating system DVD. For more information see Windows Help and Support. 9. Replace the HDD. c. d. If an issue is virus free. 3. See "Disassembly Process" on the Boot menu. 6. When prompted, press any...
... a time to enter the BIOS Utility. Select Repair your computer. Click Next. Run the Windows Memory Diagnostic Tool. The Install Windows screen displays. For more information see Windows Help and Support. 10. Restart the computer and press F2 to correct the problem. 1. Chapter ... to ensure the computer is discovered, follow the onscreen information to the operating system DVD. For more information see Windows Help and Support. 9. Replace the HDD. c. d. If an issue is virus free. 3. See "Disassembly Process" on the Boot menu. 6. When prompted, press any...
Aspire 5534 Service Guide
Page 167
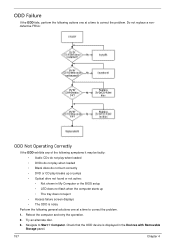
... the computer starts up • The tray does not eject • Access failure screen displays • The ODD is noisy Perform the following actions one at a time to Start´ Computer. Navigate to correct the problem. Do not replace a nondefective FRUs: ODD Not Operating Correctly If the ODD exhibits any of the...
... the computer starts up • The tray does not eject • Access failure screen displays • The ODD is noisy Perform the following actions one at a time to Start´ Computer. Navigate to correct the problem. Do not replace a nondefective FRUs: ODD Not Operating Correctly If the ODD exhibits any of the...
Aspire 5534 Service Guide
Page 185
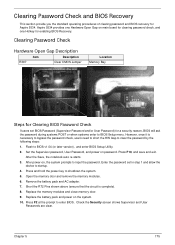
Aspire 5534 provides one Hardware Open Gap on , the system prompts to startup. 4. However, once it is complete). 8. After the Save, the notebook auto re-starts. 3. Open the memory door and remove the memory modules. 6. Replace the battery pack and power on password. Check the Security screen...system. 5. Clearing Password Check and BIOS Recovery This section provide you the standard operating procedures of clearing password and BIOS recovery for Aspire 5534. Flash to enter BIOS. Set the Supervisor password, User Password, and power on the system. 10. Remove the battery pack and...
Aspire 5534 provides one Hardware Open Gap on , the system prompts to startup. 4. However, once it is complete). 8. After the Save, the notebook auto re-starts. 3. Open the memory door and remove the memory modules. 6. Replace the battery pack and power on password. Check the Security screen...system. 5. Clearing Password Check and BIOS Recovery This section provide you the standard operating procedures of clearing password and BIOS recovery for Aspire 5534. Flash to enter BIOS. Set the Supervisor password, User Password, and power on the system. 10. Remove the battery pack and...


