Acer Aspire 5517 Series Service Guide
Page 7
...Hot Keys 14 Special Key 15 Using the System Utilities 16 Acer GridVista (dual-display compatible 16 Hardware Specifications and Configurations 17 System Utilities 25 BIOS Setup Utility 25 Navigating the BIOS Utility 25 Aspire 5517 BIOS 26 Information 26 Main 27 Security 28 Boot 31 ...Exit 32 BIOS Flash Utilities 33 DOS Flash Utility 34 WinFlash Utility 35 Remove HDD/BIOS Password Utilities 36 Machine Disassembly and Replacement 41 Disassembly Requirements 41 Pre-...
...Hot Keys 14 Special Key 15 Using the System Utilities 16 Acer GridVista (dual-display compatible 16 Hardware Specifications and Configurations 17 System Utilities 25 BIOS Setup Utility 25 Navigating the BIOS Utility 25 Aspire 5517 BIOS 26 Information 26 Main 27 Security 28 Boot 31 ...Exit 32 BIOS Flash Utilities 33 DOS Flash Utility 34 WinFlash Utility 35 Remove HDD/BIOS Password Utilities 36 Machine Disassembly and Replacement 41 Disassembly Requirements 41 Pre-...
Acer Aspire 5517 Series Service Guide
Page 8
... Power Board 104 Replacing the Upper Cover 104 Replacing the LCD Module 108 Replacing the Keyboard 113 Replacing the Switch Cover 114 Replacing the Hard Disk Drive Module 114 Replacing the WLAN Module 116 Replacing the DIMM Modules 116 Replacing the ODD Module 117 Replacing the Lower Covers 117 Replacing the SD Dummy Card 118 Replacing the Battery 119 Troubleshooting 121 Common...
... Power Board 104 Replacing the Upper Cover 104 Replacing the LCD Module 108 Replacing the Keyboard 113 Replacing the Switch Cover 114 Replacing the Hard Disk Drive Module 114 Replacing the WLAN Module 116 Replacing the DIMM Modules 116 Replacing the ODD Module 117 Replacing the Lower Covers 117 Replacing the SD Dummy Card 118 Replacing the Battery 119 Troubleshooting 121 Common...
Acer Aspire 5517 Series Service Guide
Page 52
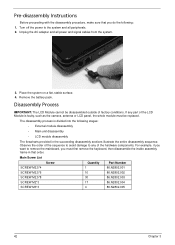
...; Main unit disassembly • LCD module disassembly The flowcharts provided in that order. Unplug the AC adapter and all peripherals. 2. Remove the battery pack. Observe the order of the sequence to avoid damage to any part of the LCD Module is divided into the following : 1. Disassembly ...Process IMPORTANT: The LCD Module cannot be replaced. For example, if you must be disassembled outside of the hardware components. Turn off the power to remove the mainboard, you want to...
...; Main unit disassembly • LCD module disassembly The flowcharts provided in that order. Unplug the AC adapter and all peripherals. 2. Remove the battery pack. Observe the order of the sequence to avoid damage to any part of the LCD Module is divided into the following : 1. Disassembly ...Process IMPORTANT: The LCD Module cannot be replaced. For example, if you must be disassembled outside of the hardware components. Turn off the power to remove the mainboard, you want to...

Acer Aspire 5517 Series Service Guide
Page 83
To replace the battery, solder the new battery to the Mainboard. Removing the RTC Battery IMPORTANT:Follow local regulations for disposal of all batteries. The RTC Battery is soldered to the connections shown. Chapter 3 73
To replace the battery, solder the new battery to the Mainboard. Removing the RTC Battery IMPORTANT:Follow local regulations for disposal of all batteries. The RTC Battery is soldered to the connections shown. Chapter 3 73

Acer Aspire 5517 Series Service Guide
Page 129
Replacing the Battery 1. Slide and hold the battery release latch to secure the battery in the direction shown to the release position (1), insert the battery pack and press down (2). 2. Slide the battery lock in place. 2 1 Chapter 3 119
Replacing the Battery 1. Slide and hold the battery release latch to secure the battery in the direction shown to the release position (1), insert the battery pack and press down (2). 2. Slide the battery lock in place. 2 1 Chapter 3 119
Acer Aspire 5517 Series Service Guide
Page 133
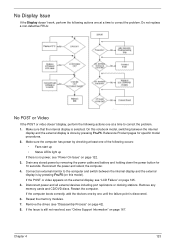
...or video appears on the external display, see "Disassembly Process" on page 167. If the Issue is done by removing the power cable and battery and holding down the power button for specific model procedures. 2. On this model). Reconnect the power and reboot the computer. 4. Restart the...Support Information" on page 42). 8. Reference Product pages for 10 seconds. Remove any stored power by pressing Fn+F5. Chapter 4 123 Do not replace a non-defective FRUs: No POST or Video If the POST or video doesn't display, perform the following actions one at a time to correct ...
...or video appears on the external display, see "Disassembly Process" on page 167. If the Issue is done by removing the power cable and battery and holding down the power button for specific model procedures. 2. On this model). Reconnect the power and reboot the computer. 4. Restart the...Support Information" on page 42). 8. Reference Product pages for 10 seconds. Remove any stored power by pressing Fn+F5. Chapter 4 123 Do not replace a non-defective FRUs: No POST or Video If the POST or video doesn't display, perform the following actions one at a time to correct ...

Acer Aspire 5517 Series Service Guide
Page 134
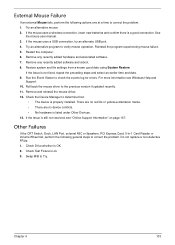
.... See the User Manual for instructions on page 42. 5. Replace the Motherboard. 6. If the Issue is still not resolved, see "Online Support Information" on battery alone as this may be defective and should be replaced. 5. See "Disassembly Process" on page 167. Adjust the ...information loss, disconnect and reconnect the power and data cables between devices. Check the display resolution is more than one year old, replace the CMOS battery. 2. Readjust if necessary. 6. Remove and reinstall the video driver. 8. c. Abnormal Video Display If video displays abnormally, perform...
.... See the User Manual for instructions on page 42. 5. Replace the Motherboard. 6. If the Issue is still not resolved, see "Online Support Information" on battery alone as this may be defective and should be replaced. 5. See "Disassembly Process" on page 167. Adjust the ...information loss, disconnect and reconnect the power and data cables between devices. Check the display resolution is more than one year old, replace the CMOS battery. 2. Readjust if necessary. 6. Remove and reinstall the video driver. 8. c. Abnormal Video Display If video displays abnormally, perform...
Acer Aspire 5517 Series Service Guide
Page 143
...if updated recently. 11. For more information see "Online Support Information" on page 167. If the mouse uses a wireless connection, insert new batteries and confirm there is not fixed, repeat the preceding steps and select an earlier time and date. 9. See the mouse user manual. 3. If...to Try. Check the Device Manager to determine that: • The device is still not resolved, see Windows Help and Support. 10. Do not replace a non-defective FRUs: 1. Remove any recently added software and reboot. 8. If the Issue is properly installed. Other Failures If the CRT Switch,...
...if updated recently. 11. For more information see "Online Support Information" on page 167. If the mouse uses a wireless connection, insert new batteries and confirm there is not fixed, repeat the preceding steps and select an earlier time and date. 9. See the mouse user manual. 3. If...to Try. Check the Device Manager to determine that: • The device is still not resolved, see Windows Help and Support. 10. Do not replace a non-defective FRUs: 1. Remove any recently added software and reboot. 8. If the Issue is properly installed. Other Failures If the CRT Switch,...
Acer Aspire 5517 Series Service Guide
Page 144
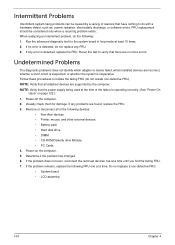
... 10 times. 2. If any error is operating correctly. (See "Power On Issue" on the computer. 5. If any FRU. 3. Do not replace a non-defective FRU: • System board • LCD assembly 134 Chapter 4 Run the advanced diagnostic test for damage. Visually check them for... following : 1. Rerun the test to isolate the failing FRU (do not replace any problems are supported by a variety of the following devices: • Non-Acer devices • Printer, mouse, and other external devices • Battery pack • Hard disk drive • DIMM • CD-ROM/Diskette drive ...
... 10 times. 2. If any error is operating correctly. (See "Power On Issue" on the computer. 5. If any FRU. 3. Do not replace a non-defective FRU: • System board • LCD assembly 134 Chapter 4 Run the advanced diagnostic test for damage. Visually check them for... following : 1. Rerun the test to isolate the failing FRU (do not replace any problems are supported by a variety of the following devices: • Non-Acer devices • Printer, mouse, and other external devices • Battery pack • Hard disk drive • DIMM • CD-ROM/Diskette drive ...
Acer Aspire 5517 Series Service Guide
Page 179
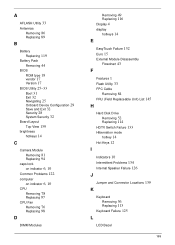
A AFLASH Utility 33 Antennas Removing 86 Replacing 89 B Battery Replacing 119 Battery Pack Removing 44 BIOS ROM type 18 vendor 17 Version 17 BIOS Utility 25-33 Boot 31 Exit 32 Navigating 25 Onboard Device Configuration 29 ...Save and Exit 32 Security 28 System Security 32 Board Layout Top View 139 brightness hotkeys 14 C Camera Module Removing 81 Replacing 94 caps lock...
A AFLASH Utility 33 Antennas Removing 86 Replacing 89 B Battery Replacing 119 Battery Pack Removing 44 BIOS ROM type 18 vendor 17 Version 17 BIOS Utility 25-33 Boot 31 Exit 32 Navigating 25 Onboard Device Configuration 29 ...Save and Exit 32 Security 28 System Security 32 Board Layout Top View 139 brightness hotkeys 14 C Camera Module Removing 81 Replacing 94 caps lock...
Acer Aspire 5517 Series Service Guide
Page 180
... P Panel 5 Bottom 8 PC Card 10 Power Board Removing 65 Replacing 104 Power On Failure 122 R Right Speaker Module Removing 68 Replacing 102 RTC Battery Removing 73 S SD Dummy Card Removing 45 Replacing 118 Speakers Removing 66, 68 speakers hotkey 14 Switch Cover Removing 55 Replacing 114 System Block Diagram 4 T Test Compatible Components 163 Thermal Module...
... P Panel 5 Bottom 8 PC Card 10 Power Board Removing 65 Replacing 104 Power On Failure 122 R Right Speaker Module Removing 68 Replacing 102 RTC Battery Removing 73 S SD Dummy Card Removing 45 Replacing 118 Speakers Removing 66, 68 speakers hotkey 14 Switch Cover Removing 55 Replacing 114 System Block Diagram 4 T Test Compatible Components 163 Thermal Module...


