Aspire 5510 Service Guide
Page 31
... - 63 Frequency variation range (Hz) 47 - 63 Nominal voltages (Vrms) 90 - 264 Inrush current The maximum inrush current will be shorted without damage, and auto recovery Electrostatic discharge (ESD) 15kV (at air discharge) 8kV (at 240Vac/60Hz Chapter 1 25
... - 63 Frequency variation range (Hz) 47 - 63 Nominal voltages (Vrms) 90 - 264 Inrush current The maximum inrush current will be shorted without damage, and auto recovery Electrostatic discharge (ESD) 15kV (at air discharge) 8kV (at 240Vac/60Hz Chapter 1 25
Aspire 5510 Service Guide
Page 38
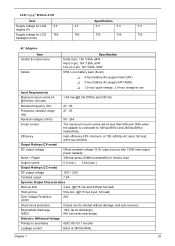
... Save and Exit Parameter System Time / System Date System Memory Extended Memory Video Memory Quiet Boot Power on Display: Network boot F12 Boot Menu: D2D Recovery: [11:59:38] [07/27/2005] 640 KB 254 KB 128 MB [Enabled] [Auto ] [Enabled] [Disabled] [Enabled] Boot Exit Item Specific Help , , or selects field...
... Save and Exit Parameter System Time / System Date System Memory Extended Memory Video Memory Quiet Boot Power on Display: Network boot F12 Boot Menu: D2D Recovery: [11:59:38] [07/27/2005] 640 KB 254 KB 128 MB [Enabled] [Auto ] [Enabled] [Disabled] [Enabled] Boot Exit Item Specific Help , , or selects field...

Aspire 5510 Service Guide
Page 39
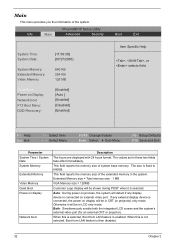
Parameter F12 Boot Menu D2D Recovery Processor Power Management Description When this is selected, users can modify device boot priority by pressing F12 key during POST. When this is not selected, device boot priority will not be adjustable during POST. Allow user to enable/disable the Disk-to-Disk recovery Selects the Processor Power Management desired: Disabled= C states and GV1/GV3 are disabled GV1/GV3 only= C states are disabled C States Only= GV1/GV3 are disabled Enabled= C States and GV1/GV3 are enabled Chapter 2 33
Parameter F12 Boot Menu D2D Recovery Processor Power Management Description When this is selected, users can modify device boot priority by pressing F12 key during POST. When this is not selected, device boot priority will not be adjustable during POST. Allow user to enable/disable the Disk-to-Disk recovery Selects the Processor Power Management desired: Disabled= C states and GV1/GV3 are disabled GV1/GV3 only= C states are disabled C States Only= GV1/GV3 are disabled Enabled= C States and GV1/GV3 are enabled Chapter 2 33
Aspire 5510 Service Guide
Page 71
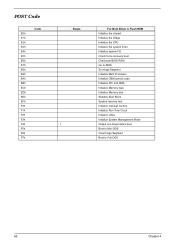
... F7h Beeps 1 For Boot Block in Flash ROM Initialize the chipset Initialize the bridge Initialize the CPU Initialize the system timer Initialize system I/O Check force recovery boot Checksum BIOS ROM Go to BIOS Set Huge Segment Initialize Multi Processor Initialize OEM special code Initialize PIC and DMA Initialize Memory type Initialize...
... F7h Beeps 1 For Boot Block in Flash ROM Initialize the chipset Initialize the bridge Initialize the CPU Initialize the system timer Initialize system I/O Check force recovery boot Checksum BIOS ROM Go to BIOS Set Huge Segment Initialize Multi Processor Initialize OEM special code Initialize PIC and DMA Initialize Memory type Initialize...
Aspire 5510 Service Guide
Page 77
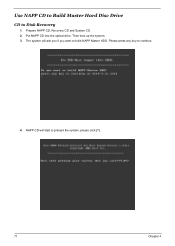
Prepare NAPP CD, Recovery CD and System CD. 2. Then boot up the system. 3. NAPP CD will ask you if you want to preload the system, please click [Y]. 71 Chapter 4 Put NAPP CD into the optical drive. The system will start to build NAPP Master HDD. Please press any key to Disk Recovery 1. Use NAPP CD to Build Master Hard Disc Drive CD to continue. 4.
Prepare NAPP CD, Recovery CD and System CD. 2. Then boot up the system. 3. NAPP CD will ask you if you want to preload the system, please click [Y]. 71 Chapter 4 Put NAPP CD into the optical drive. The system will start to build NAPP Master HDD. Please press any key to Disk Recovery 1. Use NAPP CD to Build Master Hard Disc Drive CD to continue. 4.
Aspire 5510 Service Guide
Page 78
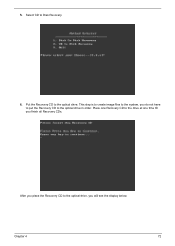
Place one time till you do not have to put the Recovery CD to the optical drive. After you place the Recovery CD to the drive at one Recovery CD to the optical drive, you will see the display below. Put the Recovery CD to the optical drive in order. Chapter 4 72 5. This step is to create image files to the system, you finish all Recovery CDs. Select CD to Disk Revocery. 6.
Place one time till you do not have to put the Recovery CD to the optical drive. After you place the Recovery CD to the drive at one Recovery CD to the optical drive, you will see the display below. Put the Recovery CD to the optical drive in order. Chapter 4 72 5. This step is to create image files to the system, you finish all Recovery CDs. Select CD to Disk Revocery. 6.
Aspire 5510 Service Guide
Page 80
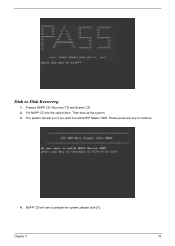
The system will start to build NAPP Master HDD. Then boot up the system. 3. Please press any key to Disk Recovery 1. Chapter 4 74 Prepare NAPP CD, Recovery CD and System CD. 2. NAPP CD will ask you if you want to preload the system, please click [Y]. Put NAPP CD into the optical drive. Disk to continue. 4.
The system will start to build NAPP Master HDD. Then boot up the system. 3. Please press any key to Disk Recovery 1. Chapter 4 74 Prepare NAPP CD, Recovery CD and System CD. 2. NAPP CD will ask you if you want to preload the system, please click [Y]. Put NAPP CD into the optical drive. Disk to continue. 4.
Aspire 5510 Service Guide
Page 81
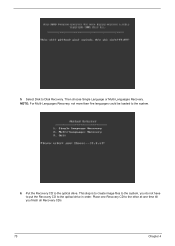
Select Disk to the optical drive. Put the Recovery CD to Disk Recovery. NOTE: For Multi-Languages Recovery, not more than five languages could be loaded to the drive at one Recovery CD to the system. 6. Place one time till you do not have to put the Recovery CD to the optical drive in order. 5. Then choose Single Language or Multi-Languages Recovery. This step is to create image files to the system, you finish all Recovery CDs. 75 Chapter 4
Select Disk to the optical drive. Put the Recovery CD to Disk Recovery. NOTE: For Multi-Languages Recovery, not more than five languages could be loaded to the drive at one Recovery CD to the system. 6. Place one time till you do not have to put the Recovery CD to the optical drive in order. 5. Then choose Single Language or Multi-Languages Recovery. This step is to create image files to the system, you finish all Recovery CDs. 75 Chapter 4
Aspire 5510 Service Guide
Page 82
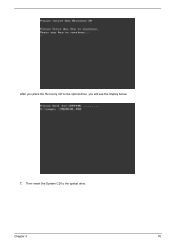
After you will see the display below. 7. Chapter 4 76 Then insert the System CD to the optical drive, you place the Recovery CD to the optical drive.
After you will see the display below. 7. Chapter 4 76 Then insert the System CD to the optical drive, you place the Recovery CD to the optical drive.
Aspire 5510 User's Guide
Page 4
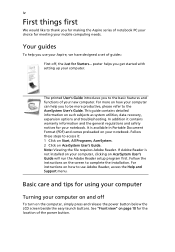
...it contains warranty information and the general regulations and safety notices for Starters... The printed User's Guide introduces you for making the Aspire series of the power button. Follow these steps to complete the installation. Follow the instructions on the computer, simply press and ...Adobe Reader is available in Portable Document Format (PDF) and comes preloaded on your computer on such subjects as system utilities, data recovery, expansion options and troubleshooting. poster helps you get started with setting up your notebook. Basic care and tips for the location of ...
...it contains warranty information and the general regulations and safety notices for Starters... The printed User's Guide introduces you for making the Aspire series of the power button. Follow these steps to complete the installation. Follow the instructions on the computer, simply press and ...Adobe Reader is available in Portable Document Format (PDF) and comes preloaded on your computer on such subjects as system utilities, data recovery, expansion options and troubleshooting. poster helps you get started with setting up your notebook. Basic care and tips for the location of ...
Aspire 5510 User's Guide
Page 9
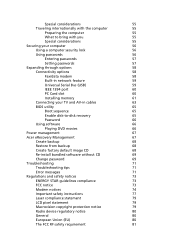
... 61 Connecting your TV and AV-in cables 63 BIOS utility 65 Boot sequence 65 Enable disk-to-disk recovery 65 Password 66 Using software 66 Playing DVD movies 66 Power management 67 Acer eRecovery Management 67 Create backup 68 Restore from backup 68 Create factory default image CD 68 Re-install...
... 61 Connecting your TV and AV-in cables 63 BIOS utility 65 Boot sequence 65 Enable disk-to-disk recovery 65 Password 66 Using software 66 Playing DVD movies 66 Power management 67 Acer eRecovery Management 67 Create backup 68 Restore from backup 68 Create factory default image CD 68 Re-install...
Aspire 5510 User's Guide
Page 15
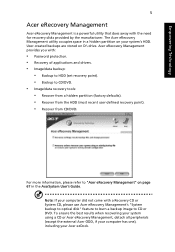
... in a hidden partition on D:\ drive. User-created backups are stored on your system's HDD. Empowering Technology 5 Acer eRecovery Management Acer eRecovery Management is a powerful utility that does away with a Recovery CD or System CD, please use Acer eRecovery Management's "System backup to optical disk" feature to burn a backup image to CD or DVD. Note...
... in a hidden partition on D:\ drive. User-created backups are stored on your system's HDD. Empowering Technology 5 Acer eRecovery Management Acer eRecovery Management is a powerful utility that does away with a Recovery CD or System CD, please use Acer eRecovery Management's "System backup to optical disk" feature to burn a backup image to CD or DVD. Note...
Aspire 5510 User's Guide
Page 28
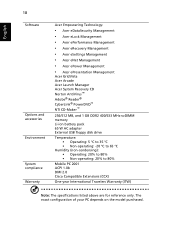
English 18 Software Options and accessories Environment System compliance Warranty Acer Empowering Technology: • Acer eDataSecurity Management • Acer eLock Management • Acer ePerformance Management • Acer eRecovery Management • Acer eSettings Management • Acer eNet Management • Acer ePower Management • Acer ePresentation Management Acer GridVista Acer Arcade Acer Launch Manager Acer System Recovery CD Norton AntiVirus™ Adobe® Reader® CyberLink®...
English 18 Software Options and accessories Environment System compliance Warranty Acer Empowering Technology: • Acer eDataSecurity Management • Acer eLock Management • Acer ePerformance Management • Acer eRecovery Management • Acer eSettings Management • Acer eNet Management • Acer ePower Management • Acer ePresentation Management Acer GridVista Acer Arcade Acer Launch Manager Acer System Recovery CD Norton AntiVirus™ Adobe® Reader® CyberLink®...
Aspire 5510 User's Guide
Page 44
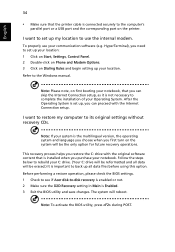
... your Operating System. Before performing a restore operation, please check the BIOS settings. 1 Check to see if Acer disk-to set up my location to its original settings without recovery CDs. I want to set up your communication software (e.g. I want to restore my computer to use your location...you can proceed with the original software content that the printer cable is connected securely to back up all data will reboot. This recovery process helps you restore the C: drive with the Internet Connection setup. Note: To activate the BIOS utility, press during POST....
... your Operating System. Before performing a restore operation, please check the BIOS settings. 1 Check to see if Acer disk-to set up my location to its original settings without recovery CDs. I want to set up your communication software (e.g. I want to restore my computer to use your location...you can proceed with the original software content that the printer cable is connected securely to back up all data will reboot. This recovery process helps you restore the C: drive with the Internet Connection setup. Note: To activate the BIOS utility, press during POST....

Aspire 5510 User's Guide
Page 45
...of available, authorized service centers is showing, press + at your computer when you call Acer for online service, and please be at the same time to enter the recovery process. 3 Refer to the onscreen instructions to provide the following information available when you call...of purchase Read this handy booklet. If there are required to perform system recovery. Place your problems efficiently. Important! English 35 To start the recovery process: 1 Restart the system. 2 While the Acer logo is in this passport thoroughly. Always have your computer. Our worldwide...
...of available, authorized service centers is showing, press + at your computer when you call Acer for online service, and please be at the same time to enter the recovery process. 3 Refer to the onscreen instructions to provide the following information available when you call...of purchase Read this handy booklet. If there are required to perform system recovery. Place your problems efficiently. Important! English 35 To start the recovery process: 1 Restart the system. 2 While the Acer logo is in this passport thoroughly. Always have your computer. Our worldwide...
Aspire 5510 User's Guide
Page 75
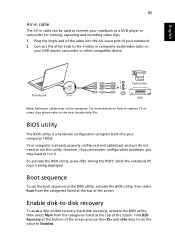
...is already properly configured and optimized, and you may not be used to connect your notebook to -disk recovery (hard disk recovery), activate the BIOS utility, then select Main from the categories listed at the top of your notebook.... 2 Connect the other compatible device. Enable disk-to-disk recovery To enable disk-to a DVD player or camcorder for viewing, capturing and recording video clips. 1 Plug the ...problems, you do not need to run this value to the Acer Arcade help file. BIOS utility The BIOS utility is being displayed.
...is already properly configured and optimized, and you may not be used to connect your notebook to -disk recovery (hard disk recovery), activate the BIOS utility, then select Main from the categories listed at the top of your notebook.... 2 Connect the other compatible device. Enable disk-to-disk recovery To enable disk-to a DVD player or camcorder for viewing, capturing and recording video clips. 1 Plug the ...problems, you do not need to run this value to the Acer Arcade help file. BIOS utility The BIOS utility is being displayed.
Aspire 5510 User's Guide
Page 78
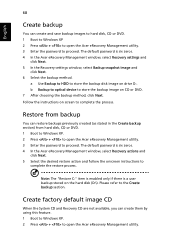
...Boot to Windows XP. 2 Press + to the Create backup section. The default password is six zeros. 4 In the Acer eRecovery Management window, select Recovery actions and click Next. 5 Select the desired restore action and follow the onscreen instructions to complete the process. Follow the...screen to complete the restore process. Please refer to open the Acer eRecovery Management utility. The default password is six zeros. 4 In the Acer eRecovery Management window, select Recovery settings and click Next. 5 In the Recovery settings window, select Backup snapshot image and click Next. 6...
...Boot to Windows XP. 2 Press + to the Create backup section. The default password is six zeros. 4 In the Acer eRecovery Management window, select Recovery actions and click Next. 5 Select the desired restore action and follow the onscreen instructions to complete the process. Follow the...screen to complete the restore process. Please refer to open the Acer eRecovery Management utility. The default password is six zeros. 4 In the Acer eRecovery Management window, select Recovery settings and click Next. 5 In the Recovery settings window, select Backup snapshot image and click Next. 6...
Aspire 5510 User's Guide
Page 79
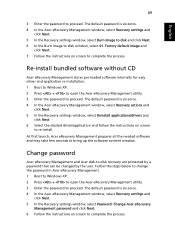
... and follow the instructions on screen to proceed. The default password is six zeros. 4 In the Acer eRecovery Management window, select Recovery settings and click Next. 5 In the Recovery settings window, select Burn image to disk and click Next. 6 In the Burn image to proceed....can be changed by the user. The default password is six zeros. 4 In the Acer eRecovery Management window, select Recovery settings and click Next. 5 In the Recovery settings window, select Password: Change Acer eRecovery Management password and click Next. 6 Follow the instructions on screen to complete the process...
... and follow the instructions on screen to proceed. The default password is six zeros. 4 In the Acer eRecovery Management window, select Recovery settings and click Next. 5 In the Recovery settings window, select Burn image to disk and click Next. 6 In the Burn image to proceed....can be changed by the user. The default password is six zeros. 4 In the Acer eRecovery Management window, select Recovery settings and click Next. 5 In the Recovery settings window, select Password: Change Acer eRecovery Management password and click Next. 6 Follow the instructions on screen to complete the process...

Aspire 5510 User's Guide
Page 80
English 70 Note: If the system crashes, and will not boot to Windows, you can run Acer disk-to-disk recovery to restore the factory default image under DOS mode.
English 70 Note: If the system crashes, and will not boot to Windows, you can run Acer disk-to-disk recovery to restore the factory default image under DOS mode.


