Aspire 4220 / 4520 User's Guide EN
Page 61
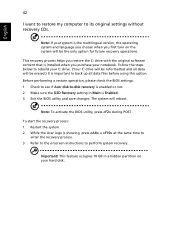
... C: drive. (Your C: drive will be the only option for future recovery operations. Note: To activate the BIOS utility, press during POST. To start the recovery process: 1 Restart the system. 2 While the Acer logo is showing, press + at the same time to enter the recovery process. 3 Refer to the onscreen instructions to back up all data...
... C: drive. (Your C: drive will be the only option for future recovery operations. Note: To activate the BIOS utility, press during POST. To start the recovery process: 1 Restart the system. 2 While the Acer logo is showing, press + at the same time to enter the recovery process. 3 Refer to the onscreen instructions to back up all data...

Aspire 4220 / 4520 User's Guide EN
Page 94
...and optimized, and you may need to run this feature. To activate the BIOS utility, press during the POST; Enable disk-to-disk recovery To enable disk-to-disk recovery (hard disk recovery), activate the BIOS utility, then select Main from the categories listed at the top of the screen... the notebook PC logo is a hardware configuration program built into your computer's BIOS. English 75 BIOS utility The BIOS utility is being displayed. Password To set this value to enable this utility. Find D2D Recovery at the top of the screen and use the and keys to Enabled. ...
...and optimized, and you may need to run this feature. To activate the BIOS utility, press during the POST; Enable disk-to-disk recovery To enable disk-to-disk recovery (hard disk recovery), activate the BIOS utility, then select Main from the categories listed at the top of the screen... the notebook PC logo is a hardware configuration program built into your computer's BIOS. English 75 BIOS utility The BIOS utility is being displayed. Password To set this value to enable this utility. Find D2D Recovery at the top of the screen and use the and keys to Enabled. ...

Service Guide
Page 58
...New features or options T Restore a BIOS when it becomes corrupted. If the battery pack does not contain enough power to run the Phlash utility. The flash utility has auto-execution function. 52 Chapter 2 NOTE: If you do not have a crisis recovery diskette at hand, then you should... a Crisis Recovery Diskette before you use the Phlash utility. NOTE: Do not install memory-related drivers (XMS, EMS, DPMI) when you use the Phlash. Follow the steps below to finish BIOS flash, you run the Phlash. 1. Prepare a bootable diskette. 2. BIOS Flash Utility The BIOS flash memory update...
...New features or options T Restore a BIOS when it becomes corrupted. If the battery pack does not contain enough power to run the Phlash utility. The flash utility has auto-execution function. 52 Chapter 2 NOTE: If you do not have a crisis recovery diskette at hand, then you should... a Crisis Recovery Diskette before you use the Phlash utility. NOTE: Do not install memory-related drivers (XMS, EMS, DPMI) when you use the Phlash. Follow the steps below to finish BIOS flash, you run the Phlash. 1. Prepare a bootable diskette. 2. BIOS Flash Utility The BIOS flash memory update...

Service Guide
Page 85
... configuration against CMOS Initialize PCI bus and devices Initialize all video adapters in system QuietBoot start (optional) Shadow video BIOS ROM Display BIOS copyright notice Display CPU type and speed Initialize EISA board Test keyboard Set key click if enabled Test for unexpected ...SMM) area Display external L2 cache size Load custom defaults (optional) Display shadow-area message Display possible high address for UMB recovery Display error messages Check for configuration errors Check for keyboard errors Set up hardware interrupt vectors Initialize coprocessor if present Disable onboard ...
... configuration against CMOS Initialize PCI bus and devices Initialize all video adapters in system QuietBoot start (optional) Shadow video BIOS ROM Display BIOS copyright notice Display CPU type and speed Initialize EISA board Test keyboard Set key click if enabled Test for unexpected ...SMM) area Display external L2 cache size Load custom defaults (optional) Display shadow-area message Display possible high address for UMB recovery Display error messages Check for configuration errors Check for keyboard errors Set up hardware interrupt vectors Initialize coprocessor if present Disable onboard ...
Service Guide
Page 87
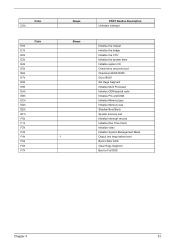
... 1 POST Routine Description Unknown interrupt Initialize the chipset Initialize the bridge Initialize the CPU Initialize the system timer Initialize system I/O Check force recovery boot Checksum BIOS ROM Go to BIOS Set Huge Segment Initialize Multi Processor Initialize OEM special code Initialize PIC and DMA Initialize Memory type Initialize Memory size Shadow Boot Block...
... 1 POST Routine Description Unknown interrupt Initialize the chipset Initialize the bridge Initialize the CPU Initialize the system timer Initialize system I/O Check force recovery boot Checksum BIOS ROM Go to BIOS Set Huge Segment Initialize Multi Processor Initialize OEM special code Initialize PIC and DMA Initialize Memory type Initialize Memory size Shadow Boot Block...


