Acer Aspire One 756 Netbook Service Guide
Page 2
... Using DMI Tools 2-19 HDD/BIOS Password 2-21 Unlocking the HDD 2-21 Clearing the Password Check and BIOS Password 2-23 Crisis Utility SOP 2-25 When to Use the Crisis SOP 2-25 Creating a USB Flash Crisis Disk 2-25 Using the Crisis Utility Disk 2-28 Chapter 3. Jumper and Connector Locations Mainboard Top View 3-2 Mainboard Bottom View 3-3 LED Board View 3-4 IO Board View 3-5 HDD Board View 3-6 Clear CMOS Jumper 3-7 Chapter 4. Troubleshooting General Information 4-2 Power On Issues 4-3 No Display Issues 4-4 LCD Picture Failure 4-6 Internal Keyboard Failure 4-7 Touchpad Failure...
... Using DMI Tools 2-19 HDD/BIOS Password 2-21 Unlocking the HDD 2-21 Clearing the Password Check and BIOS Password 2-23 Crisis Utility SOP 2-25 When to Use the Crisis SOP 2-25 Creating a USB Flash Crisis Disk 2-25 Using the Crisis Utility Disk 2-28 Chapter 3. Jumper and Connector Locations Mainboard Top View 3-2 Mainboard Bottom View 3-3 LED Board View 3-4 IO Board View 3-5 HDD Board View 3-6 Clear CMOS Jumper 3-7 Chapter 4. Troubleshooting General Information 4-2 Power On Issues 4-3 No Display Issues 4-4 LCD Picture Failure 4-6 Internal Keyboard Failure 4-7 Touchpad Failure...
Acer Aspire One 756 Netbook Service Guide
Page 3
...41 IO Board Removal 5-43 IO Board Installation 5-45 LED Board Removal 5-47 LED Board Installation 5-49 Speaker Removal 5-51 Speaker Installation 5-53 Keyboard Removal 5-55 Keyboard Installation 5-57 Touchpad Removal 5-59 Touchpad Installation 5-61 Thermal Module Removal 5-63 Thermal Module Installation 5-64 LCD Module Removal 5-66 LCD Module Installation 5-69 DC-In Cable Removal 5-72 DC-In Cable Installation 5-73 LCD Bezel Removal 5-74 LCD Bezel Installation 5-76 LCD Panel Removal 5-78 ii Internal Microphone Failure 4-11 USB Failure (USB 2.0 4-12 Wireless/BT Function Test...
...41 IO Board Removal 5-43 IO Board Installation 5-45 LED Board Removal 5-47 LED Board Installation 5-49 Speaker Removal 5-51 Speaker Installation 5-53 Keyboard Removal 5-55 Keyboard Installation 5-57 Touchpad Removal 5-59 Touchpad Installation 5-61 Thermal Module Removal 5-63 Thermal Module Installation 5-64 LCD Module Removal 5-66 LCD Module Installation 5-69 DC-In Cable Removal 5-72 DC-In Cable Installation 5-73 LCD Bezel Removal 5-74 LCD Bezel Installation 5-76 LCD Panel Removal 5-78 ii Internal Microphone Failure 4-11 USB Failure (USB 2.0 4-12 Wireless/BT Function Test...
Acer Aspire One 756 Netbook Service Guide
Page 21
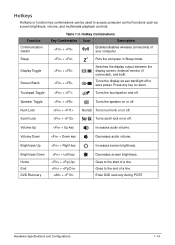
... screen brightness. Hotkeys Hotkeys or function key combinations can be used to the start of a line. Function Communication Switch Table 1:3. Speaker Toggle + Turns the speaker on or off . Scroll Lock + Turns scroll lock on and off . Goes to access computer control functions such as screen brightness, volume, and multimedia playback controls. Brightness Up + Right key Increases screen brightness. Enter D2D recovery during POST Hardware Specifications and Configurations 1-14 Hotkey Combinations Key Combination Icon Description + Enables/disables wireless...
... screen brightness. Hotkeys Hotkeys or function key combinations can be used to the start of a line. Function Communication Switch Table 1:3. Speaker Toggle + Turns the speaker on or off . Scroll Lock + Turns scroll lock on and off . Goes to access computer control functions such as screen brightness, volume, and multimedia playback controls. Brightness Up + Right key Increases screen brightness. Enter D2D recovery during POST Hardware Specifications and Configurations 1-14 Hotkey Combinations Key Combination Icon Description + Enables/disables wireless...
Acer Aspire One 756 Netbook Service Guide
Page 37
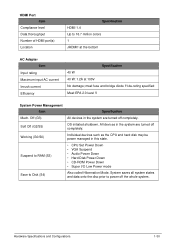
... to RAM (S3) • CPU Set Power Down • VGA Suspend • Audio Power Down • Hard Disk Power Down • CD-ROM Power Down • Super I ²t de-rating specified Meet EPA 2.0 level V System Power Management Item Specification Mech. Hardware Specifications and Configurations 1-30 Off (G3) All devices in this state. Suspend to power off completely. Soft Off (G2/S5) OS initiated shutdown. Working (G0/S0) Individual devices such...
... to RAM (S3) • CPU Set Power Down • VGA Suspend • Audio Power Down • Hard Disk Power Down • CD-ROM Power Down • Super I ²t de-rating specified Meet EPA 2.0 level V System Power Management Item Specification Mech. Hardware Specifications and Configurations 1-30 Off (G3) All devices in this state. Suspend to power off completely. Soft Off (G2/S5) OS initiated shutdown. Working (G0/S0) Individual devices such...
Acer Aspire One 756 Netbook Service Guide
Page 43
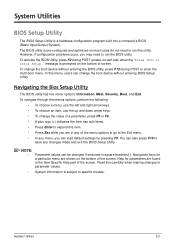
... to enter the multi-boot menu. However, if configuration problems occur, you are shown on the bottom of the screen. You can load default settings by pressing F9. The BIOS utility is prompted on the bottom of screen. Navigating the Bios Setup Utility The BIOS utility has five menu options: Information, Main, Security, Boot, and Exit. Read this menu, users can be changed if enclosed in the Item Specific Help part of the menu options to...
... to enter the multi-boot menu. However, if configuration problems occur, you are shown on the bottom of the screen. You can load default settings by pressing F9. The BIOS utility is prompted on the bottom of screen. Navigating the Bios Setup Utility The BIOS utility has five menu options: Information, Main, Security, Boot, and Exit. Read this menu, users can be changed if enclosed in the Item Specific Help part of the menu options to...

Acer Aspire One 756 Netbook Service Guide
Page 46
F1 Help Esc Exit Select Item Select Menu F5/F6 Change Values Enter Select Sub-Menu Figure 2:2. Enable or disable system boot from LAN. Displays the video memory installed. INCREASE/ REDUCE : F6/F5. Displays the total memory installed. Information Main Security InsydeH20 Setup Utility Boot Exit Rev. 3.7 System Time : System Date : Total Memory: Video Memory: Quiet Boot Network Boot F12 Boot Menu D2D Recovery Wake on LAN SATA Mode Description Sets the system time in 24-hour format. Hour valid range is from 0 to...
F1 Help Esc Exit Select Item Select Menu F5/F6 Change Values Enter Select Sub-Menu Figure 2:2. Enable or disable system boot from LAN. Displays the video memory installed. INCREASE/ REDUCE : F6/F5. Displays the total memory installed. Information Main Security InsydeH20 Setup Utility Boot Exit Rev. 3.7 System Time : System Date : Total Memory: Video Memory: Quiet Boot Network Boot F12 Boot Menu D2D Recovery Wake on LAN SATA Mode Description Sets the system time in 24-hour format. Hour valid range is from 0 to...
Acer Aspire One 756 Netbook Service Guide
Page 47
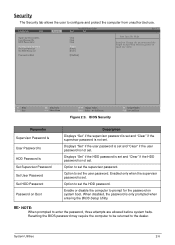
... "Set" if the HDD password is set and "Clear" if the HDD password is not set the user password. Information Main Supervisor Password Is: User Password Is: HDD Password Is: Set Supervisor Password Set User Password Set HDD Password Password on Boot Security InsydeH20 Setup Utility Boot Exit Clear Clear Clear [Enter] [Enter] [Enter] [Disabled] Rev. 3.7 Item Specific Help Install or Change the password and the length of password must be returned to set the HDD password. F1 Help Esc Exit Select Item Select Menu F5/F6 Change Values Enter Select Sub-Menu Figure 2:3. Option to set...
... "Set" if the HDD password is set and "Clear" if the HDD password is not set the user password. Information Main Supervisor Password Is: User Password Is: HDD Password Is: Set Supervisor Password Set User Password Set HDD Password Password on Boot Security InsydeH20 Setup Utility Boot Exit Clear Clear Clear [Enter] [Enter] [Enter] [Disabled] Rev. 3.7 Item Specific Help Install or Change the password and the length of password must be returned to set the HDD password. F1 Help Esc Exit Select Item Select Menu F5/F6 Change Values Enter Select Sub-Menu Figure 2:3. Option to set...

Acer Aspire One 756 Netbook Service Guide
Page 49
... password is set, the Set User Password and Password on Boot parameters are enabled for users to change a password: NOTE: Below are the procedures for changing the supervisor password. The same procedures apply in setting the user password and HDD password. Set Supervisor Password Enter Current Password [ ] Enter New Password [ ] Confirm New Password [ ] Figure 2:6. Use the ↑ and ↓ keys to save changes and exit BIOS Setup Utility. Press F10 to highlight the Set Supervisor Password parameter and press Enter. The computer sets the Supervisor Password...
... password is set, the Set User Password and Password on Boot parameters are enabled for users to change a password: NOTE: Below are the procedures for changing the supervisor password. The same procedures apply in setting the user password and HDD password. Set Supervisor Password Enter Current Password [ ] Enter New Password [ ] Confirm New Password [ ] Figure 2:6. Use the ↑ and ↓ keys to save changes and exit BIOS Setup Utility. Press F10 to highlight the Set Supervisor Password parameter and press Enter. The computer sets the Supervisor Password...

Acer Aspire One 756 Netbook Service Guide
Page 50
... Clear. 5. Type the current password in the Enter New Password and Confirm New Password fields. Setup Notice 4. The computer sets the Supervisor Password Is parameter to remove a password: NOTE: Below are the procedures for removing the supervisor password. Use the ↑ and ↓ keys to highlight the Set Supervisor Password parameter and press Enter. Set Supervisor Password Enter Current Password [ ] Enter New Password [ ] Confirm New Password [ ] Figure 2:8. The same procedures apply in removing the user and HDD passwords. Set Supervisor Password...
... Clear. 5. Type the current password in the Enter New Password and Confirm New Password fields. Setup Notice 4. The computer sets the Supervisor Password Is parameter to remove a password: NOTE: Below are the procedures for removing the supervisor password. Use the ↑ and ↓ keys to highlight the Set Supervisor Password parameter and press Enter. Set Supervisor Password Enter Current Password [ ] Enter New Password [ ] Confirm New Password [ ] Figure 2:8. The same procedures apply in removing the user and HDD passwords. Set Supervisor Password...
Acer Aspire One 756 Netbook Service Guide
Page 51
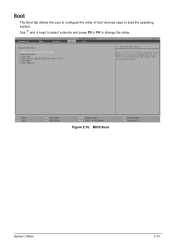
... list, or to change the value. Boot The Boot tab allows the user to configure the order of boot devices used to escape the menu F1 Help Esc Exit Select Item Select Menu F5/F6 Change Values Enter Select Sub-Menu Figure 2:10. HDD0 : Hitachi HTS543232A7A3B4 2. ATAPI CDROM : 3. Press to load the operating system. Information Main Security Boot priority order: 1. BIOS Boot F9 Setup Defaults F10 Save and Exit System Utilities 2-10 USB HDD : 6.
... list, or to change the value. Boot The Boot tab allows the user to configure the order of boot devices used to escape the menu F1 Help Esc Exit Select Item Select Menu F5/F6 Change Values Enter Select Sub-Menu Figure 2:10. HDD0 : Hitachi HTS543232A7A3B4 2. ATAPI CDROM : 3. Press to load the operating system. Information Main Security Boot priority order: 1. BIOS Boot F9 Setup Defaults F10 Save and Exit System Utilities 2-10 USB HDD : 6.
Acer Aspire One 756 Netbook Service Guide
Page 80
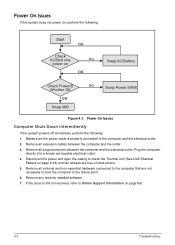
... the power and open the casing to Online Support Information on page 8-2. 4-3 Troubleshooting Remove any recently installed software. 7. Makes sure the power cable is still not resolved, refer to check the Thermal Unit (See Unit Thermal Failure on page 4-15) and fan airways are not necessary to boot the computer to the computer and the electrical outlet. 2. Remove all external and non-essential hardware connected to...
... the power and open the casing to Online Support Information on page 8-2. 4-3 Troubleshooting Remove any recently installed software. 7. Makes sure the power cable is still not resolved, refer to check the Thermal Unit (See Unit Thermal Failure on page 4-15) and fan airways are not necessary to boot the computer to the computer and the electrical outlet. 2. Remove all external and non-essential hardware connected to...
Acer Aspire One 756 Netbook Service Guide
Page 81
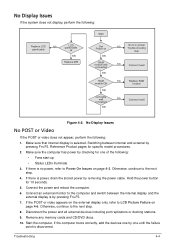
... removing the power cable. Otherwise, continue to the next step. 8. Hold the power button for specific model procedures. 2. If the POST or video appears on the external display only, refer to LCD Picture Failure on page 4-3. Start the computer. If the computer boots correctly, add the devices one of the following : Start Replace LCD NG panel/cable LCD panel/cable ok OK Replace M/B Can Power on OK RAM module well connected OK RAM module OK OK Lcd cable well connected...
... removing the power cable. Otherwise, continue to the next step. 8. Hold the power button for specific model procedures. 2. If the POST or video appears on the external display only, refer to LCD Picture Failure on page 4-3. Start the computer. If the computer boots correctly, add the devices one of the following : Start Replace LCD NG panel/cable LCD panel/cable ok OK Replace M/B Can Power on OK RAM module well connected OK RAM module OK OK Lcd cable well connected...
Acer Aspire One 756 Netbook Service Guide
Page 82
... and should be replaced. 3. If the display is too dim at the highest brightness setting, the LCD is listed under Other Devices 7. Check the display resolution is correctly configured: • Minimize or close all Windows. • If display size is not normal, right-click on page 8-2. 4-5 Troubleshooting Roll back the video driver to the User Manual for instructions on -screen prompts. 8. Reseat the memory modules. 12. Boot the computer. •...
... and should be replaced. 3. If the display is too dim at the highest brightness setting, the LCD is listed under Other Devices 7. Check the display resolution is correctly configured: • Minimize or close all Windows. • If display size is not normal, right-click on page 8-2. 4-5 Troubleshooting Roll back the video driver to the User Manual for instructions on -screen prompts. 8. Reseat the memory modules. 12. Boot the computer. •...
Acer Aspire One 756 Netbook Service Guide
Page 86
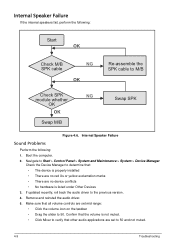
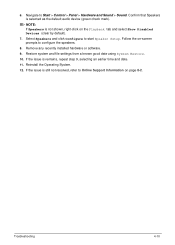
... the volume icon on the taskbar • Drag the slider to 50 and not muted. 4-9 Troubleshooting Confirm that the volume is listed under Other Devices 3. Remove and reinstall the audio driver. 5. Make sure that other audio applications are set to 50. Internal Speaker Failure Sound Problems 0 Perform the following : Start OK Check M/B SPK cable NG OK Re-assemble the SPK cable to Start > Control Panel > System and Maintenance > System > Device Manager.
... the volume icon on the taskbar • Drag the slider to 50 and not muted. 4-9 Troubleshooting Confirm that the volume is listed under Other Devices 3. Remove and reinstall the audio driver. 5. Make sure that other audio applications are set to 50. Internal Speaker Failure Sound Problems 0 Perform the following : Start OK Check M/B SPK cable NG OK Re-assemble the SPK cable to Start > Control Panel > System and Maintenance > System > Device Manager.
Acer Aspire One 756 Netbook Service Guide
Page 87
..., refer to start Speaker Setup. Follow the on-screen prompts to Start > Control > Panel > Hardware and Sound > Sound. Reinstall the Operating System. 12. Restore system and file settings from a known good date using System Restore. 10. If the issue is selected as the default audio device (green check mark). Select Speakers and click Configure to Online Support Information on the Playback tab and select Show Disabled Devices (clear by default). 7. Remove any recently installed hardware or software. 9. Troubleshooting 4-10...
..., refer to start Speaker Setup. Follow the on-screen prompts to Start > Control > Panel > Hardware and Sound > Sound. Reinstall the Operating System. 12. Restore system and file settings from a known good date using System Restore. 10. If the issue is selected as the default audio device (green check mark). Select Speakers and click Configure to Online Support Information on the Playback tab and select Show Disabled Devices (clear by default). 7. Remove any recently installed hardware or software. 9. Troubleshooting 4-10...
Acer Aspire One 756 Netbook Service Guide
Page 88
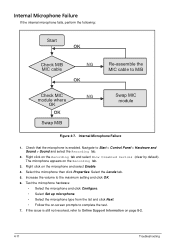
... and select Show Disabled Devices (clear by default). Test the microphone hardware: • Select the microphone and click Configure. • Select Set up microphone. • Select the microphone type from the list and click Next. • Follow the on the microphone and select Enable. 4. Increase the volume to Start > Control Panel > Hardware and Sound > Sound and select the Recording tab. 2. Navigate to the maximum setting and click OK. 6. Internal Microphone Failure 1. Select the...
... and select Show Disabled Devices (clear by default). Test the microphone hardware: • Select the microphone and click Configure. • Select Set up microphone. • Select the microphone type from the list and click Next. • Follow the on the microphone and select Enable. 4. Increase the volume to Start > Control Panel > Hardware and Sound > Sound and select the Recording tab. 2. Navigate to the maximum setting and click OK. 6. Internal Microphone Failure 1. Select the...
Acer Aspire One 756 Netbook Service Guide
Page 94
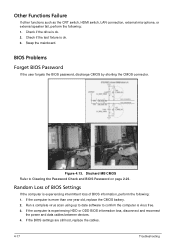
... a complete virus scan using up to date software to Clearing the Password Check and BIOS Password on page 2-23. Dischard MB CMOS Refer to confirm the computer is experiencing intermittent loss of BIOS Settings If the computer is virus free. 3. If the BIOS settings are still lost, replace the cables. 4-17 Troubleshooting BIOS Problems Forget BIOS Password If the user forgets the BIOS password, discharge CMOS by shorting the CMOS connector. Random Loss of...
... a complete virus scan using up to date software to Clearing the Password Check and BIOS Password on page 2-23. Dischard MB CMOS Refer to confirm the computer is experiencing intermittent loss of BIOS Settings If the computer is virus free. 3. If the BIOS settings are still lost, replace the cables. 4-17 Troubleshooting BIOS Problems Forget BIOS Password If the user forgets the BIOS password, discharge CMOS by shorting the CMOS connector. Random Loss of...

Acer Aspire One 756 Netbook Service Guide
Page 95
... Power On Issues on page 4-3). NOTE: • Verify that all of the following : • System board • LCD assembly Troubleshooting 4-18 Perform the following : 1. If the problem remains, replace the following devices: • Non-Acer devices • Printer, mouse, and other external devices • Battery pack • Hard disk drive • DIMM • CD-ROM/Diskette drive Module • PC Cards 4. If the issue is inoperative. Intermittent Problems Intermittent system hang problems...
... Power On Issues on page 4-3). NOTE: • Verify that all of the following : • System board • LCD assembly Troubleshooting 4-18 Perform the following : 1. If the problem remains, replace the following devices: • Non-Acer devices • Printer, mouse, and other external devices • Battery pack • Hard disk drive • DIMM • CD-ROM/Diskette drive Module • PC Cards 4. If the issue is inoperative. Intermittent Problems Intermittent system hang problems...
Acer Aspire One 756 Netbook Service Guide
Page 205
... TOUCHPAD ASSY-SILVER FOR V5-171 UNILOAD DOOR KB SUPPORT PLATE PART NO. 60.SGYN2.003 60.SGTN2.002 60.SGZN2.002 60.SH0N2.002 60.M3AN2.002 60.SGYN2.004 33.SGYN2.001 HDD BRACKET 33.SGYN2.002 LCD BRACKET R&L 33.SGYN2.003 TBD TBD TBD KEYBOARD TBD TBD TBD Keyboard ACER AF1S_A10B AF1S Internal 10 Standard 84KS Black...
... TOUCHPAD ASSY-SILVER FOR V5-171 UNILOAD DOOR KB SUPPORT PLATE PART NO. 60.SGYN2.003 60.SGTN2.002 60.SGZN2.002 60.SH0N2.002 60.M3AN2.002 60.SGYN2.004 33.SGYN2.001 HDD BRACKET 33.SGYN2.002 LCD BRACKET R&L 33.SGYN2.003 TBD TBD TBD KEYBOARD TBD TBD TBD Keyboard ACER AF1S_A10B AF1S Internal 10 Standard 84KS Black...
Acer Aspire One 756 Netbook Service Guide
Page 208
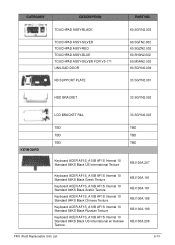
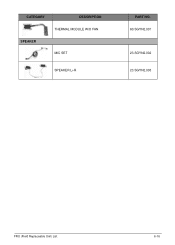
CATEGORY DESCRIPTION THERMAL MODULE W/O FAN SPEAKER MIC SET SPEAKER L+R PART NO. 60.SGYN2.007 23.SGYN2.002 23.SGYN2.003 FRU (Field Replaceable Unit) List 6-16
CATEGORY DESCRIPTION THERMAL MODULE W/O FAN SPEAKER MIC SET SPEAKER L+R PART NO. 60.SGYN2.007 23.SGYN2.002 23.SGYN2.003 FRU (Field Replaceable Unit) List 6-16


