Acer AO756 Touchpad

Related Manual Pages


Related Videos

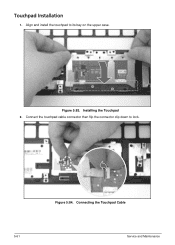
Touchpad Replacement Acer 725 756 AO725 AO756 Ultrabook Palmrest
Duration: 5:37
Total Views: 65
Duration: 5:37
Total Views: 65
Similar Questions

How To Active The Scroll Lock In Touchpad?
my scrolling up and down in touchpad not working..
my scrolling up and down in touchpad not working..
(Posted by arianiapuh 10 years ago)

Touchpad Isues
I was watching Netflix and when I was trying to move my cursor, it wouldn't move. I restarted it and...
I was watching Netflix and when I was trying to move my cursor, it wouldn't move. I restarted it and...
(Posted by wallah98 11 years ago)

Touchpad Fault
Touchpad is not workin from secon day that I bought this laptop?
Touchpad is not workin from secon day that I bought this laptop?
(Posted by iliyaniliew 11 years ago)

Touchpad/cursor
My cursor is flashing all around the top of the screen, and does not respond to the touchpad. What c...
My cursor is flashing all around the top of the screen, and does not respond to the touchpad. What c...
(Posted by lindakreger60 12 years ago)