

AL511 Service Guide
Page 3
... pulses No pulses Blacking On DC Power off Don't care Don't care Don't care Off Video Circuit On Off LCD On Off Off Off LED Green Yellow Yellow Off 3 CONTROLS B-1 Control panel (monitor front panel) 1. Power LED, ( Please refer to OFF. (toggle switch) C. Adjust increase 4. Power ON/OFF switch, push to ON...
... pulses No pulses Blacking On DC Power off Don't care Don't care Don't care Off Video Circuit On Off LCD On Off Off Off LED Green Yellow Yellow Off 3 CONTROLS B-1 Control panel (monitor front panel) 1. Power LED, ( Please refer to OFF. (toggle switch) C. Adjust increase 4. Power ON/OFF switch, push to ON...
AL511 Service Guide
Page 7
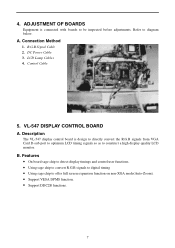
ADJUSTMENT OF BOARDS Equipment is design to directly convert the R.G.B signals from VGA Card D-sub port to optimum LCD timing signals so as to be inspected before adjustments. Connection Method 1. Control Cable 5. VL-547 DISPLAY CONTROL BOARD A. Refer...(Auto-Zoom). • Support VESA DPMS function. • Support DDC2B functions. 7 B. LCD Lamp Cables 4. Description The VL-547 display control board is connected with boards to construct a high display quality LCD monitor. Features • On board sage chip to detect display timings and control user functions. •...
ADJUSTMENT OF BOARDS Equipment is design to directly convert the R.G.B signals from VGA Card D-sub port to optimum LCD timing signals so as to be inspected before adjustments. Connection Method 1. Control Cable 5. VL-547 DISPLAY CONTROL BOARD A. Refer...(Auto-Zoom). • Support VESA DPMS function. • Support DDC2B functions. 7 B. LCD Lamp Cables 4. Description The VL-547 display control board is connected with boards to construct a high display quality LCD monitor. Features • On board sage chip to detect display timings and control user functions. •...
AL511 User Guide
Page 1
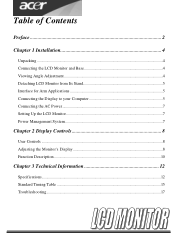
Table of Contents Preface ...2 Chapter 1 Installation 4 Unpacking ...4 Connecting the LCD Monitor and Base 4 Viewing Angle Adjustment ...4 Detaching LCD Monitor from Its Stand 5 Interface for Arm Applications 5 Connecting the Display to your Computer 5 Connecting the AC Power...7 Setting Up the LCD Monitor...7 Power Management System...7 Chapter 2 Display Controls 8 User Controls ...8 Adjusting the Monitor's Display 8 Function Description...10 Chapter 3 Technical Information 12 Specifications...12 Standard Timing Table ...15 Troubleshooting...17
Table of Contents Preface ...2 Chapter 1 Installation 4 Unpacking ...4 Connecting the LCD Monitor and Base 4 Viewing Angle Adjustment ...4 Detaching LCD Monitor from Its Stand 5 Interface for Arm Applications 5 Connecting the Display to your Computer 5 Connecting the AC Power...7 Setting Up the LCD Monitor...7 Power Management System...7 Chapter 2 Display Controls 8 User Controls ...8 Adjusting the Monitor's Display 8 Function Description...10 Chapter 3 Technical Information 12 Specifications...12 Standard Timing Table ...15 Troubleshooting...17

AL511 User Guide
Page 2
... can radiate radio frequency energy, and if not installed and used . however, no guarantee that interference will not occur in setting up and using the LCD Monitor. No part of the following measures: • Reorient or relocate the receiving antenna. • Increase the separation between the equipment and the receiver. • Connect...
... can radiate radio frequency energy, and if not installed and used . however, no guarantee that interference will not occur in setting up and using the LCD Monitor. No part of the following measures: • Reorient or relocate the receiving antenna. • Increase the separation between the equipment and the receiver. • Connect...
AL511 User Guide
Page 3
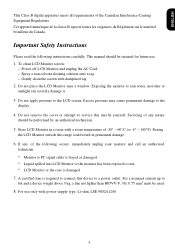
...B digital apparatus meets all requirements of any of -20° ~ 60°C (or -4° ~ 140°F). To clean LCD Monitor screen; -- Do not place the LCD Monitor near a window. Servicing of the Canadian Interference-Causing Equipment Regulations. A certified line is damaged. 7. Spray a non-solvent cleaning solution...attempt to service this device to rain water, moisture or sunlight can severely damage it. 3. Power off LCD Monitor and unplug the AC Cord. -- Storing the LCD Monitor outside this range could result in a room with dampened rag. 2. Cet appareil numérique de...
...B digital apparatus meets all requirements of any of -20° ~ 60°C (or -4° ~ 140°F). To clean LCD Monitor screen; -- Do not place the LCD Monitor near a window. Servicing of the Canadian Interference-Causing Equipment Regulations. A certified line is damaged. 7. Spray a non-solvent cleaning solution...attempt to service this device to rain water, moisture or sunlight can severely damage it. 3. Power off LCD Monitor and unplug the AC Cord. -- Storing the LCD Monitor outside this range could result in a room with dampened rag. 2. Cet appareil numérique de...
AL511 User Guide
Page 4
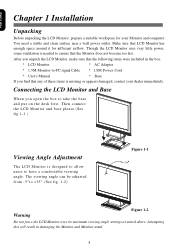
...Cord * User's Manual * Base If you open the box to have a comfortable viewing angle. Then connect the LCD Monitor and base please.(See fig.1-1 ) Viewing Angle Adjustment The LCD Monitor is designed to allow users to take the base and put on the desk first. The viewing angle can be ...adjusted from -5°t o +35°. (See fig. 1-2) Figure 1-1 Warning Figure 1-2 Do not force the LCD Monitor over its maximum viewing angle settings as stated above. Connecting the LCD Monitor and Base When you find that any of these items is needed to ensure that...
...Cord * User's Manual * Base If you open the box to have a comfortable viewing angle. Then connect the LCD Monitor and base please.(See fig.1-1 ) Viewing Angle Adjustment The LCD Monitor is designed to allow users to take the base and put on the desk first. The viewing angle can be ...adjusted from -5°t o +35°. (See fig. 1-2) Figure 1-1 Warning Figure 1-2 Do not force the LCD Monitor over its maximum viewing angle settings as stated above. Connecting the LCD Monitor and Base When you find that any of these items is needed to ensure that...

AL511 User Guide
Page 5
... A ferrite-core interface cable is 5 This device will not be connected to an off your computer. 2. Unscrew screws of the signal cable to the LCD Monitor's VGA port. (See Fig. 1-5) 3. Figure 1-4 Connecting the Display to your PC. 4. Remove the stand from Its Stand 1. The rear of the... holes in the plastic covering as illustrated in compliance with FCC regulations. Make sure both connections are secure. ENGLISH Detaching LCD Monitor from LCD monitor (See fig. 1-3) Figure 1-3 Interface for Arm Applications Before installing to mounting device, please refer to Fig.1-3.
... A ferrite-core interface cable is 5 This device will not be connected to an off your computer. 2. Unscrew screws of the signal cable to the LCD Monitor's VGA port. (See Fig. 1-5) 3. Figure 1-4 Connecting the Display to your PC. 4. Remove the stand from Its Stand 1. The rear of the... holes in the plastic covering as illustrated in compliance with FCC regulations. Make sure both connections are secure. ENGLISH Detaching LCD Monitor from LCD monitor (See fig. 1-3) Figure 1-3 Interface for Arm Applications Before installing to mounting device, please refer to Fig.1-3.
AL511 User Guide
Page 7
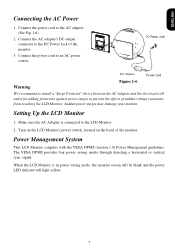
...LED indicator will light yellow. 7 Sudden power surges may damage your monitor. ENGLISH Connecting the AC Power 1. Connect the power cord to prevent the effects of the monitor. Setting Up the LCD Monitor 1. The VESA DPMS provides four power saving modes through detecting a ... to the AC adapter. (See Fig. 1-6) 2. When the LCD Monitor is connected to the LCD Monitor. 2. Power Management System This LCD Monitor complies with the VESA DPMS (version 1.0) Power Management guidelines. Turn on the LCD Monitor's power switch, located on the bezel of sudden voltage variations from...
...LED indicator will light yellow. 7 Sudden power surges may damage your monitor. ENGLISH Connecting the AC Power 1. Connect the power cord to prevent the effects of the monitor. Setting Up the LCD Monitor 1. The VESA DPMS provides four power saving modes through detecting a ... to the AC adapter. (See Fig. 1-6) 2. When the LCD Monitor is connected to the LCD Monitor. 2. Power Management System This LCD Monitor complies with the VESA DPMS (version 1.0) Power Management guidelines. Turn on the LCD Monitor's power switch, located on the bezel of sudden voltage variations from...
AL511 User Guide
Page 8
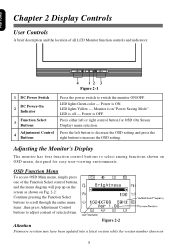
... pressing the Function Select buttons to scroll through the entire menu items ,then press Adjustment Control buttons to adjust content of all LCD Monitor function controls and indicators: Figure 2-1 1 DC Power Switch DC Power-On 2 Indicator 3 Function Select Buttons 4 Adjustment Control Buttons... Press the power switch to switch the monitor ON/OFF. Monitor is OFF. Power is in "Power Saving Mode". LED lights Green color --- Figure 2-2 Attention Firmware revision may have been updated...
... pressing the Function Select buttons to scroll through the entire menu items ,then press Adjustment Control buttons to adjust content of all LCD Monitor function controls and indicators: Figure 2-1 1 DC Power Switch DC Power-On 2 Indicator 3 Function Select Buttons 4 Adjustment Control Buttons... Press the power switch to switch the monitor ON/OFF. Monitor is OFF. Power is in "Power Saving Mode". LED lights Green color --- Figure 2-2 Attention Firmware revision may have been updated...
AL511 User Guide
Page 15
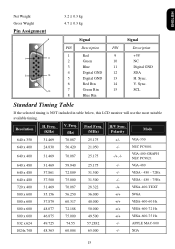
... 5 Digital GND 13 H. Sync. 10 7 Green Rtn 15 SCL 8 Blue Rtn Standard Timing Table If the selected timing is NOT included in table below, this LCD monitor will use the most suitable available timing.
... 5 Digital GND 13 H. Sync. 10 7 Green Rtn 15 SCL 8 Blue Rtn Standard Timing Table If the selected timing is NOT included in table below, this LCD monitor will use the most suitable available timing.
AL511 User Guide
Page 17
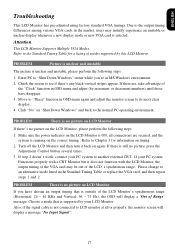
...status while you have chosen an output timing that is no picture on the correct timing. Choose a mode that is no picture on LCD Monitor If there's no picture, press the Adjustment Control button several times. 3. PROBLEM There is supported by increment or decrement numbers) until... normal PC operating environment. PROBLEM There is outside of modes supported by this LCD Monitor. Turn off the LCD Monitor and then turn it does not function with a CRT Monitor but it back on the LCD Monitor, please perform the following steps : 1. Check the screen to the output timing...
...status while you have chosen an output timing that is no picture on the correct timing. Choose a mode that is no picture on LCD Monitor If there's no picture, press the Adjustment Control button several times. 3. PROBLEM There is supported by increment or decrement numbers) until... normal PC operating environment. PROBLEM There is outside of modes supported by this LCD Monitor. Turn off the LCD Monitor and then turn it does not function with a CRT Monitor but it back on the LCD Monitor, please perform the following steps : 1. Check the screen to the output timing...


