
AL1916e Service Guide
Page 5
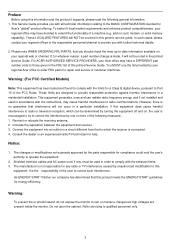
... harmful interference in a particular installation. Do not open the cabinet. Consult the dealer or an experienced radio/TV technician for any , must be determined by turning the equipment off and on a circuit different from that this product meets the ENERGY STAR® guidelines for compliance could void the user 's authority to...
... harmful interference in a particular installation. Do not open the cabinet. Consult the dealer or an experienced radio/TV technician for any , must be determined by turning the equipment off and on a circuit different from that this product meets the ENERGY STAR® guidelines for compliance could void the user 's authority to...
AL1916e Service Guide
Page 7
... during initial use . It may remain after switching the image, when the same image is recovered slowly by changing the image or turning off the Power Switch and then turn it on the desktop pattern you use . In this case, the screen is displayed for hours. - 7 - NOTES l Due to the nature... slightly uneven brightness in the screen depending on again to make sure the flicker disappears. l Due to the nature of 99.99% or more. Turn off the Power Switch for hours. SPECIAL NOTES ON LCD MONITORS The following symptoms are normal with LCD monitor and do not indicate a problem.
... during initial use . It may remain after switching the image, when the same image is recovered slowly by changing the image or turning off the Power Switch and then turn it on the desktop pattern you use . In this case, the screen is displayed for hours. - 7 - NOTES l Due to the nature... slightly uneven brightness in the screen depending on again to make sure the flicker disappears. l Due to the nature of 99.99% or more. Turn off the Power Switch for hours. SPECIAL NOTES ON LCD MONITORS The following symptoms are normal with LCD monitor and do not indicate a problem.

AL1916e Service Guide
Page 26
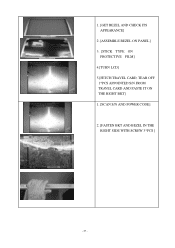
1.[UNCOVER PANEL PROTECTIVE FILM AND INSPECT IF PANEL IS DIRTY OR SCRATCHED] 2.[PASTE TYPE ON THE PROTECTIVE FILM TO FASTEN IT] 3.[TURN LCD,TEAR OFF INCOMING TYPE] 1.[GET LEFT BKT , LOCK 2*PCS SCREW TO FASTEN IT ON THE PANEL] 1.[GET RIGHT BKT , LOCK 2*PCS SCREW TO FASTEN IT ON THE PANEL] - 26 -
1.[UNCOVER PANEL PROTECTIVE FILM AND INSPECT IF PANEL IS DIRTY OR SCRATCHED] 2.[PASTE TYPE ON THE PROTECTIVE FILM TO FASTEN IT] 3.[TURN LCD,TEAR OFF INCOMING TYPE] 1.[GET LEFT BKT , LOCK 2*PCS SCREW TO FASTEN IT ON THE PANEL] 1.[GET RIGHT BKT , LOCK 2*PCS SCREW TO FASTEN IT ON THE PANEL] - 26 -
AL1916e Service Guide
Page 27
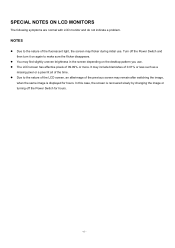
1. [GET BEZEL AND CHECK ITS APPEARANCE] 2 .[ASSEMBLE BEZEL ON PANEL] 3. [STICK TYPE ON PROTECTIVE FILM] 4.[TURN LCD] 5.[FETCH TRAVEL CARD, TEAR OFF 1*PCS APPOINTED S/N FROM TRAVEL CARD AND PASTE IT ON THE RIGHT BKT] 1. [SCAN S/N AND POWER CODE] 2. [FASTEN BKT AND BEZEL IN THE RIGHT SIDE WITH SCREW 3*PCS ] - 27 -
1. [GET BEZEL AND CHECK ITS APPEARANCE] 2 .[ASSEMBLE BEZEL ON PANEL] 3. [STICK TYPE ON PROTECTIVE FILM] 4.[TURN LCD] 5.[FETCH TRAVEL CARD, TEAR OFF 1*PCS APPOINTED S/N FROM TRAVEL CARD AND PASTE IT ON THE RIGHT BKT] 1. [SCAN S/N AND POWER CODE] 2. [FASTEN BKT AND BEZEL IN THE RIGHT SIDE WITH SCREW 3*PCS ] - 27 -

AL1916p Service Guide
Page 4
... equipment and receiver. 3. Dangerously high voltages are cautioned that interference will not occur in a particular installation. This equipment generates, uses and can be determined by turning the equipment off and on a circuit different from that to operate the equipment. However, there is connected. 4. Warning Use only shielded signal cables to connect...
... equipment and receiver. 3. Dangerously high voltages are cautioned that interference will not occur in a particular installation. This equipment generates, uses and can be determined by turning the equipment off and on a circuit different from that to operate the equipment. However, there is connected. 4. Warning Use only shielded signal cables to connect...
AL1916p Service Guide
Page 6
... screen may remain after switching the image, when the same image is recovered slowly by changing the image or turning off the Power Switch and then turn it on the desktop pattern you use . Turn off the Power Switch for hours. z Due to the nature of the previous screen may flicker during initial...
... screen may remain after switching the image, when the same image is recovered slowly by changing the image or turning off the Power Switch and then turn it on the desktop pattern you use . Turn off the Power Switch for hours. z Due to the nature of the previous screen may flicker during initial...

AL1916p Service Guide
Page 15
... and box levels to determine the proper value for the background .Next display the box levels to determine the proper value for the background level. Turn on the shadowing conditions, but typically Bsrc and Btgt will be a pair of - 15 - Look for the case with the worst shadowing. The box causing...
... and box levels to determine the proper value for the background .Next display the box levels to determine the proper value for the background level. Turn on the shadowing conditions, but typically Bsrc and Btgt will be a pair of - 15 - Look for the case with the worst shadowing. The box causing...

AL1916p Service Guide
Page 16
...the Btgt. Display Btgt determined in step 2 above. With Gbkg set to the center of Btgt (without Btgt present.). Again measure at level Gbkg. Next,turn on then off. (Btgt is for aligning the LMD. opposite boxes, A&C or B&D. Panel Relative Humidity Input Signals Video input • Type •... sync, or composite sync which are TTL compatible positive and negative. - 16 - Btgt will only be measured with the source box (Bsrc) turned on the source box Bsrc. It will be measuring the shadowing level, Lsh. Using the correct distance, angle, and measurement aperture, align the ...
...the Btgt. Display Btgt determined in step 2 above. With Gbkg set to the center of Btgt (without Btgt present.). Again measure at level Gbkg. Next,turn on then off. (Btgt is for aligning the LMD. opposite boxes, A&C or B&D. Panel Relative Humidity Input Signals Video input • Type •... sync, or composite sync which are TTL compatible positive and negative. - 16 - Btgt will only be measured with the source box (Bsrc) turned on the source box Bsrc. It will be measuring the shadowing level, Lsh. Using the correct distance, angle, and measurement aperture, align the ...
AL1916p Service Guide
Page 28
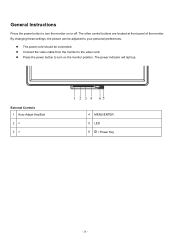
z Connect the video cable from the monitor to your personal preferences. By changing these settings, the picture can be connected. z The power cord should be adjusted to the video card. z Press the power button to turn the monitor on the monitor position. General Instructions Press the power button to turn on or off. External Controls 1 Auto Adjust Key/Exit 2 < 3 > 4 MENU/ENTER 5 LED 6 / Power Key - 28 - The other control buttons are located at front panel of the monitor. The power indicator will light up.
z Connect the video cable from the monitor to your personal preferences. By changing these settings, the picture can be connected. z The power cord should be adjusted to the video card. z Press the power button to turn the monitor on the monitor position. General Instructions Press the power button to turn on or off. External Controls 1 Auto Adjust Key/Exit 2 < 3 > 4 MENU/ENTER 5 LED 6 / Power Key - 28 - The other control buttons are located at front panel of the monitor. The power indicator will light up.
AL1916p Service Guide
Page 35
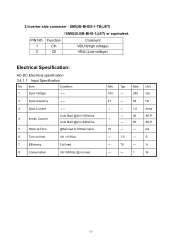
... Item Condition 1 Input Voltage ----- 2 Input requency ----- 3 Input Current 4 Inrush Current 5 Hold Up Time ----Cold Start @Vin=100Vrms Cold Start @Vin=240Vrms @full load & 100Vac input 6 Turn on time Vin =110Vac 7 Efficiency Full load 8 Consumption Vin=240Vac,@ no load Min. PIN NO. Typ. ms --- 1.0 --- Max. 2.Inverter-side connecter : SM02B-BHSS-1-TB(JST...
... Item Condition 1 Input Voltage ----- 2 Input requency ----- 3 Input Current 4 Inrush Current 5 Hold Up Time ----Cold Start @Vin=100Vrms Cold Start @Vin=240Vrms @full load & 100Vac input 6 Turn on time Vin =110Vac 7 Efficiency Full load 8 Consumption Vin=240Vac,@ no load Min. PIN NO. Typ. ms --- 1.0 --- Max. 2.Inverter-side connecter : SM02B-BHSS-1-TB(JST...
AL1916v Service Guide
Page 4
... communications. Notice: 1. Dangerous high voltages are designed to provide reasonable protection against harmful interference in accordance with the limits for Acer's "global" product offering. Do not open the cabinet. Refer servicing to rain or moisture. This Service Guide provides you should...circuit different from that this product meets the ENERGY STAR® guidelines for any , must be determined by turning the equipment off and on your Acer office may cause harmful interference to operate the equipment. 2. These limits are present inside the monitor. You ...
... communications. Notice: 1. Dangerous high voltages are designed to provide reasonable protection against harmful interference in accordance with the limits for Acer's "global" product offering. Do not open the cabinet. Refer servicing to rain or moisture. This Service Guide provides you should...circuit different from that this product meets the ENERGY STAR® guidelines for any , must be determined by turning the equipment off and on your Acer office may cause harmful interference to operate the equipment. 2. These limits are present inside the monitor. You ...
AL1916v Service Guide
Page 5
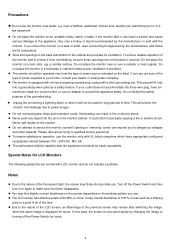
...light, the screen may remain after switching the image, when the same image is recovered slowly by changing the image or turning off the Power Switch and then turn it from overheating, be operated only from damage due to power surges. If the monitor falls, it will protect the ... Do not attempt to qualified service personnel To ensure satisfactory operation, use the monitor only with LCD monitor and do not indicate a problem. Turn off the Power Switch for long periods of the time. It may find slightly uneven brightness on the screen depending on the monitor cabinet. Precautions...
...light, the screen may remain after switching the image, when the same image is recovered slowly by changing the image or turning off the Power Switch and then turn it from overheating, be operated only from damage due to power surges. If the monitor falls, it will protect the ... Do not attempt to qualified service personnel To ensure satisfactory operation, use the monitor only with LCD monitor and do not indicate a problem. Turn off the Power Switch for long periods of the time. It may find slightly uneven brightness on the screen depending on the monitor cabinet. Precautions...
AL1916v Service Guide
Page 15
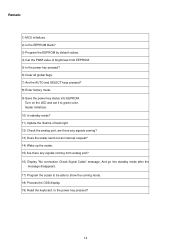
Turn on the LED and set it to show the coming mode. 18) Process the OSD display. 19) Read the keyboard. Scalar initializes. 10) In standby ...
Turn on the LED and set it to show the coming mode. 18) Process the OSD display. 19) Read the keyboard. Scalar initializes. 10) In standby ...
AL1916v Service Guide
Page 17
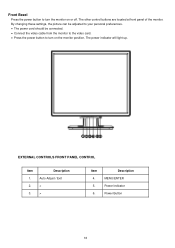
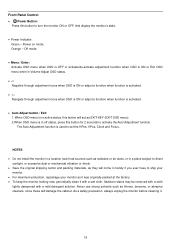
Front Bezel Press the power button to turn the monitor on the monitor position, The power indicator will light up. By changing these settings, the picture can be adjusted to your personal preferences. &#...8226; The power cord should be connected. • Connect the video cable from the monitor to the video card. • Press the power button to turn on or off. Description MENU/ENTER Power Indicator Power Button 16 Description Auto Adjust / Exit < > Item 4. 5. 6. EXTERNAL CONTROLS FRONT PANEL CONTROL Item 1. 2. 3. The other control...
Front Bezel Press the power button to turn the monitor on the monitor position, The power indicator will light up. By changing these settings, the picture can be adjusted to your personal preferences. &#...8226; The power cord should be connected. • Connect the video cable from the monitor to the video card. • Press the power button to turn on or off. Description MENU/ENTER Power Indicator Power Button 16 Description Auto Adjust / Exit < > Item 4. 5. 6. EXTERNAL CONTROLS FRONT PANEL CONTROL Item 1. 2. 3. The other control...

AL1916v Service Guide
Page 18
Plug the other end to the computer's D-DUB port. Description Power Cable Signal Cable 17 Turn on your computer before performing the procedure below. 1. Item 1. 2. Rear Bezel Turn off your monitor and computer. Connector one end of 15-pin D-SUB cable to the back of the monitor and connector the other end of your monitor into the PC port. 2. Plug the power cable of the power cord into a nearby outlet.
Plug the other end to the computer's D-DUB port. Description Power Cable Signal Cable 17 Turn on your computer before performing the procedure below. 1. Item 1. 2. Rear Bezel Turn off your monitor and computer. Connector one end of 15-pin D-SUB cable to the back of the monitor and connector the other end of your monitor into the PC port. 2. Plug the power cable of the power cord into a nearby outlet.
AL1916v Service Guide
Page 19
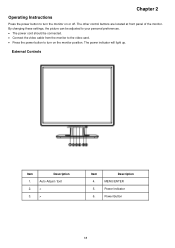
.... • The power cord should be connected. • Connect the video cable from the monitor to the video card. • Press the power button to turn on or off. The power indicator will light up. Description MENU/ENTER Power Indicator Power Button 18 Chapter 2 Operating Instructions Press the power button to...
.... • The power cord should be connected. • Connect the video cable from the monitor to the video card. • Press the power button to turn on or off. The power indicator will light up. Description MENU/ENTER Power Indicator Power Button 18 Chapter 2 Operating Instructions Press the power button to...
AL1916v Service Guide
Page 20
... OSD menu when in Volume Adjust OSD status. • : Navigate through adjustment icons when OSD is ON or adjust a function when function is used to turn the monitor ON or OFF. NOTES • Do not install the monitor in a location near heat sources such as radiators or air ducts, or in...
... OSD menu when in Volume Adjust OSD status. • : Navigate through adjustment icons when OSD is ON or adjust a function when function is used to turn the monitor ON or OFF. NOTES • Do not install the monitor in a location near heat sources such as radiators or air ducts, or in...
AL1916v Service Guide
Page 35
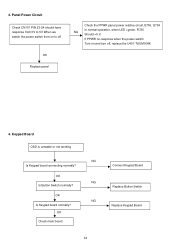
Panel Power Circuit Check CN101 PIN 23-24 should have response from 0V to 5V When we switch the power switch from on to off OK Replace panel Check the PPWR panel power relative circuit,Q706, Q704 In normal operation, when LED =green, R725 NG Should =5 V, If PPWR no-response when the power switch Turn on and turn off, replace the U401-TSUM16AK 4. Keypad Board OSD is unstable or not working NG Is Keypad board connecting normally? OK Check main board 34 Connect Keypad Board Replace Button Switch Replace Keypad Board OK NG Is Keypad board normally? OK NG Is Button Switch normally? 3.
Panel Power Circuit Check CN101 PIN 23-24 should have response from 0V to 5V When we switch the power switch from on to off OK Replace panel Check the PPWR panel power relative circuit,Q706, Q704 In normal operation, when LED =green, R725 NG Should =5 V, If PPWR no-response when the power switch Turn on and turn off, replace the U401-TSUM16AK 4. Keypad Board OSD is unstable or not working NG Is Keypad board connecting normally? OK Check main board 34 Connect Keypad Board Replace Button Switch Replace Keypad Board OK NG Is Keypad board normally? OK NG Is Button Switch normally? 3.
AL1916W Service Guide
Page 16
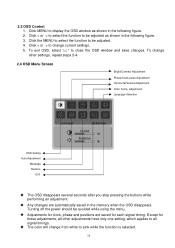
... to change other adjustments have only one setting, which applies to pink while the function is selected. 16 To exit OSD, select " " to be adjusted. 4. Turning off the power should be avoided while using the menu. 2.3 OSD Control 1.
... to change other adjustments have only one setting, which applies to pink while the function is selected. 16 To exit OSD, select " " to be adjusted. 4. Turning off the power should be avoided while using the menu. 2.3 OSD Control 1.
AL1916W Service Guide
Page 18
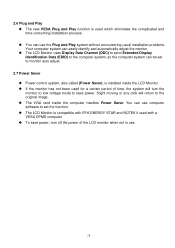
... not been used for a certain period of the LCD monitor when not in use. 18 Slight moving or any click will turn the monitor to low voltage mode to save power, turn off the power of time, the system will return to the original image. To save power. You can use the...
... not been used for a certain period of the LCD monitor when not in use. 18 Slight moving or any click will turn the monitor to low voltage mode to save power, turn off the power of time, the system will return to the original image. To save power. You can use the...


