
AL1916e Service Guide
Page 6
Use only a trolley or stand recommended by the manufacture and follow the kit instructions. To ensure reliable operation of the monitor and to your home, consult your outlet does not ...accommodate the three-wire plug, have appropriate configured receptacles marked between 100-240V AC, Min. 3.5A. Do not place the monitor on an unstable trolley, stand, or table. Do not place the monitor in a wet basement. If your dealer or local power company. This will fit only into the slot on...
Use only a trolley or stand recommended by the manufacture and follow the kit instructions. To ensure reliable operation of the monitor and to your home, consult your outlet does not ...accommodate the three-wire plug, have appropriate configured receptacles marked between 100-240V AC, Min. 3.5A. Do not place the monitor on an unstable trolley, stand, or table. Do not place the monitor in a wet basement. If your dealer or local power company. This will fit only into the slot on...
AL1916e Service Guide
Page 31
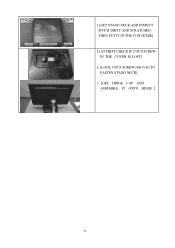
1.[GET STAND NECK AND INSPECT IF IT IS DIRTY AND SCRATCHED, THEN PUT IT IN THE CONVEYER] 1.[AT FIRST CHECK IF 2*PCS SCREW IN THE COVER IS LOST] 2. [LOCK 4*PCS SCREW (M4*8-B) TO FASTEN STAND NECK] 3. [GET HINGE CAP AND ASSEMBLE IT ONTO HINGE ] - 31 -
1.[GET STAND NECK AND INSPECT IF IT IS DIRTY AND SCRATCHED, THEN PUT IT IN THE CONVEYER] 1.[AT FIRST CHECK IF 2*PCS SCREW IN THE COVER IS LOST] 2. [LOCK 4*PCS SCREW (M4*8-B) TO FASTEN STAND NECK] 3. [GET HINGE CAP AND ASSEMBLE IT ONTO HINGE ] - 31 -
AL1916p Service Guide
Page 5
z Do not place the monitor on a bed, sofa, rug or similar surface. Do not place the monitor on an unstable trolley, stand, or table. z The monitor should be used for ventilation. If your dealer or local power company. z Do not attempt to qualified service personnel....shelf, use the monitor near or over a radiator or heat register. Please refer all servicing to service the monitor yourself; Use only a trolley or stand recommended by the manufacture and follow the kit instructions. If you to ground the appliance safely. z To ensure satisfactory operation, use an adapter to ...
z Do not place the monitor on a bed, sofa, rug or similar surface. Do not place the monitor on an unstable trolley, stand, or table. z The monitor should be used for ventilation. If your dealer or local power company. z Do not attempt to qualified service personnel....shelf, use the monitor near or over a radiator or heat register. Please refer all servicing to service the monitor yourself; Use only a trolley or stand recommended by the manufacture and follow the kit instructions. If you to ground the appliance safely. z To ensure satisfactory operation, use an adapter to ...
AL1916v Service Guide
Page 5
... covers can injure a person and cause serious damage to the appliance. It may find slightly uneven brightness on the screen depending on an unstable trolley, stand, or table. Do not place the monitor on the monitor. Never spill liquids on a bed, sofa, rug, or similar surface. The wall socket shall ... install the correct outlet, or use the monitor near or over a radiator or heat register. Notes Due to power surges. Use only a trolley or stand recommended by changing the image or turning off the Power Switch and then turn it will not be operated only from damage due to the...
... covers can injure a person and cause serious damage to the appliance. It may find slightly uneven brightness on the screen depending on an unstable trolley, stand, or table. Do not place the monitor on the monitor. Never spill liquids on a bed, sofa, rug, or similar surface. The wall socket shall ... install the correct outlet, or use the monitor near or over a radiator or heat register. Notes Due to power surges. Use only a trolley or stand recommended by changing the image or turning off the Power Switch and then turn it will not be operated only from damage due to the...
AL1916v Service Guide
Page 26
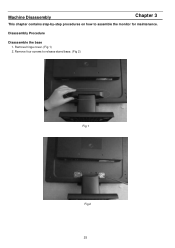
Machine Disassembly Chapter 3 This chapter contains step-by-step procedures on how to release stand base. (Fig 2) Fig 1 Fig 2 25 Disassembly Procedure Disassemble the base 1. Remove hinge cover. (Fig 1) 2. Remove four screws to assemble the monitor for maintenance.
Machine Disassembly Chapter 3 This chapter contains step-by-step procedures on how to release stand base. (Fig 2) Fig 1 Fig 2 25 Disassembly Procedure Disassemble the base 1. Remove hinge cover. (Fig 1) 2. Remove four screws to assemble the monitor for maintenance.
AL1916v Service Guide
Page 41
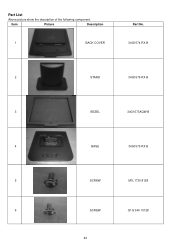
Item Picture Description 1 BACK COVER Part No. 34G1574 RX B 2 STAND 34G1576 RX B 3 BEZEL 34G1573AQW B 4 BASE 34G1575 RX B 5 SCREW M1L1730 8128 6 SCREW Q1G 340 10128 40 Part List Above picture show the description of the following component.
Item Picture Description 1 BACK COVER Part No. 34G1574 RX B 2 STAND 34G1576 RX B 3 BEZEL 34G1573AQW B 4 BASE 34G1575 RX B 5 SCREW M1L1730 8128 6 SCREW Q1G 340 10128 40 Part List Above picture show the description of the following component.
AL1916W Service Guide
Page 19
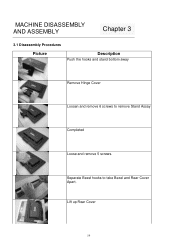
Lift up Rear Cover 19 MACHINE DISASSEMBLY AND ASSEMBLY Chapter 3 3.1 Disassembly Procedures Picture Description Push the hooks and stand bottom away Remove Hinge Cover Loosen and remove 6 screws to take Bezel and Rear Cover Apart. Separate Bezel hooks to remove Stand Assay Completed Loose and remove 5 screws.
Lift up Rear Cover 19 MACHINE DISASSEMBLY AND ASSEMBLY Chapter 3 3.1 Disassembly Procedures Picture Description Push the hooks and stand bottom away Remove Hinge Cover Loosen and remove 6 screws to take Bezel and Rear Cover Apart. Separate Bezel hooks to remove Stand Assay Completed Loose and remove 5 screws.

AL1916W Service Guide
Page 26
Join hooks of Rear Cover with Bezel Fasten 5 screws Completed Fasten 6 screws Insert Stand Cover Have the hook latched 26
Join hooks of Rear Cover with Bezel Fasten 5 screws Completed Fasten 6 screws Insert Stand Cover Have the hook latched 26

AL1916W Service Guide
Page 35
Picture MONITOR CABLE Monitor 32F3018003 Cable,A150X2,30AWG, 180cm,Black,JCE Part name Description STAND BASE SEAT ASSY,A190A2H02 Vendor Part No. 40-D003442 LCD FRONT BEZEL Bezel Assy,A190E3-H02 40-D003450 LCD BACK REAR,A190A2-H02,ABS 40-D003444 COVER PA-757N, W/O AUDIO LCD STAND STAND ASSY,A190E3- 40-D003440 NECK H02,ABS ,BLACK Hinge Cover COVER HINGE,A190A2- 40-D003441 H02 PCBA COVER PCBA COVER 41-D002884 ASSY,A190E3,ASSY 35
Picture MONITOR CABLE Monitor 32F3018003 Cable,A150X2,30AWG, 180cm,Black,JCE Part name Description STAND BASE SEAT ASSY,A190A2H02 Vendor Part No. 40-D003442 LCD FRONT BEZEL Bezel Assy,A190E3-H02 40-D003450 LCD BACK REAR,A190A2-H02,ABS 40-D003444 COVER PA-757N, W/O AUDIO LCD STAND STAND ASSY,A190E3- 40-D003440 NECK H02,ABS ,BLACK Hinge Cover COVER HINGE,A190A2- 40-D003441 H02 PCBA COVER PCBA COVER 41-D002884 ASSY,A190E3,ASSY 35
AL1916W Service Guide
Page 37
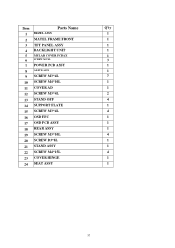
Item 1 2 3 4 5 6 7 8 9 10 11 12 13 14 15 16 17 18 19 20 21 22 23 24 Parts Name BEZEL ASSY MATEL FRAME FRONT TFT PANEL ASSY BACKLIGHT UNIT MYLAR COVER PCBAX SCREW M3*4L POWER PCB ASSY AD PCB ASSY SCREW M3*4L SCREW M4*10L COVER AD SCREW M3*4L STAND OFF SUPPORT FLATE SCREW M3*4L OSD FFC OSD PCB ASSY REAR ASSY SCREW M3*10L SCREW D3*8L STAND ASSY SCREW M4*15L COVER HINGE SEAT ASSY Q'ty 1 1 1 1 1 3 1 1 7 1 1 2 4 1 4 1 1 1 4 1 1 4 1 1 37
Item 1 2 3 4 5 6 7 8 9 10 11 12 13 14 15 16 17 18 19 20 21 22 23 24 Parts Name BEZEL ASSY MATEL FRAME FRONT TFT PANEL ASSY BACKLIGHT UNIT MYLAR COVER PCBAX SCREW M3*4L POWER PCB ASSY AD PCB ASSY SCREW M3*4L SCREW M4*10L COVER AD SCREW M3*4L STAND OFF SUPPORT FLATE SCREW M3*4L OSD FFC OSD PCB ASSY REAR ASSY SCREW M3*10L SCREW D3*8L STAND ASSY SCREW M4*15L COVER HINGE SEAT ASSY Q'ty 1 1 1 1 1 3 1 1 7 1 1 2 4 1 4 1 1 1 4 1 1 4 1 1 37


