
AL1912 Service Guide
Page 4
... operate the equipment. However, there is connected. 4. As an ENERGY STAR® Partner our company has determined that changes or modifications not expressly approved by turning the equipment off and on a circuit different from that interference will not occur in a residential installation. Refer servicing to rain or moisture. These limits are...
... operate the equipment. However, there is connected. 4. As an ENERGY STAR® Partner our company has determined that changes or modifications not expressly approved by turning the equipment off and on a circuit different from that interference will not occur in a residential installation. Refer servicing to rain or moisture. These limits are...
AL1912 Service Guide
Page 6
....99% or more. It may remain after switching the image, when the same image is recovered slowly by changing the image or turning off the Power Switch and then turn it on the desktop pattern you use . SPECIAL NOTES ON LCD MONITORS The following symptoms are normal with LCD monitor and do...
....99% or more. It may remain after switching the image, when the same image is recovered slowly by changing the image or turning off the Power Switch and then turn it on the desktop pattern you use . SPECIAL NOTES ON LCD MONITORS The following symptoms are normal with LCD monitor and do...
AL1912 Service Guide
Page 19
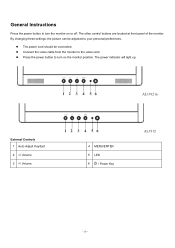
Connect the video cable from the monitor to the video card. The power indicator will light up. The power cord should be adjusted to your personal preferences. By changing these settings, the picture can be connected. Press the power button to turn the monitor on the monitor position. AL1912 m External Controls 1 Auto Adjust Key/Exit 2 / Volume 4 MENU/ENTER 5 LED 6 / Power Key AL1912 - 19 - The other control buttons are located at front panel of the monitor. General Instructions Press the power button to turn on or off.
Connect the video cable from the monitor to the video card. The power indicator will light up. The power cord should be adjusted to your personal preferences. By changing these settings, the picture can be connected. Press the power button to turn the monitor on the monitor position. AL1912 m External Controls 1 Auto Adjust Key/Exit 2 / Volume 4 MENU/ENTER 5 LED 6 / Power Key AL1912 - 19 - The other control buttons are located at front panel of the monitor. General Instructions Press the power button to turn on or off.
AL1912 Service Guide
Page 26
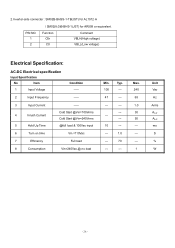
...50 ------- 1 Unit Vac Hz Arms A0-P A0-P ms S % W - 26 - Typ 1.0 70 --- 2.Inverter-side connecter : SM02B-BHSS-1-TB(JST) for AL1912 m PIN NO. 1 2 / SM02(8.0)B-BHS-1(JST) for AR599 or equivalent. Function Cth Ctl Comment VBLH(High voltage) VBLL(Low voltage) Electrical Specification: AC-DC Electrical ... Input Frequency ----- 3 Input Current 4 Inrush Current 5 Hold Up Time ----Cold Start @Vin=100Vrms Cold Start @Vin=240Vrms @full load & 100Vac input 6 Turn on time Vin =110Vac 7 Efficiency Full load 8 Consumption Vin=240Vac,@ no load Min. 100 47 --- --- 10 -------
...50 ------- 1 Unit Vac Hz Arms A0-P A0-P ms S % W - 26 - Typ 1.0 70 --- 2.Inverter-side connecter : SM02B-BHSS-1-TB(JST) for AL1912 m PIN NO. 1 2 / SM02(8.0)B-BHS-1(JST) for AR599 or equivalent. Function Cth Ctl Comment VBLH(High voltage) VBLL(Low voltage) Electrical Specification: AC-DC Electrical ... Input Frequency ----- 3 Input Current 4 Inrush Current 5 Hold Up Time ----Cold Start @Vin=100Vrms Cold Start @Vin=240Vrms @full load & 100Vac input 6 Turn on time Vin =110Vac 7 Efficiency Full load 8 Consumption Vin=240Vac,@ no load Min. 100 47 --- --- 10 -------

AL1912 User's Guide
Page 2
... Part 15 of the FCC Rules. FCC Statement Warning This equipment has been tested and found to comply with the instruction, may be determined by turning the equipment off and on, the user is encouraged to try to correct the interference by the party responsible for help. Warning Use only shielded...
... Part 15 of the FCC Rules. FCC Statement Warning This equipment has been tested and found to comply with the instruction, may be determined by turning the equipment off and on, the user is encouraged to try to correct the interference by the party responsible for help. Warning Use only shielded...
AL1912 User's Guide
Page 7
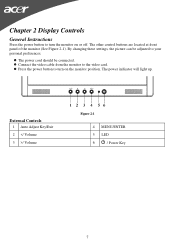
External Controls 1 Auto Adjust Key/Exit 2 / Volume Figure 2-1 4 MENU/ENTER 5 LED 6 / Power Key 7 Connect the video cable from the monitor to turn the monitor on the monitor position. The power cord should be adjusted to turn on or off. Press the power button to the video card. Chapter 2 Display Controls General Instructions Press the power button to your personal preferences. The other control buttons are located at front panel of the monitor (See Figure 2-1). The power indicator will light up. By changing these settings, the picture can be connected.
External Controls 1 Auto Adjust Key/Exit 2 / Volume Figure 2-1 4 MENU/ENTER 5 LED 6 / Power Key 7 Connect the video cable from the monitor to turn the monitor on the monitor position. The power cord should be adjusted to turn on or off. Press the power button to the video card. Chapter 2 Display Controls General Instructions Press the power button to your personal preferences. The other control buttons are located at front panel of the monitor (See Figure 2-1). The power indicator will light up. By changing these settings, the picture can be connected.

AL1912 User's Guide
Page 8
Power On mode. Auto Adjust button / Exit: 1. The Auto Adjustment function is used to turn the monitor ON or OFF, And display the monitor's state. As a safety precaution, always unplug the monitor before cleaning it with a mild detergent solution. When ...
Power On mode. Auto Adjust button / Exit: 1. The Auto Adjustment function is used to turn the monitor ON or OFF, And display the monitor's state. As a safety precaution, always unplug the monitor before cleaning it with a mild detergent solution. When ...

AL1912 User's Guide
Page 15
... system is outside of the "Clock" function in the Standard Timing Table or replace the VGA card, and then repeat steps 1 and 2. Turn off the LCD Monitor and then turn it does not function with a CRT Monitor but it back on timing. 2. Choose a mode that is running on LCD Monitor If you...
... system is outside of the "Clock" function in the Standard Timing Table or replace the VGA card, and then repeat steps 1 and 2. Turn off the LCD Monitor and then turn it does not function with a CRT Monitor but it back on timing. 2. Choose a mode that is running on LCD Monitor If you...


