
User Manual
Page 3
...CPU Installation 14 2.4 Installation of Heatsink and CPU fan 16 2.5 Installation of Memory Modules (DIMM 17 2.6 Expansion Slots (PCI and PCI Express Slots 19 2.7 Jumpers Setup 20 2.8 Onboard Headers and Connectors 21 2.9 SATAII Hard Disk Setup Guide 25 2.10 Serial ATA (SATA) / Serial ATAII (SATAII) Hard Disks Installation 26 2.11 Hot Plug Function for SATA / SATAII HDDs 26 2.12 SATA / SATAII HDD Hot Plug Feature and Operation Guide 27 2.13 Driver Installation Guide 29 2.14 Installing Windows® 7 / 7 64-bit / VistaTM / VistaTM 64-bit / XP / XP 64-bit 29 2.14.1 Installing Windows...
...CPU Installation 14 2.4 Installation of Heatsink and CPU fan 16 2.5 Installation of Memory Modules (DIMM 17 2.6 Expansion Slots (PCI and PCI Express Slots 19 2.7 Jumpers Setup 20 2.8 Onboard Headers and Connectors 21 2.9 SATAII Hard Disk Setup Guide 25 2.10 Serial ATA (SATA) / Serial ATAII (SATAII) Hard Disks Installation 26 2.11 Hot Plug Function for SATA / SATAII HDDs 26 2.12 SATA / SATAII HDD Hot Plug Feature and Operation Guide 27 2.13 Driver Installation Guide 29 2.14 Installing Windows® 7 / 7 64-bit / VistaTM / VistaTM 64-bit / XP / XP 64-bit 29 2.14.1 Installing Windows...
User Manual
Page 9
This motherboard supports Dual Channel Memory Technology. D-Sub, DVI-D and HDMI monitors cannot be enabled only if the display supports 12bpc in EDID. Before installing SATAII hard disk to SATAII connector, please read the "SATAII Hard Disk Setup Guide" on page 25 to adjust your hardware devices to get the best system performance under Windows® 7 / VistaTM / XP. It is a revolutionary technology that only support up to read "Untied Overclocking Technology" on page 17 for the...
This motherboard supports Dual Channel Memory Technology. D-Sub, DVI-D and HDMI monitors cannot be enabled only if the display supports 12bpc in EDID. Before installing SATAII hard disk to SATAII connector, please read the "SATAII Hard Disk Setup Guide" on page 25 to adjust your hardware devices to get the best system performance under Windows® 7 / VistaTM / XP. It is a revolutionary technology that only support up to read "Untied Overclocking Technology" on page 17 for the...
User Manual
Page 10
... update your overclocking record under 100 mA current consumption. Although this utility, you what it back again. Your friends then can press key during the POST or press key to BIOS setup menu to spray thermal grease between the CPU and the heatsink when you checking with your OC settings as yours! To improve heat dissipation, remember to access ASRock Instant Flash. For EuP ready power supply...
... update your overclocking record under 100 mA current consumption. Although this utility, you what it back again. Your friends then can press key during the POST or press key to BIOS setup menu to spray thermal grease between the CPU and the heatsink when you checking with your OC settings as yours! To improve heat dissipation, remember to access ASRock Instant Flash. For EuP ready power supply...

User Manual
Page 11
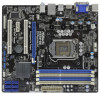
... ATX 12V Power Connector (ATX12V1) 21 System Panel Header (PANEL1, White) 4 CPU Fan Connector (CPU_FAN1) 22 USB 2.0 Header (USB6_7, Blue) 5 Power Fan Connector (PWR_FAN1) 23 Clear CMOS Jumper (CLRCMOS1) 6 1156-Pin CPU Socket 24 USB 2.0 Header (USB8_9, Blue) 7 2 x 240-pin DDR3 DIMM Slots 25 USB 2.0 Header (USB10_11, Blue) (Dual Channel: DDR3_A2, DDR3_B2, Blue) 26 USB_PWR3 Jumper 8 2 x 240-pin DDR3 DIMM Slots 27 TPM Header (TPMS1) (Dual Channel: DDR3_A1, DDR3_B1, White) 28 Infrared Module Header (IR1) 9 ATX Power Connector (ATXPWR1) 29 Print Port Header (LPT1, White) 10 Chassis...
... ATX 12V Power Connector (ATX12V1) 21 System Panel Header (PANEL1, White) 4 CPU Fan Connector (CPU_FAN1) 22 USB 2.0 Header (USB6_7, Blue) 5 Power Fan Connector (PWR_FAN1) 23 Clear CMOS Jumper (CLRCMOS1) 6 1156-Pin CPU Socket 24 USB 2.0 Header (USB8_9, Blue) 7 2 x 240-pin DDR3 DIMM Slots 25 USB 2.0 Header (USB10_11, Blue) (Dual Channel: DDR3_A2, DDR3_B2, Blue) 26 USB_PWR3 Jumper 8 2 x 240-pin DDR3 DIMM Slots 27 TPM Header (TPMS1) (Dual Channel: DDR3_A1, DDR3_B1, White) 28 Infrared Module Header (IR1) 9 ATX Power Connector (ATXPWR1) 29 Print Port Header (LPT1, White) 10 Chassis...

User Manual
Page 25
... the updates. 25 Please visit the vendors' website for changing various ATA features. Western Digital 7531 8642 If pin 5 and pin 6 are just for details: http://www.hitachigst.com/hdd/support/download.htm The above examples are shorted, SATA 1.5Gb/s will be enabled. For different SATAII hard disk products of SATAII hard disks may not be the same. Some default setting of different vendors, the jumper pin setting methods...
... the updates. 25 Please visit the vendors' website for changing various ATA features. Western Digital 7531 8642 If pin 5 and pin 6 are just for details: http://www.hitachigst.com/hdd/support/download.htm The above examples are shorted, SATA 1.5Gb/s will be enabled. For different SATAII hard disk products of SATAII hard disks may not be the same. Some default setting of different vendors, the jumper pin setting methods...
User Manual
Page 29
... to install Windows® 7 / 7 64-bit / VistaTM / VistaTM 64-bit OS on your SATA / SATAII HDDs, please follow below steps. AHCI mode is not supported under Windows® XP / XP 64-bit OS. B. B. Then, the drivers compatible to your optical drive first. Enter BIOS SETUP UTILITY Advanced screen Storage Configuration. 2.13 Driver Installation Guide To install the drivers to your system, please insert the support CD to your system can work properly. 2.14 Installing Windows® 7 / 7 64-bit / VistaTM / VistaTM 64-bit...
... to install Windows® 7 / 7 64-bit / VistaTM / VistaTM 64-bit OS on your SATA / SATAII HDDs, please follow below steps. AHCI mode is not supported under Windows® XP / XP 64-bit OS. B. B. Then, the drivers compatible to your optical drive first. Enter BIOS SETUP UTILITY Advanced screen Storage Configuration. 2.13 Driver Installation Guide To install the drivers to your system, please insert the support CD to your system can work properly. 2.14 Installing Windows® 7 / 7 64-bit / VistaTM / VistaTM 64-bit...
User Manual
Page 33
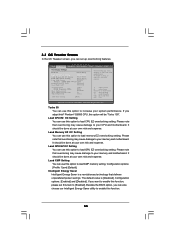
BIOS SETUP UTILITY Main OC Tweaker Advanced H/W Monitor Boot Security Exit OC Tweaker Settings Turbo 50 [Press Enter] Load CPU EZ OC Setting [Press Enter] Load Memory EZ OC Setting Load GPU EZ OC Setting Load XMP Setting [Press Enter] [Press Enter] [Default] Profile 1 : DDR3 2000 9-9-9-27 1.65V Intelligent Energy Saver [Disabled] Good Night LED [Disabled] Overclock Mode BCLK Frequency (MHz) Boot Failure Guard Boot Failure Guard Count Spread Spectrum [Auto] [133] [Enabled] [3] [Auto] CPU Ratio Setting 24[24] Overclocking may cause damage to your memory and motherboard. Turbo ...
BIOS SETUP UTILITY Main OC Tweaker Advanced H/W Monitor Boot Security Exit OC Tweaker Settings Turbo 50 [Press Enter] Load CPU EZ OC Setting [Press Enter] Load Memory EZ OC Setting Load GPU EZ OC Setting Load XMP Setting [Press Enter] [Press Enter] [Default] Profile 1 : DDR3 2000 9-9-9-27 1.65V Intelligent Energy Saver [Disabled] Good Night LED [Disabled] Overclock Mode BCLK Frequency (MHz) Boot Failure Guard Boot Failure Guard Count Spread Spectrum [Auto] [133] [Enabled] [3] [Auto] CPU Ratio Setting 24[24] Overclocking may cause damage to your memory and motherboard. Turbo ...
User Manual
Page 38
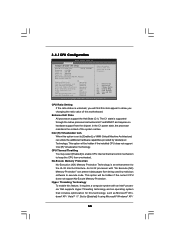
... Threading Technology To enable this motherboard. 3.4.1CPU Configuration BIOS SETUP UTILITY Advanced Configure advanded CPU settings Intel (R) Core (TM) CPU 870 @ 2.93GHz Frequency :2.93GHz Cache L1 :128 KB Cache L2 :1024 KB Cache L3 :8192 KB Ratio Status:Unlocked (Min:09, Max:22) Ratio Actual Value:22 CPU Ratio Setting 20 [Auto] Enhanced Halt State [Disabled] Intel (R) Virtualization tech. [Enabled] CPU Thermal Throttling [Enabled] No-Excute Memory Protection [Disabled] Hyper Threading Technology [Enabled] Active Processor Cores [All] A20M [Disabled...
... Threading Technology To enable this motherboard. 3.4.1CPU Configuration BIOS SETUP UTILITY Advanced Configure advanded CPU settings Intel (R) Core (TM) CPU 870 @ 2.93GHz Frequency :2.93GHz Cache L1 :128 KB Cache L2 :1024 KB Cache L3 :8192 KB Ratio Status:Unlocked (Min:09, Max:22) Ratio Actual Value:22 CPU Ratio Setting 20 [Auto] Enhanced Halt State [Disabled] Intel (R) Virtualization tech. [Enabled] CPU Thermal Throttling [Enabled] No-Excute Memory Protection [Disabled] Hyper Threading Technology [Enabled] Active Processor Cores [All] A20M [Disabled...
User Manual
Page 40
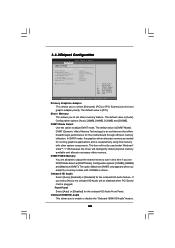
... set share memory feature. The default value is [PCI]. DVMT (Dynamic Video Memory Technology) is plugged. If you to select [Onboard], [PCI] or [PCI Express] as needed for the motherboard through efficient memory utilization. Onboard HDMI HD Audio This allows you select [Auto], the onboard HD Audio will intelligently detect physical memory available and allocate necessary video memory. In DVMT mode, the graphics driver allocates memory as the boot graphic adapter priority. Front Panel Select [Auto] or [Disabled] for the onboard HD Audio feature. The option...
... set share memory feature. The default value is [PCI]. DVMT (Dynamic Video Memory Technology) is plugged. If you to select [Onboard], [PCI] or [PCI Express] as needed for the motherboard through efficient memory utilization. Onboard HDMI HD Audio This allows you select [Auto], the onboard HD Audio will intelligently detect physical memory available and allocate necessary video memory. In DVMT mode, the graphics driver allocates memory as the boot graphic adapter priority. Front Panel Select [Auto] or [Disabled] for the onboard HD Audio feature. The option...

User Manual
Page 41
... Bit. Intel VT-d Configuration Use this item to enable or disable Intel® VT-d technology (Intel® Virtualization Technology for Directed I/O). Select [Auto] will enable this feature is [Disabled]. 3.4.3 ACPI Configuration BIOS SETUP UTILITY Advanced ACPI Configuration Suspend To RAM Restore on the system from the power-soft-off when the power recovers. PS/2 Keyboard Power On Use this item to enable or disable PCI devices to turn on the system from the power-soft-off mode. PCI Devices Power On Use this item to enable...
... Bit. Intel VT-d Configuration Use this item to enable or disable Intel® VT-d technology (Intel® Virtualization Technology for Directed I/O). Select [Auto] will enable this feature is [Disabled]. 3.4.3 ACPI Configuration BIOS SETUP UTILITY Advanced ACPI Configuration Suspend To RAM Restore on the system from the power-soft-off when the power recovers. PS/2 Keyboard Power On Use this item to enable or disable PCI devices to turn on the system from the power-soft-off mode. PCI Devices Power On Use this item to enable...

User Manual
Page 44
... Select Screen Select Item Change Option General Help Load Defaults Save and Exit Exit v02.54 (C) Copyright 1985-2005, American Megatrends, Inc. Configuration options: [Disabled], [Auto], [Enabled]. 32-Bit Data Transfer Use this item to maximize the IDE hard disk data transfer rate. 3.4.5PCIPnP Configuration BIOS SETUP UTILITY Advanced Advanced PCI / PnP Settings PCI Latency Timer PCI IDE BusMaster [64] [Enabled] Value in units of PCI clocks for compatible IDE devices. Use this item to enable 32-bit access to enable or disable the S.M.A.R.T. (Self-Monitoring, Analysis...
... Select Screen Select Item Change Option General Help Load Defaults Save and Exit Exit v02.54 (C) Copyright 1985-2005, American Megatrends, Inc. Configuration options: [Disabled], [Auto], [Enabled]. 32-Bit Data Transfer Use this item to maximize the IDE hard disk data transfer rate. 3.4.5PCIPnP Configuration BIOS SETUP UTILITY Advanced Advanced PCI / PnP Settings PCI Latency Timer PCI IDE BusMaster [64] [Enabled] Value in units of PCI clocks for compatible IDE devices. Use this item to enable 32-bit access to enable or disable the S.M.A.R.T. (Self-Monitoring, Analysis...

User Manual
Page 46
...Enabled], [Auto], [Disabled] and [BIOS Setup Only]. USB devices are allowed to use under BIOS setup and Windows / Linux OS. If you have USB compatibility issue, it is [Enabled]. USB devices are not allowed to use of these four options: [Enabled] - There are connected. [Disabled] - 3.4.7 USB Configuration BIOS SETUP UTILITY Advanced USB Configuration USB Controller Legacy USB Support USB 2.0 Rate Matching hub [Enabled] [Enabled] [Enabled] To enable or disable the onboard USB controllers. +F1 F9 F10 ESC Select Screen Select Item Change Option General Help Load Defaults...
...Enabled], [Auto], [Disabled] and [BIOS Setup Only]. USB devices are allowed to use under BIOS setup and Windows / Linux OS. If you have USB compatibility issue, it is [Enabled]. USB devices are not allowed to use of these four options: [Enabled] - There are connected. [Disabled] - 3.4.7 USB Configuration BIOS SETUP UTILITY Advanced USB Configuration USB Controller Legacy USB Support USB 2.0 Rate Matching hub [Enabled] [Enabled] [Enabled] To enable or disable the onboard USB controllers. +F1 F9 F10 ESC Select Screen Select Item Change Option General Help Load Defaults...

User Manual
Page 47
... On]. BIOS SETUP UTILITY Main OC Tweaker Advanced H/W Monitor Boot Security Exit Hardware Health Event Monitoring CPU Temperature M/B Temperature : 37 C / 98 F : 31 C / 87 F CPU Fan Speed Chassis Fan Speed Power Fan Speed : N/A : N/A : N/A Vcore + 3.30V + 5.00V + 12.00V CPU Fan Setting Chassis Fan Setting Case Open Feature : 1.152V : 3.312V : 11.968V : 5.080V [Enabled] F1 F9 F10 ESC Select Screen Select Item General Help Load Defaults Save and Exit Exit v02.54 (C) Copyright 1985-2003, American Megatrends, Inc. Configuration options: [Full On] and [Manual mode]. Use this...
... On]. BIOS SETUP UTILITY Main OC Tweaker Advanced H/W Monitor Boot Security Exit Hardware Health Event Monitoring CPU Temperature M/B Temperature : 37 C / 98 F : 31 C / 87 F CPU Fan Speed Chassis Fan Speed Power Fan Speed : N/A : N/A : N/A Vcore + 3.30V + 5.00V + 12.00V CPU Fan Setting Chassis Fan Setting Case Open Feature : 1.152V : 3.312V : 11.968V : 5.080V [Enabled] F1 F9 F10 ESC Select Screen Select Item General Help Load Defaults Save and Exit Exit v02.54 (C) Copyright 1985-2003, American Megatrends, Inc. Configuration options: [Full On] and [Manual mode]. Use this...

User Manual
Page 49
... the Numeric Lock function after boot-up. 3.7 Security Screen In this item is [Auto]. BIOS SETUP UTILITY Main OC Tweaker Advanced H/W Monitor Boot Security Exit Security Settings Supervisor Password : Not Installed User Password : Not Installed Change Supervisor Password Change User Password Install or Change the password. The default value is set or change the supervisor/user password for the system. Boot From Onboard LAN Use this option to select logo in POST screen. Select Screen Select Item Enter Change F1 General Help F9 Load Defaults F10 Save and Exit ESC...
... the Numeric Lock function after boot-up. 3.7 Security Screen In this item is [Auto]. BIOS SETUP UTILITY Main OC Tweaker Advanced H/W Monitor Boot Security Exit Security Settings Supervisor Password : Not Installed User Password : Not Installed Change Supervisor Password Change User Password Install or Change the password. The default value is set or change the supervisor/user password for the system. Boot From Onboard LAN Use this option to select logo in POST screen. Select Screen Select Item Enter Change F1 General Help F9 Load Defaults F10 Save and Exit ESC...

User Manual
Page 51
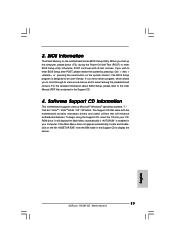
... the Main Menu did not appear automatically, locate and double click on a specific item then follow the installation wizard to your OS documentation for general reference only. Please install the necessary drivers to display the menus. 4.2.2 Drivers Menu The Drivers Menu shows the available devices drivers if the system detects installed devices. Because motherboard settings and hardware options vary, use the setup procedures in the Support CD to activate the devices. 4.2.3 Utilities Menu The Utilities Menu shows...
... the Main Menu did not appear automatically, locate and double click on a specific item then follow the installation wizard to your OS documentation for general reference only. Please install the necessary drivers to display the menus. 4.2.2 Drivers Menu The Drivers Menu shows the available devices drivers if the system detects installed devices. Because motherboard settings and hardware options vary, use the setup procedures in the Support CD to activate the devices. 4.2.3 Utilities Menu The Utilities Menu shows...
Quick Installation Guide
Page 2
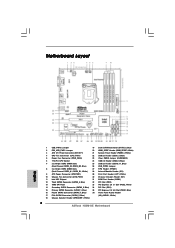
Motherboard Layout English 1 USB_PWR2 Jumper 19 Sixth SATAII Connector (SATAII_6, Blue) 2 PS2_USB_PWR1 Jumper 20 HDMI_SPDIF Header (HDMI_SPDIF1, White) 3 ATX 12V Power Connector (ATX12V1) 21 System Panel Header (PANEL1, White) 4 CPU Fan Connector (CPU_FAN1) 22 USB 2.0 Header (USB6_7, Blue) 5 Power Fan Connector (PWR_FAN1) 23 Clear CMOS Jumper (CLRCMOS1) 6 1156-Pin CPU Socket 24 USB 2.0 Header (USB8_9, Blue) 7 2 x 240-pin DDR3 DIMM Slots 25 USB 2.0 Header (USB10_11, Blue) (Dual Channel: DDR3_A2, DDR3_B2, Blue) 26 USB_PWR3 Jumper 8 2 x 240-pin DDR3 DIMM Slots 27 TPM Header (...
Motherboard Layout English 1 USB_PWR2 Jumper 19 Sixth SATAII Connector (SATAII_6, Blue) 2 PS2_USB_PWR1 Jumper 20 HDMI_SPDIF Header (HDMI_SPDIF1, White) 3 ATX 12V Power Connector (ATX12V1) 21 System Panel Header (PANEL1, White) 4 CPU Fan Connector (CPU_FAN1) 22 USB 2.0 Header (USB6_7, Blue) 5 Power Fan Connector (PWR_FAN1) 23 Clear CMOS Jumper (CLRCMOS1) 6 1156-Pin CPU Socket 24 USB 2.0 Header (USB8_9, Blue) 7 2 x 240-pin DDR3 DIMM Slots 25 USB 2.0 Header (USB10_11, Blue) (Dual Channel: DDR3_A2, DDR3_B2, Blue) 26 USB_PWR3 Jumper 8 2 x 240-pin DDR3 DIMM Slots 27 TPM Header (...
Quick Installation Guide
Page 8
... HDMI port. 9. Please visit our website for system usage under Windows® 7 64-bit / 7 / VistaTM 64-bit / VistaTM. 10. ASRock website: http://www.asrock.com/feature/IES/index.html 8 ASRock H55M-GE Motherboard English HBR is a user-friendly ASRock overclocking tool which allows you implement Dual Channel Memory Technology, make sure to SATAII mode. Before installing SATAII hard disk to DDR3 1333, the XMP DDR3 1600 is supported through overclocking. 7. This motherboard supports Untied Overclocking Technology. It is supported...
... HDMI port. 9. Please visit our website for system usage under Windows® 7 64-bit / 7 / VistaTM 64-bit / VistaTM. 10. ASRock website: http://www.asrock.com/feature/IES/index.html 8 ASRock H55M-GE Motherboard English HBR is a user-friendly ASRock overclocking tool which allows you implement Dual Channel Memory Technology, make sure to SATAII mode. Before installing SATAII hard disk to DDR3 1333, the XMP DDR3 1600 is supported through overclocking. 7. This motherboard supports Untied Overclocking Technology. It is supported...
Quick Installation Guide
Page 9
... the power supply manufacturer for more details. 9 ASRock H55M-GE Motherboard English Please be noticed that not all the 775 CPU Fan can load the OC profile to their own system to Intel's suggestion, the EuP ready power supply must use FAT32/16/12 file system. 15. With this utility, you can press key during the POST or press key to BIOS setup menu to update system BIOS without preparing an additional floppy...
... the power supply manufacturer for more details. 9 ASRock H55M-GE Motherboard English Please be noticed that not all the 775 CPU Fan can load the OC profile to their own system to Intel's suggestion, the EuP ready power supply must use FAT32/16/12 file system. 15. With this utility, you can press key during the POST or press key to BIOS setup menu to update system BIOS without preparing an additional floppy...
Quick Installation Guide
Page 21
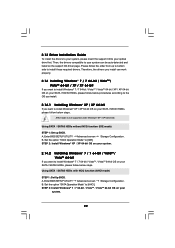
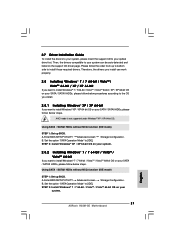
... "SATA Operation Mode" to [IDE]. Using SATA / SATAII HDDs without NCQ function (IDE mode) STEP 1: Set up BIOS. Set the option "SATA Operation Mode" to [IDE]. B. A. Enter BIOS SETUP UTILITY Advanced screen Storage Configuration. Enter BIOS SETUP UTILITY Advanced screen Storage Configuration. STEP 2: Install Windows® XP / XP 64-bit OS on your system. 2.8.2 Installing Windows® 7 / 7 64-bit / VistaTM / VistaTM 64-bit If you want to install Windows® 7 / 7 64-bit / VistaTM / VistaTM 64-bit OS on your system. 21 ASRock H55M-GE Motherboard English STEP 2: Install Windows...
... "SATA Operation Mode" to [IDE]. Using SATA / SATAII HDDs without NCQ function (IDE mode) STEP 1: Set up BIOS. Set the option "SATA Operation Mode" to [IDE]. B. A. Enter BIOS SETUP UTILITY Advanced screen Storage Configuration. Enter BIOS SETUP UTILITY Advanced screen Storage Configuration. STEP 2: Install Windows® XP / XP 64-bit OS on your system. 2.8.2 Installing Windows® 7 / 7 64-bit / VistaTM / VistaTM 64-bit If you want to install Windows® 7 / 7 64-bit / VistaTM / VistaTM 64-bit OS on your system. 21 ASRock H55M-GE Motherboard English STEP 2: Install Windows...
Quick Installation Guide
Page 23
... necessary drivers and useful utilities that came with its various sub-menus and to enter BIOS Setup after POST, please restart the system by pressing + + , or pressing the reset button on the system chassis. It is designed to display the menus. 23 ASRock H55M-GE Motherboard English It will enhance motherboard features. The BIOS Setup program is a menu-driven program, which allows you to the User Manual (PDF file) contained in the Support CD. 4. Software Support...
... necessary drivers and useful utilities that came with its various sub-menus and to enter BIOS Setup after POST, please restart the system by pressing + + , or pressing the reset button on the system chassis. It is designed to display the menus. 23 ASRock H55M-GE Motherboard English It will enhance motherboard features. The BIOS Setup program is a menu-driven program, which allows you to the User Manual (PDF file) contained in the Support CD. 4. Software Support...


