User Manual
Page 1
G41C-GS / G41C-S User Manual Version 1.0 Published December 2009 Copyright©2009 ASRock INC. All rights reserved. 1
G41C-GS / G41C-S User Manual Version 1.0 Published December 2009 Copyright©2009 ASRock INC. All rights reserved. 1
User Manual
Page 2
... defect or error in any form or by any means, except duplication of documentation by the California Legislature. With respect to the contents of this manual, ASRock does not provide warranty of any kind, either expressed or implied, including but not limited to change without notice, and should not be constructed as...
... defect or error in any form or by any means, except duplication of documentation by the California Legislature. With respect to the contents of this manual, ASRock does not provide warranty of any kind, either expressed or implied, including but not limited to change without notice, and should not be constructed as...
User Manual
Page 5
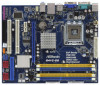
... to this manual occur, the updated version will be available on ASRock website as well. It delivers excellent performance with robust design conforming to ASRock's commitment to change without further notice. www.asrock.com/support/index.asp 1.1 Package Contents ASRock G41C-GS / G41C-S Motherboard (Micro ATX Form Factor: 9.6-in x 7.8-in, 24.4 cm x 19.8 cm) ASRock G41C-GS / G41C-S Quick Installation Guide ASRock G41C-GS / G41C-S Support...
... to this manual occur, the updated version will be available on ASRock website as well. It delivers excellent performance with robust design conforming to ASRock's commitment to change without further notice. www.asrock.com/support/index.asp 1.1 Package Contents ASRock G41C-GS / G41C-S Motherboard (Micro ATX Form Factor: 9.6-in x 7.8-in, 24.4 cm x 19.8 cm) ASRock G41C-GS / G41C-S Quick Installation Guide ASRock G41C-GS / G41C-S Support...
User Manual
Page 17
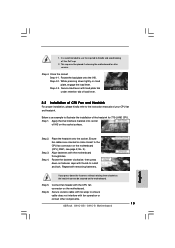
... you installed the heatsink, you press down on fastener caps with fan operation or contact other . For proper installation, please kindly refer to the instruction manuals of CPU Fan and Heatsink This motherboard is an example to illustrate the installation of heatsink and cooling fan compliant with 775-Pin socket that...
... you installed the heatsink, you press down on fastener caps with fan operation or contact other . For proper installation, please kindly refer to the instruction manuals of CPU Fan and Heatsink This motherboard is an example to illustrate the installation of heatsink and cooling fan compliant with 775-Pin socket that...
User Manual
Page 23
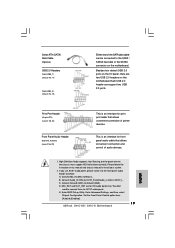
... this motherboard. C. Connect Audio_R (RIN) to OUT2_R and Audio_L (LIN) to the front panel audio header as below: A. D. Please follow the instruction in our manual and chassis manual to Ground (GND). B. Connect Ground (GND) to install your system. 2. You don't need to function correctly. Enter BIOS Setup Utility. Set the Front Panel...
... this motherboard. C. Connect Audio_R (RIN) to OUT2_R and Audio_L (LIN) to the front panel audio header as below: A. D. Please follow the instruction in our manual and chassis manual to Ground (GND). B. Connect Ground (GND) to install your system. 2. You don't need to function correctly. Enter BIOS Setup Utility. Set the Front Panel...
User Manual
Page 26
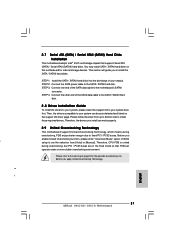
... the warning on the support CD driver page. STEP 3: Connect one end of BIOS setup to set the selection from up to bottom side to [Manual]. Please follow the order from [Auto] to install those required drivers. Therefore, the drivers you to the SATA / SATAII hard disk. This section will guide...
... the warning on the support CD driver page. STEP 3: Connect one end of BIOS setup to set the selection from up to bottom side to [Manual]. Please follow the order from [Auto] to install those required drivers. Therefore, the drivers you to the SATA / SATAII hard disk. This section will guide...
User Manual
Page 32
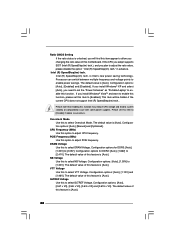
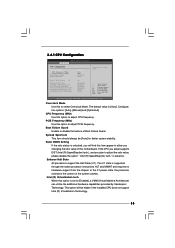
...], [1.66V] to enable power savings. VTT Voltage Use this to [2.05V]. This item will find this item appear to adjust CPU frequency. Configuration options: [Auto], [Manual] and [Optimized]. The default value of this feature is [Auto]. The default value of this motherboard. CPU Frequency (MHz) Use this option to allow you...
...], [1.66V] to enable power savings. VTT Voltage Use this to [2.05V]. This item will find this item appear to adjust CPU frequency. Configuration options: [Auto], [Manual] and [Optimized]. The default value of this feature is [Auto]. The default value of this motherboard. CPU Frequency (MHz) Use this option to allow you...
User Manual
Page 35
..., Inc. The default value is supported through the native processor instructions HLT and MWAIT and requires no hardware support from the chipset. Configuration options: [Auto], [Manual] and [Optimized]. PCIE Frequency (MHz) Use this option is unlocked, you will be [Auto] for better system stability. Enhance Halt State All processors support the...
..., Inc. The default value is supported through the native processor instructions HLT and MWAIT and requires no hardware support from the chipset. Configuration options: [Auto], [Manual] and [Optimized]. PCIE Frequency (MHz) Use this option is unlocked, you will be [Auto] for better system stability. Enhance Halt State All processors support the...

Quick Installation Guide
Page 5
... our website for purchasing ASRock G41C-GS / G41C-S motherboard, a reliable motherboard produced under ASRock's consistently stringent quality control. More detailed information of this manual will be found in the user manual presented in , 24.4 cm x 19.8 cm) ASRock G41C-GS / G41C-S Quick Installation Guide ASRock G41C-GS / G41C-S Support CD Two Serial ATA (SATA) Data Cables (Optional) One I/O Panel Shield English 5 ASRock G41C-GS / G41C-S Motherboard In case any...
... our website for purchasing ASRock G41C-GS / G41C-S motherboard, a reliable motherboard produced under ASRock's consistently stringent quality control. More detailed information of this manual will be found in the user manual presented in , 24.4 cm x 19.8 cm) ASRock G41C-GS / G41C-S Quick Installation Guide ASRock G41C-GS / G41C-S Support CD Two Serial ATA (SATA) Data Cables (Optional) One I/O Panel Shield English 5 ASRock G41C-GS / G41C-S Motherboard In case any...

Quick Installation Guide
Page 8
... Ready (EuP ready power supply is required) (see CAUTION 15) * For detailed product information, please visit our website: http://www.asrock.com WARNING Please realize that there is a certain risk involved with 64-bit CPU, there is subject to page 18 for system usage... Manual" in the support CD. 2. You can also connect SATA hard disk to adjust the jumper. Before installing SATAII hard disk to SATAII mode. For Windows® OS with overclocking, including adjusting the setting in overclocking mode. * When you need to SATAII connector directly. 8 ASRock G41C-GS / G41C-S...
... Ready (EuP ready power supply is required) (see CAUTION 15) * For detailed product information, please visit our website: http://www.asrock.com WARNING Please realize that there is a certain risk involved with 64-bit CPU, there is subject to page 18 for system usage... Manual" in the support CD. 2. You can also connect SATA hard disk to adjust the jumper. Before installing SATAII hard disk to SATAII mode. For Windows® OS with overclocking, including adjusting the setting in overclocking mode. * When you need to SATAII connector directly. 8 ASRock G41C-GS / G41C-S...
Quick Installation Guide
Page 13
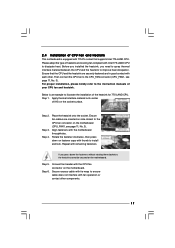
... on load plate, engage the load lever. Step 6. 1. Secure load lever with remaining fasteners. Align fasteners with thumb to the instruction manuals of the heatsink for after service. Step 4. Step 4-3. If you press down on the motherboard. Step 5. Rotate the fastener clockwise, ...cap tab to the CPU fan connector on the motherboard. Connect fan header with fan operation or contact other components. 13 ASRock G41C-GS / G41C-S Motherboard Step 4. Place the heatsink onto the socket. Secure excess cable with tie-wrap to illustrate the installation of your...
... on load plate, engage the load lever. Step 6. 1. Secure load lever with remaining fasteners. Align fasteners with thumb to the instruction manuals of the heatsink for after service. Step 4. Step 4-3. If you press down on the motherboard. Step 5. Rotate the fastener clockwise, ...cap tab to the CPU fan connector on the motherboard. Connect fan header with fan operation or contact other components. 13 ASRock G41C-GS / G41C-S Motherboard Step 4. Place the heatsink onto the socket. Secure excess cable with tie-wrap to illustrate the installation of your...
Quick Installation Guide
Page 19
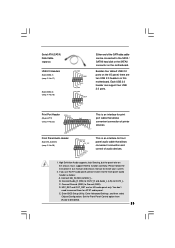
... Panel Control option from [Auto] to Ground (GND). Connect Ground (GND) to [Enabled]. 19 ASRock G41C-GS / G41C-S Motherboard English Enter BIOS Setup Utility. Besides four default USB 2.0 ports on the motherboard. Please follow the instruction in our manual and chassis manual to connect them for print port cable that allows convenient connection and control of...
... Panel Control option from [Auto] to Ground (GND). Connect Ground (GND) to [Enabled]. 19 ASRock G41C-GS / G41C-S Motherboard English Enter BIOS Setup Utility. Besides four default USB 2.0 ports on the motherboard. Please follow the instruction in our manual and chassis manual to connect them for print port cable that allows convenient connection and control of...
Quick Installation Guide
Page 21
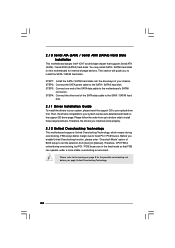
... your system, please insert the support CD to your optical drive first. STEP 4: Connect the other end of the SATA data cable to [Manual]. This section will guide you to fixed PCI / PCIE buses. Therefore, the drivers you apply Untied Overclocking Technology. STEP 2: Connect the SATA...of BIOS setup to set the selection from up to bottom side to the warning on page 8 for internal storage devices. English 21 ASRock G41C-GS / G41C-S Motherboard Before you enable Untied Overclocking function, please enter "Overclock Mode" option of your system can be auto-detected and listed on ...
... your system, please insert the support CD to your optical drive first. STEP 4: Connect the other end of the SATA data cable to [Manual]. This section will guide you to fixed PCI / PCIE buses. Therefore, the drivers you apply Untied Overclocking Technology. STEP 2: Connect the SATA...of BIOS setup to set the selection from up to bottom side to the warning on page 8 for internal storage devices. English 21 ASRock G41C-GS / G41C-S Motherboard Before you enable Untied Overclocking function, please enter "Overclock Mode" option of your system can be auto-detected and listed on ...
Quick Installation Guide
Page 22
... The Flash Memory on the system chassis. For the detailed information about BIOS Setup, please refer to the User Manual (PDF file) contained in the Support CD to display the menus. 22 ASRock G41C-GS / G41C-S Motherboard English If the Main Menu does not appear automatically, locate and doubleclick on the file "ASSETUP.EXE" from...
... The Flash Memory on the system chassis. For the detailed information about BIOS Setup, please refer to the User Manual (PDF file) contained in the Support CD to display the menus. 22 ASRock G41C-GS / G41C-S Motherboard English If the Main Menu does not appear automatically, locate and doubleclick on the file "ASSETUP.EXE" from...
