User Manual
Page 4
... Bridge Configuration 61 4.4.4 Storage Configuration 62 4.4.5 Super IO Configuration 63 4.4.6 ACPI Configuration 64 Software and Utilities Operation 37 3.1 Installing Drivers 37 3.2 A-Tuning 38 3.3 Qualcomm® Atheros® Security Wake On Internet Technology... 42 3.4 Start8 49 4. Installation 14 Pre-installation Precautions 14 2.1 CPU Installation 15 2.2 Installation of CPU Fan and Heatsink 16 2.3 Installation of Memory Modules (DIMM 17 2.4 Expansion Slots (PCI and PCI Express Slots 19 2.5 Jumpers Setup 20 2.6 Onboard Headers and Connectors 21 2.7 Smart Switches 26...
... Bridge Configuration 61 4.4.4 Storage Configuration 62 4.4.5 Super IO Configuration 63 4.4.6 ACPI Configuration 64 Software and Utilities Operation 37 3.1 Installing Drivers 37 3.2 A-Tuning 38 3.3 Qualcomm® Atheros® Security Wake On Internet Technology... 42 3.4 Start8 49 4. Installation 14 Pre-installation Precautions 14 2.1 CPU Installation 15 2.2 Installation of CPU Fan and Heatsink 16 2.3 Installation of Memory Modules (DIMM 17 2.4 Expansion Slots (PCI and PCI Express Slots 19 2.5 Jumpers Setup 20 2.6 Onboard Headers and Connectors 21 2.7 Smart Switches 26...

User Manual
Page 9
... x Main BIOS and 1 x Backup BIOS) - DRAM, VDDP, VDDR Voltage multi-adjustment - CPU temperature sensing - HD Audio Jacks: Rear Speaker/Central/Bass/Line in/Front Speaker/Microphone - 7 x SATA3 6.0 Gb/s Connectors, support RAID (RAID 0, RAID 1, RAID 5 and RAID 10), NCQ, AHCI and Hot Plug - 1 x IR Header - 1 x COM Port Header - 1 x Chassis Intrusion Header - 1 x Power LED Header - 2 x CPU Fan Connectors (1 x 4-pin, 1 x 3-pin) - 3 x Chassis Fan Connectors (1 x 4-pin, 2 x 3-pin) - 1 x Power Fan Connector (3-pin) - 1 x 24 pin ATX Power Connector - 1 x 8 pin 12V Power Connector - 1 x XFire Power...
... x Main BIOS and 1 x Backup BIOS) - DRAM, VDDP, VDDR Voltage multi-adjustment - CPU temperature sensing - HD Audio Jacks: Rear Speaker/Central/Bass/Line in/Front Speaker/Microphone - 7 x SATA3 6.0 Gb/s Connectors, support RAID (RAID 0, RAID 1, RAID 5 and RAID 10), NCQ, AHCI and Hot Plug - 1 x IR Header - 1 x COM Port Header - 1 x Chassis Intrusion Header - 1 x Power LED Header - 2 x CPU Fan Connectors (1 x 4-pin, 1 x 3-pin) - 3 x Chassis Fan Connectors (1 x 4-pin, 2 x 3-pin) - 1 x Power Fan Connector (3-pin) - 1 x 24 pin ATX Power Connector - 1 x 8 pin 12V Power Connector - 1 x XFire Power...
User Manual
Page 13
... can start installing the OS in RAID mode. ASRock Easy Driver Installer For users that users are required. ASRock Dehumidifier Function Users may prevent motherboard damages due to dampness by sending a support request from a support CD to your USB storage device, please change "SATA Mode" to "RAID", then you can easily examine the current system configuration in UEFI setup. ASRock Internet Flash ASRock Internet Flash searches for available UEFI firmware updates from bypassing OMG, guest accounts without entering Windows® OS. When enabling Dehumidifier...
... can start installing the OS in RAID mode. ASRock Easy Driver Installer For users that users are required. ASRock Dehumidifier Function Users may prevent motherboard damages due to dampness by sending a support request from a support CD to your USB storage device, please change "SATA Mode" to "RAID", then you can easily examine the current system configuration in UEFI setup. ASRock Internet Flash ASRock Internet Flash searches for available UEFI firmware updates from bypassing OMG, guest accounts without entering Windows® OS. When enabling Dehumidifier...

User Manual
Page 16
...Connector (PWR_FAN1) 3 CPU Fan Connector (CPU_FAN1) 4 CPU Fan Connector (CPU_FAN2) 5 2 x 240-pin DDR3 DIMM Slots (DDR3_A1, DDR3_B1) 6 2 x 240-pin DDR3 DIMM Slots (DDR3_A2, DDR3_B2) 7 ATX Power Connector (ATXPWR1) 8 USB 3.0 Header (USB3_5_6) 9 SATA3 Connectors (SATA3_7_8) 10 SATA3 Connectors (SATA3_3_4) 11 SATA3 Connectors (SATA3_1_2) 12 SATA3 Connector (SATA3_5) 13 Chassis Speaker Header (SPEAKER1) 14 Power Switch (PWRBTN1) 15 Reset Switch (RSTBTN1) 16 BIOS Selection Switch (BIOS_SEL1) 17 Chassis Fan Connector (CHA_FAN1) 18 Power LED Header (PLED1) 19 System Panel Header (PANEL1) 20 Clear CMOS...
...Connector (PWR_FAN1) 3 CPU Fan Connector (CPU_FAN1) 4 CPU Fan Connector (CPU_FAN2) 5 2 x 240-pin DDR3 DIMM Slots (DDR3_A1, DDR3_B1) 6 2 x 240-pin DDR3 DIMM Slots (DDR3_A2, DDR3_B2) 7 ATX Power Connector (ATXPWR1) 8 USB 3.0 Header (USB3_5_6) 9 SATA3 Connectors (SATA3_7_8) 10 SATA3 Connectors (SATA3_3_4) 11 SATA3 Connectors (SATA3_1_2) 12 SATA3 Connector (SATA3_5) 13 Chassis Speaker Header (SPEAKER1) 14 Power Switch (PWRBTN1) 15 Reset Switch (RSTBTN1) 16 BIOS Selection Switch (BIOS_SEL1) 17 Chassis Fan Connector (CHA_FAN1) 18 Power LED Header (PLED1) 19 System Panel Header (PANEL1) 20 Clear CMOS...
User Manual
Page 32
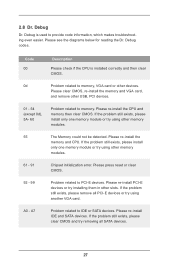
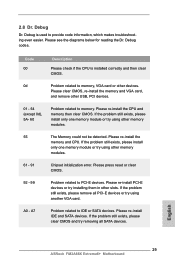
... install only one memory module or try using other USB, PCI devices. 01 - 54 (except 0d), 5A- 60 Problem related to provide code information, which makes troubleshooting even easier. Please re-install IDE and SATA devices. Please re-install the memory and CPU. A0 - A7 Problem related to PCI-E devices. 2.8 Dr. Debug Dr. Debug is installed correctly and then clear CMOS. 0d Problem related to memory, VGA card or other slots. Please clear CMOS, re-install the memory and VGA card, and remove other memory...
... install only one memory module or try using other USB, PCI devices. 01 - 54 (except 0d), 5A- 60 Problem related to provide code information, which makes troubleshooting even easier. Please re-install IDE and SATA devices. Please re-install the memory and CPU. A0 - A7 Problem related to PCI-E devices. 2.8 Dr. Debug Dr. Debug is installed correctly and then clear CMOS. 0d Problem related to memory, VGA card or other slots. Please clear CMOS, re-install the memory and VGA card, and remove other memory...
User Manual
Page 36
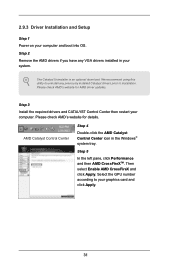
... select Enable AMD CrossFireX and click Apply. We recommend using this utility to uninstall any VGA drivers installed in the Windows® system tray. Step 5 In the left pane, click Performance and then AMD CrossFireXTM. Select the GPU number according to installation. Please check AMD's website for details. 2.9.3 Driver Installation and Setup Step 1 Power on your system. The Catalyst Uninstaller is an optional download. Step 2 Remove the AMD drivers if...
... select Enable AMD CrossFireX and click Apply. We recommend using this utility to uninstall any VGA drivers installed in the Windows® system tray. Step 5 In the left pane, click Performance and then AMD CrossFireXTM. Select the GPU number according to installation. Please check AMD's website for details. 2.9.3 Driver Installation and Setup Step 1 Power on your system. The Catalyst Uninstaller is an optional download. Step 2 Remove the AMD drivers if...
User Manual
Page 37
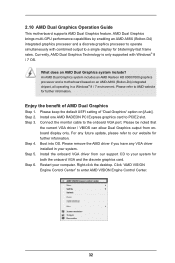
.... Connect the monitor cable to PCIE2 slot. Boot into OS. Enjoy the benefit of "Dual Graphics" option on an AMD A88X (Bolton-D4) integrated chipset, all operating in your computer. 2.10 AMD Dual Graphics Operation Guide This motherboard supports AMD Dual Graphics feature. An AMD Dual Graphics system includes an AMD Radeon HD 8000/7000 graphics processor and a motherboard based on [Auto]. Step 2. Step 4. Step 3. Install the onboard VGA driver from onboard display only. What does an AMD Dual Graphics system include? For any VGA driver installed in a Windows®...
.... Connect the monitor cable to PCIE2 slot. Boot into OS. Enjoy the benefit of "Dual Graphics" option on an AMD A88X (Bolton-D4) integrated chipset, all operating in your computer. 2.10 AMD Dual Graphics Operation Guide This motherboard supports AMD Dual Graphics feature. An AMD Dual Graphics system includes an AMD Radeon HD 8000/7000 graphics processor and a motherboard based on [Auto]. Step 2. Step 4. Step 3. Install the onboard VGA driver from onboard display only. What does an AMD Dual Graphics system include? For any VGA driver installed in a Windows®...
User Manual
Page 42
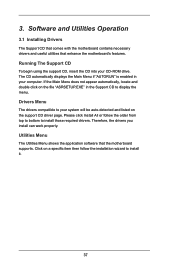
.... Drivers Menu The drivers compatible to display the menu. Software and Utilities Operation 3.1 Installing Drivers The Support CD that comes with the motherboard contains necessary drivers and useful utilities that the motherboard supports. If the Main Menu does not appear automatically, locate and double click on the file "ASRSETUP.EXE" in your CD-ROM drive. The CD automatically displays the Main Menu if "AUTORUN" is enabled in the Support CD to your system will be auto-detected and listed on a specific...
.... Drivers Menu The drivers compatible to display the menu. Software and Utilities Operation 3.1 Installing Drivers The Support CD that comes with the motherboard contains necessary drivers and useful utilities that the motherboard supports. If the Main Menu does not appear automatically, locate and double click on the file "ASRSETUP.EXE" in your CD-ROM drive. The CD automatically displays the Main Menu if "AUTORUN" is enabled in the Support CD to your system will be auto-detected and listed on a specific...

User Manual
Page 64
... [as HDMI], you can use HDMI monitor with audio function. It allows you to DVI port. Configuration options: [Onboard], [PCI] and [PCI Express]. Dual Graphics This item appears only when you can use Dual Link DVI monitor without audio function. Use this option, the primary monitor will be automatically enabled when you install AMD RADEON graphics card. If you enable this to enable or disable IOMMU support. Primary Graphics Adapter This item will be onboard VGA. If you select [Auto], Dual Graphics function will switch the PCI Bus scanning...
... [as HDMI], you can use HDMI monitor with audio function. It allows you to DVI port. Configuration options: [Onboard], [PCI] and [PCI Express]. Dual Graphics This item appears only when you can use Dual Link DVI monitor without audio function. Use this option, the primary monitor will be automatically enabled when you install AMD RADEON graphics card. If you enable this to enable or disable IOMMU support. Primary Graphics Adapter This item will be onboard VGA. If you select [Auto], Dual Graphics function will switch the PCI Bus scanning...
User Manual
Page 67
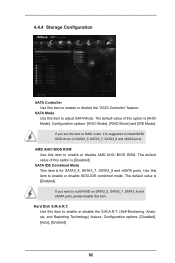
... item to RAID mode, it is suggested to install SATA ODD driver on SATA3_5, SATA3_7, SATA3_8 and eSATA ports, please disable this item to enable or disable SATA IDE combined mode. The default value of this option is [AHCI Mode]. Configuration options: [Disabled], [Auto], [Enabled]. 62 4.4.4 Storage Configuration SATA Controller Use this item to enable or disable AMD AHCI BIOS ROM. Hard Disk S.M.A.R.T. The default value is for SATA3_5, SATA3_7, SATA3_8 and eSATA ports. Configuration options: [AHCI Mode], [RAID Mode] and [IDE Mode]. Use this item. SATA IDE Combined Mode This...
... item to RAID mode, it is suggested to install SATA ODD driver on SATA3_5, SATA3_7, SATA3_8 and eSATA ports, please disable this item to enable or disable SATA IDE combined mode. The default value of this option is [AHCI Mode]. Configuration options: [Disabled], [Auto], [Enabled]. 62 4.4.4 Storage Configuration SATA Controller Use this item to enable or disable AMD AHCI BIOS ROM. Hard Disk S.M.A.R.T. The default value is for SATA3_5, SATA3_7, SATA3_8 and eSATA ports. Configuration options: [AHCI Mode], [RAID Mode] and [IDE Mode]. Use this item. SATA IDE Combined Mode This...

User Manual
Page 71
...The default value is recommended to select [Disabled] to enter OS. [UEFI Setup Only] - Enables legacy support if USB devices are four confi guration options: [Enabled], [Auto], [Disabled] and [UEFI Setup Only]. USB devices are not allowed to use of USB 2.0 controller. A88X USB 3.0 Controller Use this item to enable or disable the use only under legacy OS and UEFI setup when [Disabled] is [Enabled]. 66 There are connected. [Disabled] - Enables support for the details of USB 3.0 controller. If you have USB compatibility issue, it is [Enabled]. 4.4.7 USB Configuration USB...
...The default value is recommended to select [Disabled] to enter OS. [UEFI Setup Only] - Enables legacy support if USB devices are four confi guration options: [Enabled], [Auto], [Disabled] and [UEFI Setup Only]. USB devices are not allowed to use of USB 2.0 controller. A88X USB 3.0 Controller Use this item to enable or disable the use only under legacy OS and UEFI setup when [Disabled] is [Enabled]. 66 There are connected. [Disabled] - Enables support for the details of USB 3.0 controller. If you have USB compatibility issue, it is [Enabled]. 4.4.7 USB Configuration USB...
User Manual
Page 72
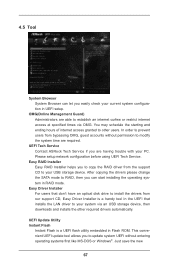
... the RAID driver from the support CD to your current system configuration in Flash ROM. Please setup network configuration before using UEFI Tech Service. Easy Driver Installer For users that don't have an optical disk drive to install the drivers from bypassing OMG, guest accounts without entering operating systems first like MS-DOS or Windows®. UEFI Update Utility Instant Flash Instant Flash is a handy tool in the UEFI that installs the LAN driver to your PC. This convenient UEFI update tool...
... the RAID driver from the support CD to your current system configuration in Flash ROM. Please setup network configuration before using UEFI Tech Service. Easy Driver Installer For users that don't have an optical disk drive to install the drivers from bypassing OMG, guest accounts without entering operating systems first like MS-DOS or Windows®. UEFI Update Utility Instant Flash Instant Flash is a handy tool in the UEFI that installs the LAN driver to your PC. This convenient UEFI update tool...
User Manual
Page 73
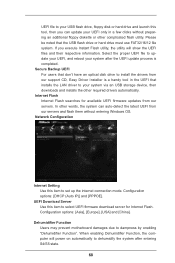
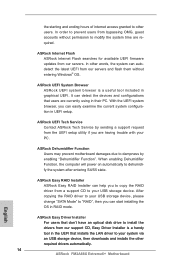
.... Dehumidifier Function Users may prevent motherboard damages due to your system via an USB storage device, then downloads and installs the other required drivers automatically. Network Configuration Internet Setting Use this item to update your UEFI, and reboot your UEFI only in the UEFI that installs the LAN driver to dampness by enabling "Dehumidifier Function". Configuration options: [DHCP (Auto IP)] and [PPPOE]. Select the proper UEFI file to set up the internet connection mode. In other complicated flash utility. Configuration options: [Asia...
.... Dehumidifier Function Users may prevent motherboard damages due to your system via an USB storage device, then downloads and installs the other required drivers automatically. Network Configuration Internet Setting Use this item to update your UEFI, and reboot your UEFI only in the UEFI that installs the LAN driver to dampness by enabling "Dehumidifier Function". Configuration options: [DHCP (Auto IP)] and [PPPOE]. Select the proper UEFI file to set up the internet connection mode. In other complicated flash utility. Configuration options: [Asia...

Quick Installation Guide
Page 4
...) 14 Power Switch (PWRBTN1) 15 Reset Switch (RSTBTN1) 16 BIOS Selection Switch (BIOS_SEL1) 17 Chassis Fan Connector (CHA_FAN1) 18 Power LED Header (PLED1) 19 System Panel Header (PANEL1) 20 Clear CMOS Jumper (CLRCMOS1) 21 USB 2.0 Header (USB_0_1) 22 USB 2.0 Header (USB_2_3) 23 USB 2.0 Header (USB_4_5) 24 Infrared Module Header (IR1) 25 Chassis Intrusion Header (CI1) 26 COM Port Header (COM1) 27 Front Panel Audio Header (HD_AUDIO1) 28 Chassis Fan Connector (CHA_FAN2) 29 XFire Power Connector (CROSS_FIRE_PWR1) 30 Chassis Fan Connector (CHA_FAN3) 4 ASRock FM2A88X Extreme6+ Motherboard English
...) 14 Power Switch (PWRBTN1) 15 Reset Switch (RSTBTN1) 16 BIOS Selection Switch (BIOS_SEL1) 17 Chassis Fan Connector (CHA_FAN1) 18 Power LED Header (PLED1) 19 System Panel Header (PANEL1) 20 Clear CMOS Jumper (CLRCMOS1) 21 USB 2.0 Header (USB_0_1) 22 USB 2.0 Header (USB_2_3) 23 USB 2.0 Header (USB_4_5) 24 Infrared Module Header (IR1) 25 Chassis Intrusion Header (CI1) 26 COM Port Header (COM1) 27 Front Panel Audio Header (HD_AUDIO1) 28 Chassis Fan Connector (CHA_FAN2) 29 XFire Power Connector (CROSS_FIRE_PWR1) 30 Chassis Fan Connector (CHA_FAN3) 4 ASRock FM2A88X Extreme6+ Motherboard English

Quick Installation Guide
Page 7
...to change without further notice. www.asrock.com/support/index.asp 1.1 Package Contents ASRock FM2A88X Extreme6+ Motherboard (ATX Form Factor) ASRock FM2A88X Extreme6+ Quick Installation Guide ASRock FM2A88X Extreme6+ Support CD 4 x Serial ATA (SATA) Data Cables (Optional) 1 x I/O Panel Shield ASRock Reminds You... Introduction Thank you are using. This Quick Installation Guide contains introduction of this motherboard, please visit our website for specific information about the model you for details. 7 ASRock FM2A88X Extreme6+ Motherboard English You may find the latest VGA cards...
...to change without further notice. www.asrock.com/support/index.asp 1.1 Package Contents ASRock FM2A88X Extreme6+ Motherboard (ATX Form Factor) ASRock FM2A88X Extreme6+ Quick Installation Guide ASRock FM2A88X Extreme6+ Support CD 4 x Serial ATA (SATA) Data Cables (Optional) 1 x I/O Panel Shield ASRock Reminds You... Introduction Thank you are using. This Quick Installation Guide contains introduction of this motherboard, please visit our website for specific information about the model you for details. 7 ASRock FM2A88X Extreme6+ Motherboard English You may find the latest VGA cards...

Quick Installation Guide
Page 10
...GUI support (1 x Main BIOS and 1 x Backup BIOS) - Supports "Plug and Play" - ACPI 1.1 compliance wake up events - DRAM, VDDP, VDDR Voltage multi-adjustment - HD Audio Jacks: Rear Speaker/Central/Bass/Line in/Front Speaker/Microphone - 7 x SATA3 6.0 Gb/s Connectors, support RAID (RAID 0, RAID 1, RAID 5 and RAID 10), NCQ, AHCI and Hot Plug - 1 x IR Header - 1 x COM Port Header - 1 x Chassis Intrusion Header - 1 x Power LED Header - 2 x CPU Fan Connectors (1 x 4-pin, 1 x 3-pin) - 3 x Chassis Fan Connectors (1 x 4-pin, 2 x 3-pin) - 1 x Power Fan Connector (3-pin) - 1 x 24 pin ATX Power Connector...
...GUI support (1 x Main BIOS and 1 x Backup BIOS) - Supports "Plug and Play" - ACPI 1.1 compliance wake up events - DRAM, VDDP, VDDR Voltage multi-adjustment - HD Audio Jacks: Rear Speaker/Central/Bass/Line in/Front Speaker/Microphone - 7 x SATA3 6.0 Gb/s Connectors, support RAID (RAID 0, RAID 1, RAID 5 and RAID 10), NCQ, AHCI and Hot Plug - 1 x IR Header - 1 x COM Port Header - 1 x Chassis Intrusion Header - 1 x Power LED Header - 2 x CPU Fan Connectors (1 x 4-pin, 1 x 3-pin) - 3 x Chassis Fan Connectors (1 x 4-pin, 2 x 3-pin) - 1 x Power Fan Connector (3-pin) - 1 x 24 pin ATX Power Connector...
Quick Installation Guide
Page 14
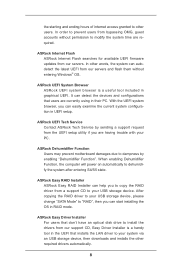
... available UEFI firmware updates from our servers and flash them without permission to modify the system time are currently using in graphical UEFI. ASRock UEFI System Browser ASRock UEFI system browser is a handy tool in RAID mode. the starting and ending hours of internet access granted to other required drivers automatically. 14 ASRock FM2A88X Extreme6+ Motherboard English It can detect the devices and configurations that don't have an optical disk drive to install the drivers from a support...
... available UEFI firmware updates from our servers and flash them without permission to modify the system time are currently using in graphical UEFI. ASRock UEFI System Browser ASRock UEFI system browser is a handy tool in RAID mode. the starting and ending hours of internet access granted to other required drivers automatically. 14 ASRock FM2A88X Extreme6+ Motherboard English It can detect the devices and configurations that don't have an optical disk drive to install the drivers from a support...
Quick Installation Guide
Page 29
...-install the CPU and memory then clear CMOS. If the problem still exists, please install only one memory module or try using other memory modules. 61 - 91 Chipset initialization error. If the problem still exists, please clear CMOS and try installing them in other slots. Please clear CMOS, re-install the memory and VGA card, and remove other USB, PCI devices. 01 - 54 (except 0d), 5A- 60 Problem related to PCI-E devices. Please re-install IDE and SATA devices. English 29 ASRock FM2A88X Extreme6+ Motherboard Please press reset or clear CMOS...
...-install the CPU and memory then clear CMOS. If the problem still exists, please install only one memory module or try using other memory modules. 61 - 91 Chipset initialization error. If the problem still exists, please clear CMOS and try installing them in other slots. Please clear CMOS, re-install the memory and VGA card, and remove other USB, PCI devices. 01 - 54 (except 0d), 5A- 60 Problem related to PCI-E devices. Please re-install IDE and SATA devices. English 29 ASRock FM2A88X Extreme6+ Motherboard Please press reset or clear CMOS...
RAID Installation Guide
Page 5
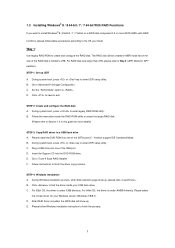
...). Set the "SATA Mode" option to create and configure the RAID disk. E. D. Way 1: Use legacy RAID ROM to . During system boot, press or key to Tools Easy RAID Installer F. Go to enter UEFI setup utility. B. After RAID driver is under /I386 directory. 1.3 Installing Windows® 8 / 8 64-bit / 7 / 7 64-bit With RAID Functions If you install. The RAID disk will show up . For RAID disk size larger than 2TB, please refer to exit. STEP 1: Set up UEFI A. C. Click to save to Way 2 (UEFI Mode for your USB flash drive...
...). Set the "SATA Mode" option to create and configure the RAID disk. E. D. Way 1: Use legacy RAID ROM to . During system boot, press or key to Tools Easy RAID Installer F. Go to enter UEFI setup utility. B. After RAID driver is under /I386 directory. 1.3 Installing Windows® 8 / 8 64-bit / 7 / 7 64-bit With RAID Functions If you install. The RAID disk will show up . For RAID disk size larger than 2TB, please refer to exit. STEP 1: Set up UEFI A. C. Click to save to Way 2 (UEFI Mode for your USB flash drive...
RAID Installation Guide
Page 15
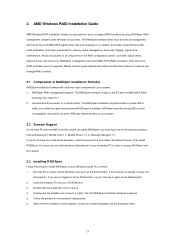
... install two major components to work with AMD SATA RAID controllers. Please read this private JRE to all AMD SATA logical drives that may be present on the PC with the AMD Controller, where you install RAIDXpert, you are not supported. RAIDXpert RAID management software: The RAIDXpert software installs on your networked PC in the RAID configuration (server, controller, logical drives, physical drives, and enclosure). If the computer is designed to your CD-ROM drive...
... install two major components to work with AMD SATA RAID controllers. Please read this private JRE to all AMD SATA logical drives that may be present on the PC with the AMD Controller, where you install RAIDXpert, you are not supported. RAIDXpert RAID management software: The RAIDXpert software installs on your networked PC in the RAID configuration (server, controller, logical drives, physical drives, and enclosure). If the computer is designed to your CD-ROM drive...


