
User Manual
Page 5
... stringent quality control. Introduction Thank you are using. In case any modifications of this manual occur, the updated version will be available on ASRock website as well. www.asrock.com/support/index.asp 1.1 Package Contents ASRock 990FX Extreme9 Motherboard (ATX Form Factor) ASRock 990FX Extreme9 Quick Installation Guide ASRock 990FX Extreme9 Support CD 1 x ASRock SLI_Bridge_2S Card 1 x ASRock 3-Way SLI-2S1S Bridge Card 6 x Serial ATA (SATA) Data Cables (Optional) 2 x Serial ATA (SATA) HDD Power Cables (Optional) 1 x I/O Panel Shield 1 x Front USB 3.0 Panel with robust...
... stringent quality control. Introduction Thank you are using. In case any modifications of this manual occur, the updated version will be available on ASRock website as well. www.asrock.com/support/index.asp 1.1 Package Contents ASRock 990FX Extreme9 Motherboard (ATX Form Factor) ASRock 990FX Extreme9 Quick Installation Guide ASRock 990FX Extreme9 Support CD 1 x ASRock SLI_Bridge_2S Card 1 x ASRock 3-Way SLI-2S1S Bridge Card 6 x Serial ATA (SATA) Data Cables (Optional) 2 x Serial ATA (SATA) HDD Power Cables (Optional) 1 x I/O Panel Shield 1 x Front USB 3.0 Panel with robust...

User Manual
Page 10
... S4 ACPI features which includes Hardware Monitor, Fan Control, Overclocking, OC DNA, IES and XFast RAM. By calling S3 and S4 at specific timing during the POST or the key to enter into the BIOS setup menu to shorten boot up time. This convenient BIOS update tool allows you to enter your USB flash drive, floppy disk or hard drive, then you to get the same OC settings. 1.3 Unique Features ASRock Extreme Tuning Utility (AXTU) ASRock Extreme Tuning Utility...
... S4 ACPI features which includes Hardware Monitor, Fan Control, Overclocking, OC DNA, IES and XFast RAM. By calling S3 and S4 at specific timing during the POST or the key to enter into the BIOS setup menu to shorten boot up time. This convenient BIOS update tool allows you to enter your USB flash drive, floppy disk or hard drive, then you to get the same OC settings. 1.3 Unique Features ASRock Extreme Tuning Utility (AXTU) ASRock Extreme Tuning Utility...

User Manual
Page 12
... USB storage device. ASRock Internet Flash ASRock Internet Flash searches for available UEFI firmware updates from bypassing OMG, guest accounts without permission to modify the system time are required. After copying the RAID driver to your USB storage device, please change "SATA Mode" to "RAID", then you can start installing the OS in graphical UEFI. ASRock UEFI System Browser ASRock UEFI system browser is a useful tool included in RAID mode. 12 It can help you can autodetect the latest UEFI from a support...
... USB storage device. ASRock Internet Flash ASRock Internet Flash searches for available UEFI firmware updates from bypassing OMG, guest accounts without permission to modify the system time are required. After copying the RAID driver to your USB storage device, please change "SATA Mode" to "RAID", then you can start installing the OS in graphical UEFI. ASRock UEFI System Browser ASRock UEFI system browser is a useful tool included in RAID mode. 12 It can help you can autodetect the latest UEFI from a support...

User Manual
Page 14
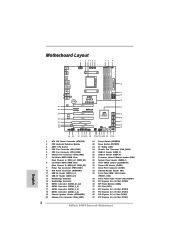
...-pin DDR3 DIMM Slots 29 Clear CMOS Jumper (CLRCMOS1) (Dual Channel B: DDR3_A2, DDR3_B2) 30 Power LED Header (PLED1) 9 Power Fan Connector (PWR_FAN1) 31 Serial Port Connector (COM1) 10 ATX Power Connector (ATXPWR1) 32 Infrared Module Header (IR1) 11 USB 3.0 Header (USB3_6_7) 33 Front Panel IEEE 1394 Header 12 USB 3.0 Header (USB3_4_5) (FRONT_1394) 13 Northbridge Controller 34 Front Panel Audio Header (HD_AUDIO1) 14 Southbridge Controller 35 PCI Express 2.0 x16 Slot (PCIE5) 15 SATA3 Connector (SATA3_A1_A2) 36 SPI Flash Memory (32Mb) 16 SATA3 Connector (SATA3_5_6) 37 PCI Slot...
...-pin DDR3 DIMM Slots 29 Clear CMOS Jumper (CLRCMOS1) (Dual Channel B: DDR3_A2, DDR3_B2) 30 Power LED Header (PLED1) 9 Power Fan Connector (PWR_FAN1) 31 Serial Port Connector (COM1) 10 ATX Power Connector (ATXPWR1) 32 Infrared Module Header (IR1) 11 USB 3.0 Header (USB3_6_7) 33 Front Panel IEEE 1394 Header 12 USB 3.0 Header (USB3_4_5) (FRONT_1394) 13 Northbridge Controller 34 Front Panel Audio Header (HD_AUDIO1) 14 Southbridge Controller 35 PCI Express 2.0 x16 Slot (PCIE5) 15 SATA3 Connector (SATA3_A1_A2) 36 SPI Flash Memory (32Mb) 16 SATA3 Connector (SATA3_5_6) 37 PCI Slot...
User Manual
Page 32
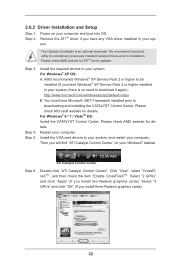
... item "Enable CrossFireXTM". 2.6.2 Driver Installation and Setup Step 1. Step 5. AMD recommends Windows® XP Service Pack 2 or higher to be installed (If you have any previously installed Catalyst drivers prior to uninstall any VGA driver installed in your system, there is an optional download. For Windows® 8 / 7 / VistaTM OS: Install the CATALYST Control Center. Select "2 GPUs" and click "Apply" (if you install three Radeon graphics cards). 32 Remove the ATITM driver if you...
... item "Enable CrossFireXTM". 2.6.2 Driver Installation and Setup Step 1. Step 5. AMD recommends Windows® XP Service Pack 2 or higher to be installed (If you have any previously installed Catalyst drivers prior to uninstall any VGA driver installed in your system, there is an optional download. For Windows® 8 / 7 / VistaTM OS: Install the CATALYST Control Center. Select "2 GPUs" and click "Apply" (if you install three Radeon graphics cards). 32 Remove the ATITM driver if you...
User Manual
Page 45
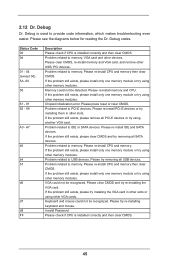
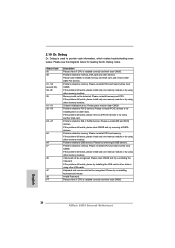
... USB, PCI devices. Problem related to memory. Please clear CMOS and try re-installing keyboard and mouse. Keyboard and mouse could not be recognized. Please re-install CPU and memory then clear CMOS. Please re-install memory and CPU. Problem related to memory. Please clear CMOS, re-install memory and VGA card, and remove other slots. Please press reset or clear CMOS. If the problem still exists, please clear CMOS and try removing all PCI-E devices or try using other memory modules. Please try re-installing the VGA card. Please re-install IDE and SATA devices...
... USB, PCI devices. Problem related to memory. Please clear CMOS and try re-installing keyboard and mouse. Keyboard and mouse could not be recognized. Please re-install CPU and memory then clear CMOS. Please re-install memory and CPU. Problem related to memory. Please clear CMOS, re-install memory and VGA card, and remove other slots. Please press reset or clear CMOS. If the problem still exists, please clear CMOS and try removing all PCI-E devices or try using other memory modules. Please try re-installing the VGA card. Please re-install IDE and SATA devices...
User Manual
Page 47
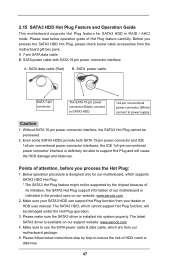
2.15 SATA3 HDD Hot Plug Feature and Operation Guide This motherboard supports Hot Plug feature for our motherboard, which are from our motherboard package. 5. Points of our motherboard is indicated in RAID / AHCI mode. Please make sure the SATA3 driver is available on our website: www.asrock.com 2. SATA power cable SATA 7-pin connector The SATA 15-pin power connector (Black) connect to SATA3 HDD 1x4-pin conventional power connector (White) connect to reduce the risk of Hot Plug feature carefully. The...
2.15 SATA3 HDD Hot Plug Feature and Operation Guide This motherboard supports Hot Plug feature for our motherboard, which are from our motherboard package. 5. Points of our motherboard is indicated in RAID / AHCI mode. Please make sure the SATA3 driver is available on our website: www.asrock.com 2. SATA power cable SATA 7-pin connector The SATA 15-pin power connector (Black) connect to SATA3 HDD 1x4-pin conventional power connector (White) connect to reduce the risk of Hot Plug feature carefully. The...
User Manual
Page 49
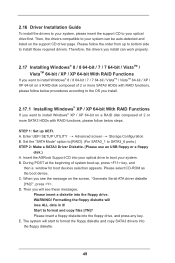
2.16 Driver Installation Guide To install the drivers to your system, please insert the support CD to your system. A. Please select CD-ROM as the boot device. D. Start to SATA3_6 ports.) STEP 2: Make a SATA3 Driver Diskette. (Please use an USB floppy or a floppy disk.) A. E. Enter UEFI SETUP UTILITY Advanced screen Storage Configuration. WARNING! C. Formatting the floppy diskette will start to format the floppy diskette and copy SATA3 drivers into your optical drive to boot your optical drive first. Insert the ASRock Support CD into...
2.16 Driver Installation Guide To install the drivers to your system, please insert the support CD to your system. A. Please select CD-ROM as the boot device. D. Start to SATA3_6 ports.) STEP 2: Make a SATA3 Driver Diskette. (Please use an USB floppy or a floppy disk.) A. E. Enter UEFI SETUP UTILITY Advanced screen Storage Configuration. WARNING! C. Formatting the floppy diskette will start to format the floppy diskette and copy SATA3 drivers into your optical drive to boot your optical drive first. Insert the ASRock Support CD into...

User Manual
Page 53
... the screen has a menu bar with the following selections: Main For setting system time/date information OC Tweaker For overclocking configurations Advanced For advanced system configurations Tool Useful tools H/W Monitor Displays current hardware status Boot For configuring boot settings and boot priority Security For security settings Exit Exit the current screen or the UEFI SETUP UTILITY Use < > key or < > key to choose among the selections on the menu bar, and use the UEFI SETUP UTILITY to enter the UEFI SETUP UTILITY after POST...
... the screen has a menu bar with the following selections: Main For setting system time/date information OC Tweaker For overclocking configurations Advanced For advanced system configurations Tool Useful tools H/W Monitor Displays current hardware status Boot For configuring boot settings and boot priority Security For security settings Exit Exit the current screen or the UEFI SETUP UTILITY Use < > key or < > key to choose among the selections on the menu bar, and use the UEFI SETUP UTILITY to enter the UEFI SETUP UTILITY after POST...

User Manual
Page 57
DRAM Timing Control Use this item to control DRAM timing. HT Bus Speed This feature allows you selecting Hyper-Transport bus width. DRAM Timing Configuration DRAM Frequency If [Auto] is [Auto]. 57 Power Down Enable Use this item to enable or disable DDR power down mode. Configuration options: [Disabled], [Auto]. Configuration options: [8 Bit] and [16 Bit]. The default value is selected, the motherboard will detect the memory module(s) inserted and assigns appropriate frequency automatically. DRAM Timing Control DRAM Slot Use this item to [2000MHz]. HT Bus Width This ...
DRAM Timing Control Use this item to control DRAM timing. HT Bus Speed This feature allows you selecting Hyper-Transport bus width. DRAM Timing Configuration DRAM Frequency If [Auto] is [Auto]. 57 Power Down Enable Use this item to enable or disable DDR power down mode. Configuration options: [Disabled], [Auto]. Configuration options: [8 Bit] and [16 Bit]. The default value is selected, the motherboard will detect the memory module(s) inserted and assigns appropriate frequency automatically. DRAM Timing Control DRAM Slot Use this item to [2000MHz]. HT Bus Width This ...
User Manual
Page 63
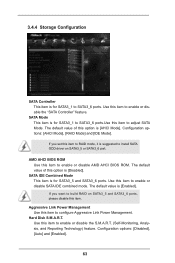
...to adjust SATA Mode. Use this item to enable or disable AMD AHCI BIOS ROM. 3.4.4 Storage Configuration SATA Controller This item is [Enabled]. SATA Mode This item is for SATA3_1 to SATA3_6 ports.Use this item to configure Aggressive Link Power Management. The default value is for SATA3_5 and SATA3_6 ports. The default value of this item to enable or disable the S.M.A.R.T. (Self-Monitoring, Analysis, and Reporting Technology) feature. SATA IDE Combined Mode This item is [AHCI Mode]. Hard Disk S.M.A.R.T. Configuration options: [AHCI Mode], [RAID Mode] and [IDE Mode]. If you...
...to adjust SATA Mode. Use this item to enable or disable AMD AHCI BIOS ROM. 3.4.4 Storage Configuration SATA Controller This item is [Enabled]. SATA Mode This item is for SATA3_1 to SATA3_6 ports.Use this item to configure Aggressive Link Power Management. The default value is for SATA3_5 and SATA3_6 ports. The default value of this item to enable or disable the S.M.A.R.T. (Self-Monitoring, Analysis, and Reporting Technology) feature. SATA IDE Combined Mode This item is [AHCI Mode]. Hard Disk S.M.A.R.T. Configuration options: [AHCI Mode], [RAID Mode] and [IDE Mode]. If you...
User Manual
Page 77
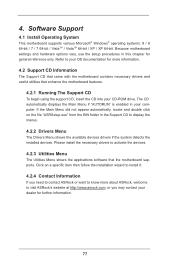
... motherboard settings and hardware options vary, use the setup procedures in this chapter for more about ASRock, welcome to install it. 4.2.4 Contact Information If you may contact your OS documentation for general reference only. The CD automatically displays the Main Menu if "AUTORUN" is enabled in the Support CD to your dealer for further information. 77 Please install the necessary drivers to activate the devices. 4.2.3 Utilities Menu...
... motherboard settings and hardware options vary, use the setup procedures in this chapter for more about ASRock, welcome to install it. 4.2.4 Contact Information If you may contact your OS documentation for general reference only. The CD automatically displays the Main Menu if "AUTORUN" is enabled in the Support CD to your dealer for further information. 77 Please install the necessary drivers to activate the devices. 4.2.3 Utilities Menu...
User Guide
Page 2
...) 25 USB 2.0 Header (USB6_7) 26 USB 2.0 Header (USB4_5) 27 Consumer Infrared Module Header (CIR1) 28 System Panel Header (PANEL1) 29 Clear CMOS Jumper (CLRCMOS1) 30 Power LED Header (PLED1) 31 Serial Port Connector (COM1) 32 Infrared Module Header (IR1) 33 Front Panel IEEE 1394 Header (FRONT_1394) 34 Front Panel Audio Header (HD_AUDIO1) 35 PCI Express 2.0 x16 Slot (PCIE5) 36 SPI Flash Memory (32Mb) 37 PCI Slot (PCI1) 38 PCI Express 2.0 x16 Slot (PCIE4) 39 PCI Express 2.0 x16 Slot (PCIE3) 40 PCI Express 2.0 x1 Slot (PCIE2) 41 PCI Express 2.0 x16 Slot (PCIE1) 2 ASRock 990FX Extreme9 Motherboard...
...) 25 USB 2.0 Header (USB6_7) 26 USB 2.0 Header (USB4_5) 27 Consumer Infrared Module Header (CIR1) 28 System Panel Header (PANEL1) 29 Clear CMOS Jumper (CLRCMOS1) 30 Power LED Header (PLED1) 31 Serial Port Connector (COM1) 32 Infrared Module Header (IR1) 33 Front Panel IEEE 1394 Header (FRONT_1394) 34 Front Panel Audio Header (HD_AUDIO1) 35 PCI Express 2.0 x16 Slot (PCIE5) 36 SPI Flash Memory (32Mb) 37 PCI Slot (PCI1) 38 PCI Express 2.0 x16 Slot (PCIE4) 39 PCI Express 2.0 x16 Slot (PCIE3) 40 PCI Express 2.0 x1 Slot (PCIE2) 41 PCI Express 2.0 x16 Slot (PCIE1) 2 ASRock 990FX Extreme9 Motherboard...
User Guide
Page 5
... the BIOS setup, please refer to the "User Manual" in Storage Configuration to set the BIOS option in our support CD for purchasing ASRock 990FX Extreme9 motherboard, a reliable motherboard produced under ASRock's consistently stringent quality control. In case any modifications of the motherboard and step-bystep installation guide. To get better performance in Windows® 8 / 8 64-bit / 7 / 7 64-bit / VistaTM / VistaTM 64-bit, it is recommended to AHCI mode. Because the motherboard speci...
... the BIOS setup, please refer to the "User Manual" in Storage Configuration to set the BIOS option in our support CD for purchasing ASRock 990FX Extreme9 motherboard, a reliable motherboard produced under ASRock's consistently stringent quality control. In case any modifications of the motherboard and step-bystep installation guide. To get better performance in Windows® 8 / 8 64-bit / 7 / 7 64-bit / VistaTM / VistaTM 64-bit, it is recommended to AHCI mode. Because the motherboard speci...

User Guide
Page 10
... the POST or the key to enter into the BIOS setup menu to your friends. With this tool and save your OC settings as a profile and share it fully utilizes the memory space that cannot be noted that the USB flash drive or hard drive must use FAT32/16/12 file system. 10 ASRock 990FX Extreme9 Motherboard English Please be used under Windows® OS 32-bit CPU. Just...
... the POST or the key to enter into the BIOS setup menu to your friends. With this tool and save your OC settings as a profile and share it fully utilizes the memory space that cannot be noted that the USB flash drive or hard drive must use FAT32/16/12 file system. 10 ASRock 990FX Extreme9 Motherboard English Please be used under Windows® OS 32-bit CPU. Just...

User Guide
Page 12
... after regaining power. Only USB2.0 ports support this feature. ASRock UEFI System Browser ASRock UEFI system browser is a useful tool included in UEFI setup. After copying the RAID driver to your USB storage device, please change "SATA Mode" to dampness by enabling "Dehumidifier Function". ASRock Crashless BIOS ASRock Crashless BIOS allows users to be placed in the root directory of your USB disk. With the UEFI system browser, you can help you can start installing the OS...
... after regaining power. Only USB2.0 ports support this feature. ASRock UEFI System Browser ASRock UEFI system browser is a useful tool included in UEFI setup. After copying the RAID driver to your USB storage device, please change "SATA Mode" to dampness by enabling "Dehumidifier Function". ASRock Crashless BIOS ASRock Crashless BIOS allows users to be placed in the root directory of your USB disk. With the UEFI system browser, you can help you can start installing the OS...
User Guide
Page 34
... other slots or using another VGA card. Please re-install IDE and SATA devices. Problem related to provide code information, which makes troubleshooting even easier. If the problem still exists, please install only one memory module or try installing the VGA card in other USB, PCI devices. English 34 ASRock 990FX Extreme9 Motherboard Please re-install memory and CPU. Please try re-installing keyboard and mouse. Please try removing all SATA devices. Please check if CPU is installed correctly and then clear CMOS. Please press reset or clear CMOS...
... other slots or using another VGA card. Please re-install IDE and SATA devices. Problem related to provide code information, which makes troubleshooting even easier. If the problem still exists, please install only one memory module or try installing the VGA card in other USB, PCI devices. English 34 ASRock 990FX Extreme9 Motherboard Please re-install memory and CPU. Please try re-installing keyboard and mouse. Please try removing all SATA devices. Please check if CPU is installed correctly and then clear CMOS. Please press reset or clear CMOS...
User Guide
Page 37
... to the User Manual (PDF file) contained in your CD-ROM drive. otherwise, POST continues with the motherboard contains necessary drivers and useful utilities that came with its various sub-menus and to enter BIOS Setup after POST, please restart the system by pressing + + , or pressing the reset button on the system chassis. Software Support CD information This motherboard supports various Microsoft® Windows® operating systems: 8 / 8 64-bit / 7 / 7 64-bit / VistaTM / VistaTM...
... to the User Manual (PDF file) contained in your CD-ROM drive. otherwise, POST continues with the motherboard contains necessary drivers and useful utilities that came with its various sub-menus and to enter BIOS Setup after POST, please restart the system by pressing + + , or pressing the reset button on the system chassis. Software Support CD information This motherboard supports various Microsoft® Windows® operating systems: 8 / 8 64-bit / 7 / 7 64-bit / VistaTM / VistaTM...
Installation Guide
Page 5
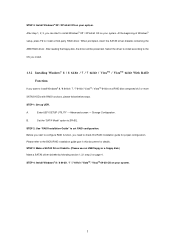
... the floppy disk, the driver will be presented. Set the "SATA Mode" option to install a third-party RAID driver. STEP 3: Make a SATA3 Driver Diskette. (Please use an USB floppy or a floppy disk.) Make a SATA3 driver diskette by following section 1.3.1 step 2 on your system. 5 STEP 4: Install Windows® 8 / 8 64-bit / 7 / 7 64-bit / VistaTM / VistaTM 64-bit OS on page 4. When prompted, insert the SATA3 driver diskette containing the AMD RAID driver. Enter UEFI SETUP UTILITY → Advanced screen → Storage Configuration. B. Before you start to install Windows...
... the floppy disk, the driver will be presented. Set the "SATA Mode" option to install a third-party RAID driver. STEP 3: Make a SATA3 Driver Diskette. (Please use an USB floppy or a floppy disk.) Make a SATA3 driver diskette by following section 1.3.1 step 2 on your system. 5 STEP 4: Install Windows® 8 / 8 64-bit / 7 / 7 64-bit / VistaTM / VistaTM 64-bit OS on page 4. When prompted, insert the SATA3 driver diskette containing the AMD RAID driver. Enter UEFI SETUP UTILITY → Advanced screen → Storage Configuration. B. Before you start to install Windows...
Installation Guide
Page 10
... CD-ROM drive. 3. Double-click the Install CD's icon to work with the AMD SB950 SATA RAID Controller (the "Host PC"). 2. When the first installation screen appears, choose an installer language from the dropdown menu. 10 Insert the software CD into your system: 1. 2. RAIDXpert uses this guide carefully and follow the instructions below to configure and manage RAID functions. 2.1 Components of RAIDXpert Installation Software RAIDXpert installation software will install two major components to configure RAID...
... CD-ROM drive. 3. Double-click the Install CD's icon to work with the AMD SB950 SATA RAID Controller (the "Host PC"). 2. When the first installation screen appears, choose an installer language from the dropdown menu. 10 Insert the software CD into your system: 1. 2. RAIDXpert uses this guide carefully and follow the instructions below to configure and manage RAID functions. 2.1 Components of RAIDXpert Installation Software RAIDXpert installation software will install two major components to configure RAID...


