User Manual
Page 5
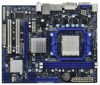
.... Because the motherboard specifications and the BIOS software might be updated, the content of the motherboard and step-by-step guide to change without further notice. www.asrock.com/support/index.asp 1.1 Package Contents ASRock 880GM-LE FX Motherboard (Micro ATX Form Factor: 9.6-in x 7.8-in, 24.4 cm x 19.8 cm) ASRock 880GM-LE FX Quick Installation Guide ASRock 880GM-LE FX Support CD 2 x Serial ATA (SATA...
.... Because the motherboard specifications and the BIOS software might be updated, the content of the motherboard and step-by-step guide to change without further notice. www.asrock.com/support/index.asp 1.1 Package Contents ASRock 880GM-LE FX Motherboard (Micro ATX Form Factor: 9.6-in x 7.8-in, 24.4 cm x 19.8 cm) ASRock 880GM-LE FX Quick Installation Guide ASRock 880GM-LE FX Support CD 2 x Serial ATA (SATA...

User Manual
Page 9
...®. Please visit our website for the operation procedures of output phases to SATAII mode. In other complicated flash utility. This convenient BIOS update tool allows you what it is no such limitation. 5. Just launch this utility, you to save your OC settings as yours! ...hard disk drive to improve efficiency when the CPU cores are idle. ASRock Instant Flash is a BIOS flash utility embedded in a few clicks without sacrificing computing performance. Please be noted that the OC profile can update your BIOS only in Flash ROM. For Windows® OS with others. ...
...®. Please visit our website for the operation procedures of output phases to SATAII mode. In other complicated flash utility. This convenient BIOS update tool allows you what it is no such limitation. 5. Just launch this utility, you to save your OC settings as yours! ...hard disk drive to improve efficiency when the CPU cores are idle. ASRock Instant Flash is a BIOS flash utility embedded in a few clicks without sacrificing computing performance. Please be noted that the OC profile can update your BIOS only in Flash ROM. For Windows® OS with others. ...

User Manual
Page 21
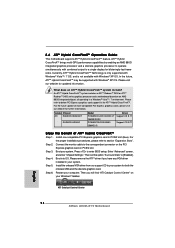
For the future update of ATITM Hybrid CrossFireXTM Step 1. Step 3. Step 6. Install the onboard VGA driver from our support CD to the correspondent connector on the PCI Express graphics ... the benefit of more compatible PCI Express graphics cards, please visit our website for further information. For the proper installation procedures, please refer to enter BIOS setup. Step 5. 2.6 ATITM Hybrid CrossFireXTM Operation Guide This motherboard supports ATITM Hybrid CrossFireXTM feature. Currently, ATITM Hybrid CrossFireXTM Technology is only supported with Windows®...
For the future update of ATITM Hybrid CrossFireXTM Step 1. Step 3. Step 6. Install the onboard VGA driver from our support CD to the correspondent connector on the PCI Express graphics ... the benefit of more compatible PCI Express graphics cards, please visit our website for further information. For the proper installation procedures, please refer to enter BIOS setup. Step 5. 2.6 ATITM Hybrid CrossFireXTM Operation Guide This motherboard supports ATITM Hybrid CrossFireXTM feature. Currently, ATITM Hybrid CrossFireXTM Technology is only supported with Windows®...

User Manual
Page 23
... are setup. After waiting for 15 seconds, use a jumper cap to enable (see p.12, No. 9) 1_2 2_3 Default Clear CMOS Note: CLRCMOS1 allows you update the BIOS. Jumper Setting PS2_USB_PW1 1_2 2_3 Short pin2, pin3 to short pin2 and pin3 on pins, the jumper is "Short". If you do not clear the... computer and unplug the power cord from the power supply. To clear and reset the system parameters to clear the CMOS when you just finish updating the BIOS, you must boot up events. When the jumper cap is placed on CLRCMOS1 for PS/2 or USB wake up the system first, and then...
... are setup. After waiting for 15 seconds, use a jumper cap to enable (see p.12, No. 9) 1_2 2_3 Default Clear CMOS Note: CLRCMOS1 allows you update the BIOS. Jumper Setting PS2_USB_PW1 1_2 2_3 Short pin2, pin3 to short pin2 and pin3 on pins, the jumper is "Short". If you do not clear the... computer and unplug the power cord from the power supply. To clear and reset the system parameters to clear the CMOS when you just finish updating the BIOS, you must boot up events. When the jumper cap is placed on CLRCMOS1 for PS/2 or USB wake up the system first, and then...

User Manual
Page 38
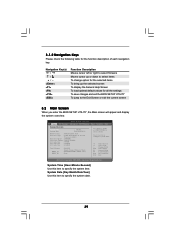
Because the BIOS software is constantly being updated, the following selections: Main To set up the system time/date information OC Tweaker To set up overclocking features Advanced To set up the advanced BIOS features H/W Monitor To display current hardware status Boot To set up the default system device to ...computer. You may not exactly match what you see on your system. The SPI Memory on the menu bar, and then press to enter the BIOS SETUP UTILITY after POST, restart the system by pressing + + , or by turning the system off and then back on the system chassis. 3....
Because the BIOS software is constantly being updated, the following selections: Main To set up the system time/date information OC Tweaker To set up overclocking features Advanced To set up the advanced BIOS features H/W Monitor To display current hardware status Boot To set up the default system device to ...computer. You may not exactly match what you see on your system. The SPI Memory on the menu bar, and then press to enter the BIOS SETUP UTILITY after POST, restart the system by pressing + + , or by turning the system off and then back on the system chassis. 3....
User Manual
Page 39
... Advanced H/W Monitor System Overview System Time System Date [17:00:09] [Tue 10/18/2011] BIOS Version : 880GM-LE FX P1.0 Processor Type : AMD Phenom(tm) II X3 720 Processor (64bit) Processor Speed : 2800MHz Microcode Update : 100F42/1000086 L1 Cache Size : 384KB L2 Cache Size : 1536KB L3 Cache Size : 6144KB...Security Exit Use [Enter], [TAB] or [SHIFT-TAB] to the Exit Screen or exit the current screen 3.2 Main Screen When you enter the BIOS SETUP UTILITY, the Main screen will appear and display the system overview. System Time [Hour:Minute:Second] Use this item to configure system Time....
... Advanced H/W Monitor System Overview System Time System Date [17:00:09] [Tue 10/18/2011] BIOS Version : 880GM-LE FX P1.0 Processor Type : AMD Phenom(tm) II X3 720 Processor (64bit) Processor Speed : 2800MHz Microcode Update : 100F42/1000086 L1 Cache Size : 384KB L2 Cache Size : 1536KB L3 Cache Size : 6144KB...Security Exit Use [Enter], [TAB] or [SHIFT-TAB] to the Exit Screen or exit the current screen 3.2 Main Screen When you enter the BIOS SETUP UTILITY, the Main screen will appear and display the system overview. System Time [Hour:Minute:Second] Use this item to configure system Time....

User Manual
Page 44
...®. CPU Configuration Chipset Configuration ACPI Configuration Storage Configuration PCIPnP Configuration Floppy Configuration SuperIO Configuration USB Configuration BIOS Update Utility ASRock Instant Flash Select Screen Select Item Enter Go to update your BIOS, and reboot your system after BIOS update process completes. 44 This convenient BIOS update tool allows you execute ASRock Instant Flash utility, the utility will show the...
...®. CPU Configuration Chipset Configuration ACPI Configuration Storage Configuration PCIPnP Configuration Floppy Configuration SuperIO Configuration USB Configuration BIOS Update Utility ASRock Instant Flash Select Screen Select Item Enter Go to update your BIOS, and reboot your system after BIOS update process completes. 44 This convenient BIOS update tool allows you execute ASRock Instant Flash utility, the utility will show the...
Quick Installation Guide
Page 4
... the BIOS software might be updated, the content of the motherboard and step-by-step guide to change without further notice. www.asrock.com/support/index.asp 1.1 Package Contents ASRock 880GM-LE FX Motherboard (Micro ATX Form Factor: 9.6-in x 7.8-in, 24.4 cm x 19.8 cm) ASRock 880GM-LE FX Quick Installation Guide ASRock 880GM-LE FX Support CD 2 x Serial ATA (SATA) Data Cables (Optional) 1 x I/O Shield 4 ASRock 880GM-LE FX Motherboard...
... the BIOS software might be updated, the content of the motherboard and step-by-step guide to change without further notice. www.asrock.com/support/index.asp 1.1 Package Contents ASRock 880GM-LE FX Motherboard (Micro ATX Form Factor: 9.6-in x 7.8-in, 24.4 cm x 19.8 cm) ASRock 880GM-LE FX Quick Installation Guide ASRock 880GM-LE FX Support CD 2 x Serial ATA (SATA) Data Cables (Optional) 1 x I/O Shield 4 ASRock 880GM-LE FX Motherboard...
Quick Installation Guide
Page 8
... ASRock 880GM-LE FX Motherboard English Please be noticed that the OC profile can only be shared and worked on page 28 of "User Manual" in a few clicks without entering operating systems first like MS-DOS or Windows®. ASRock website: http://www.asrock.com 9. Due to update system BIOS... without preparing an additional floppy diskette or other words, it is able to access ASRock Instant Flash. The voltage regulator can also connect SATA hard ...
... ASRock 880GM-LE FX Motherboard English Please be noticed that the OC profile can only be shared and worked on page 28 of "User Manual" in a few clicks without entering operating systems first like MS-DOS or Windows®. ASRock website: http://www.asrock.com 9. Due to update system BIOS... without preparing an additional floppy diskette or other words, it is able to access ASRock Instant Flash. The voltage regulator can also connect SATA hard ...
Quick Installation Guide
Page 18
... with Windows® XP OS. Boot your computer. Then set the option "Surround View" to enter BIOS setup. ATI Catalyst Control Center English 18 ASRock 880GM-LE FX Motherboard ATITM Hybrid CrossFireXTM brings multi-GPU performance capabilities by enabling an AMD 880G integrated graphics processor and a... AMD 880G integrated chipset, all operating in your system. What does an ATITM Hybrid CrossFireXTM system include? For the future update of ATITM Hybrid CrossFireXTM Step 1. Connect the monitor cable to a single display for further information. Press to [Enabled]. In...
... with Windows® XP OS. Boot your computer. Then set the option "Surround View" to enter BIOS setup. ATI Catalyst Control Center English 18 ASRock 880GM-LE FX Motherboard ATITM Hybrid CrossFireXTM brings multi-GPU performance capabilities by enabling an AMD 880G integrated graphics processor and a... AMD 880G integrated chipset, all operating in your system. What does an ATITM Hybrid CrossFireXTM system include? For the future update of ATITM Hybrid CrossFireXTM Step 1. Connect the monitor cable to a single display for further information. Press to [Enabled]. In...

Quick Installation Guide
Page 20
Note: To select +5VSB, it down before you do not clear the CMOS right after you update the BIOS. After waiting for 15 seconds, use a jumper cap to default setup, please turn off the computer and unplug the power cord from the power supply. ...If you need to clear the CMOS when you just finish updating the BIOS, you to enable (see p.2, No. 9) Default Clear CMOS Note: CLRCMOS1 allows you must boot up events. English 20 ASRock 880GM-LE FX Motherboard If no jumper cap is placed on pins, the jumper is "Short". The illustration...
Note: To select +5VSB, it down before you do not clear the CMOS right after you update the BIOS. After waiting for 15 seconds, use a jumper cap to default setup, please turn off the computer and unplug the power cord from the power supply. ...If you need to clear the CMOS when you just finish updating the BIOS, you to enable (see p.2, No. 9) Default Clear CMOS Note: CLRCMOS1 allows you must boot up events. English 20 ASRock 880GM-LE FX Motherboard If no jumper cap is placed on pins, the jumper is "Short". The illustration...


