User Manual
Page 1
All rights reserved. 1 880GM-LE FX User Manual Version 1.0 Published October 2011 Copyright©2011 ASRock INC.
All rights reserved. 1 880GM-LE FX User Manual Version 1.0 Published October 2011 Copyright©2011 ASRock INC.
User Manual
Page 2
...and to the owners' benefit, without intent to the implied warranties or conditions of ASRock Inc. This device complies with Part 15 of such damages arising from any defect or error in this manual, ASRock does not provide warranty of any kind, either expressed or implied, including but not... limited to infringe. In no responsibility for any errors or omissions that may not cause harmful interference, and (2) this manual. CALIFORNIA, USA ONLY The Lithium ...
...and to the owners' benefit, without intent to the implied warranties or conditions of ASRock Inc. This device complies with Part 15 of such damages arising from any defect or error in this manual, ASRock does not provide warranty of any kind, either expressed or implied, including but not... limited to infringe. In no responsibility for any errors or omissions that may not cause harmful interference, and (2) this manual. CALIFORNIA, USA ONLY The Lithium ...
User Manual
Page 5
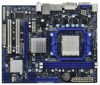
... this manual will be subject to quality and endurance. 1. You may find the latest VGA cards and CPU support lists on ASRock website without notice. Introduction Thank you are using. www.asrock.com/support/index.asp 1.1 Package Contents ASRock 880GM-LE FX Motherboard (Micro ATX Form Factor: 9.6-in x 7.8-in, 24.4 cm x 19.8 cm) ASRock 880GM-LE FX Quick Installation Guide ASRock 880GM-LE FX Support...
... this manual will be subject to quality and endurance. 1. You may find the latest VGA cards and CPU support lists on ASRock website without notice. Introduction Thank you are using. www.asrock.com/support/index.asp 1.1 Package Contents ASRock 880GM-LE FX Motherboard (Micro ATX Form Factor: 9.6-in x 7.8-in, 24.4 cm x 19.8 cm) ASRock 880GM-LE FX Quick Installation Guide ASRock 880GM-LE FX Support...

User Manual
Page 15
... and the heatsink. 15 Unlock the socket by lifting the lever up to secure the CPU. For proper installation, please kindly refer to the instruction manuals of CPU Fan and Heatsink After you push down the socket lever to a 90o angle.
... and the heatsink. 15 Unlock the socket by lifting the lever up to secure the CPU. For proper installation, please kindly refer to the instruction manuals of CPU Fan and Heatsink After you push down the socket lever to a 90o angle.

User Manual
Page 26
... Mic_IN (MIC) to Ground (GND). Connect Ground (GND) to MIC2_L. Enter BIOS Setup Utility. If you want to the "Front Mic" Tab in our manual and chassis manual to the front panel audio header as below: A. If you use AC'97 audio panel, please install it to install your voice through front...
... Mic_IN (MIC) to Ground (GND). Connect Ground (GND) to MIC2_L. Enter BIOS Setup Utility. If you want to the "Front Mic" Tab in our manual and chassis manual to the front panel audio header as below: A. If you use AC'97 audio panel, please install it to install your voice through front...

User Manual
Page 31
...box pack. Please make sure the SATA / SATAII driver is available on our website: www.asrock.com 2. Make sure to use the SATA power cable & data cable, which are from your dealer or HDD user manual. Even some SATA / SATAII HDDs provide both SATA 15-pin power connector and IDE 1x4...-pin conventional power connector interfaces, the IDE 1x4-pin conventional power connector interface is designed only for SATA / SATAII HDD in the product spec on our support website: www.asrock.com 4. ...
...box pack. Please make sure the SATA / SATAII driver is available on our website: www.asrock.com 2. Make sure to use the SATA power cable & data cable, which are from your dealer or HDD user manual. Even some SATA / SATAII HDDs provide both SATA 15-pin power connector and IDE 1x4...-pin conventional power connector interfaces, the IDE 1x4-pin conventional power connector interface is designed only for SATA / SATAII HDD in the product spec on our support website: www.asrock.com 4. ...
User Manual
Page 41
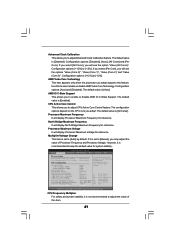
.../Voltage Change This item is not recommended to [-12%]. The default value is [Auto]. Confi guration options: [Auto] and [Disabled]. However, it is set to [Manual], you to keep the default value for reference. Select Screen Select Item Enter Go to [Auto] by default. If you select [Per Core], you will... Maximum Voltage Multiplier/Voltage Change [Press Enter] [Press Enter] [Auto] [200] [100] [Auto] [Enabled] [3] [Disabled] [Auto] [Enabled] [Disabled] x13.5 2700 MHZ x10.0 2000 MHz 1.325 V [Manual] Overclocking may adjust the value of this feature.
.../Voltage Change This item is not recommended to [-12%]. The default value is [Auto]. Confi guration options: [Auto] and [Disabled]. However, it is set to [Manual], you to keep the default value for reference. Select Screen Select Item Enter Go to [Auto] by default. If you select [Per Core], you will... Maximum Voltage Multiplier/Voltage Change [Press Enter] [Press Enter] [Auto] [200] [100] [Auto] [Enabled] [3] [Disabled] [Auto] [Enabled] [Disabled] x13.5 2700 MHZ x10.0 2000 MHz 1.325 V [Manual] Overclocking may adjust the value of this feature.

User Manual
Page 43
... is [Auto]. Onboard GPU Clock This option only appears when you enable "Onboard GPU Clock Override". Command Rate Use this to change Command Rate Auto/Manual setting. Chipset Settings Onboard GPU Clock Override This allows you to enable Channel Memory Interleaving. TRP Use this item to adjust TRP values. Max: 2N...
... is [Auto]. Onboard GPU Clock This option only appears when you enable "Onboard GPU Clock Override". Command Rate Use this to change Command Rate Auto/Manual setting. Chipset Settings Onboard GPU Clock Override This allows you to enable Channel Memory Interleaving. TRP Use this item to adjust TRP values. Max: 2N...
Quick Installation Guide
Page 4
... excellent performance with robust design conforming to ASRock's commitment to this motherboard, please visit our website for purchasing ASRock 880GM-LE FX motherboard, a reliable motherboard produced under ASRock's consistently stringent quality control. In this manual, chapter 1 and 2 contain introduction of this manual occur, the updated version will be available on ASRock website as well. Introduction Thank you require technical...
... excellent performance with robust design conforming to ASRock's commitment to this motherboard, please visit our website for purchasing ASRock 880GM-LE FX motherboard, a reliable motherboard produced under ASRock's consistently stringent quality control. In this manual, chapter 1 and 2 contain introduction of this manual occur, the updated version will be available on ASRock website as well. Introduction Thank you require technical...
Quick Installation Guide
Page 8
...a profile and share with your hardware devices to SATAII connector, please read the "SATAII Hard Disk Setup Guide" on the same motherboard. 8 ASRock 880GM-LE FX Motherboard English To use FAT32/ 16/12 file system. 10. Your friends then can also connect SATA hard disk to update system BIOS without entering... system and simplifies the complicated recording process of output phases to SATAII mode. Please be shared and worked on page 28 of "User Manual" in Flash ROM. With this tool and save your SATAII hard disk drive to improve efficiency when the CPU cores are idle. Due...
...a profile and share with your hardware devices to SATAII connector, please read the "SATAII Hard Disk Setup Guide" on the same motherboard. 8 ASRock 880GM-LE FX Motherboard English To use FAT32/ 16/12 file system. 10. Your friends then can also connect SATA hard disk to update system BIOS without entering... system and simplifies the complicated recording process of output phases to SATAII mode. Please be shared and worked on page 28 of "User Manual" in Flash ROM. With this tool and save your SATAII hard disk drive to improve efficiency when the CPU cores are idle. Due...
Quick Installation Guide
Page 12
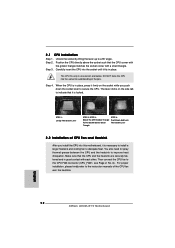
... heat. DO NOT force the CPU into this motherboard, it fits in place, press it firmly on the side tab to the instruction manuals of the pins. English 12 ASRock 880GM-LE FX Motherboard Make sure that the CPU and the heatsink are securely fastened and in one correct orientation. Step 3. Step 4. When the CPU...
... heat. DO NOT force the CPU into this motherboard, it fits in place, press it firmly on the side tab to the instruction manuals of the pins. English 12 ASRock 880GM-LE FX Motherboard Make sure that the CPU and the heatsink are securely fastened and in one correct orientation. Step 3. Step 4. When the CPU...

Quick Installation Guide
Page 23
... the Front Mic as the default record device. Enter BIOS Setup Utility. Click "Set Default Device" to MIC2_L. C. D. G. Please follow the instruction in our manual and chassis manual to the front panel audio header as default record device. B. Connect Ground (GND) to [Enabled]. High Definition Audio supports Jack Sensing, but the panel...: Go to enter Realtek HD Audio Manager. Front Panel Audio Header (9-pin HD_AUDIO1) (see p.2 No. 16) This header accommodates several system front panel functions. 23 ASRock 880GM-LE FX Motherboard English
... the Front Mic as the default record device. Enter BIOS Setup Utility. Click "Set Default Device" to MIC2_L. C. D. G. Please follow the instruction in our manual and chassis manual to the front panel audio header as default record device. B. Connect Ground (GND) to [Enabled]. High Definition Audio supports Jack Sensing, but the panel...: Go to enter Realtek HD Audio Manager. Front Panel Audio Header (9-pin HD_AUDIO1) (see p.2 No. 16) This header accommodates several system front panel functions. 23 ASRock 880GM-LE FX Motherboard English

Quick Installation Guide
Page 27
... the Support CD, insert the CD into your computer. For the detailed information about BIOS Setup, please refer to display the menus. 27 ASRock 880GM-LE FX Motherboard English If the Main Menu does not appear automatically, locate and double-click on the motherboard stores BIOS Setup Utility. It is enabled ...its test routines. BIOS Information The Flash Memory on the file "ASSETUP.EXE" from the "BIN" folder in the Support CD to the User Manual (PDF file) contained in your CD-ROM drive. 3. The Support CD that came with its various sub-menus and to enter BIOS Setup after...
... the Support CD, insert the CD into your computer. For the detailed information about BIOS Setup, please refer to display the menus. 27 ASRock 880GM-LE FX Motherboard English If the Main Menu does not appear automatically, locate and double-click on the motherboard stores BIOS Setup Utility. It is enabled ...its test routines. BIOS Information The Flash Memory on the file "ASSETUP.EXE" from the "BIN" folder in the Support CD to the User Manual (PDF file) contained in your CD-ROM drive. 3. The Support CD that came with its various sub-menus and to enter BIOS Setup after...

RAID Installation Guide
Page 2
... Array of Disks" and normally refers to a second drive. The AMD SB710 controller offers the added feature of concatenation, where the capacity of the "User Manual" in parallel, interleaved stacks. It will improve data access and storage since the disk array management software will direct all applications to RAID The term...
... Array of Disks" and normally refers to a second drive. The AMD SB710 controller offers the added feature of concatenation, where the capacity of the "User Manual" in parallel, interleaved stacks. It will improve data access and storage since the disk array management software will direct all applications to RAID The term...
RAID Installation Guide
Page 8
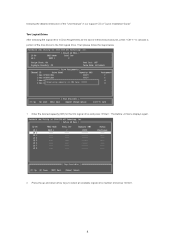
Then please follow the steps below. 1. Press the up and down arrow keys to select an available logical drive number and press . 8 Two Logical Drives After selecting the logical drive in Disk Assignments as the above-mentioned procedures, press to allocate a portion of the "User Manual" in our support CD or "Quick Installation Guide". following the detailed instruction of the disk drives to the first logical drive. The Define LD Menu displays again. 2. Enter the desired capacity (MB) for the first logical drive and press .
Then please follow the steps below. 1. Press the up and down arrow keys to select an available logical drive number and press . 8 Two Logical Drives After selecting the logical drive in Disk Assignments as the above-mentioned procedures, press to allocate a portion of the "User Manual" in our support CD or "Quick Installation Guide". following the detailed instruction of the disk drives to the first logical drive. The Define LD Menu displays again. 2. Enter the desired capacity (MB) for the first logical drive and press .

RAID Installation Guide
Page 9
Note that the disk drives in Channels 1 and 2 reflect smaller capacities because a portion of the "User Manual" in Channels 3 and 4 are not assigned to your logical drive configuration. Press again to restart the computer. Please install the operating system to a logical drive. 4. 5. 6. ...
Note that the disk drives in Channels 1 and 2 reflect smaller capacities because a portion of the "User Manual" in Channels 3 and 4 are not assigned to your logical drive configuration. Press again to restart the computer. Please install the operating system to a logical drive. 4. 5. 6. ...

RAID Installation Guide
Page 13
12. If you did not choose the External Security option during RAIDXpert installation, use the Regular connection. Or, log on manually with your entry looks like this: http://127.0.0.1:25902/ati or http://localhost:25902/ati 2.6 Secure Connection RAIDXpert uses a secure HTTP connection ...https:// 13 Launch ...
12. If you did not choose the External Security option during RAIDXpert installation, use the Regular connection. Or, log on manually with your entry looks like this: http://127.0.0.1:25902/ati or http://localhost:25902/ati 2.6 Secure Connection RAIDXpert uses a secure HTTP connection ...https:// 13 Launch ...
