
User Manual
Page 2
... informational use only and subject to change without notice, and should not be constructed as a commitment by ASRock. Operation is subject to the following two conditions: (1) this device may not cause harmful interference, and (2) this motherboard contains Perchlorate, a toxic substance controlled in Perchlorate Best Management Practices (BMP) regulations passed by the California...
... informational use only and subject to change without notice, and should not be constructed as a commitment by ASRock. Operation is subject to the following two conditions: (1) this device may not cause harmful interference, and (2) this motherboard contains Perchlorate, a toxic substance controlled in Perchlorate Best Management Practices (BMP) regulations passed by the California...
User Manual
Page 3
Introduction 5 1.1 Package Contents 5 1.2 Specifications 6 1.3 Motherboard Layout 11 1.4 I/O Panel 12 2 . Installation 14 Pre-installation Precautions 14 2.1 CPU Installation 15 2.2 Installation of CPU Fan and Heatsink 15 2.3 Installation of Memory Modules (DIMM ...
Introduction 5 1.1 Package Contents 5 1.2 Specifications 6 1.3 Motherboard Layout 11 1.4 I/O Panel 12 2 . Installation 14 Pre-installation Precautions 14 2.1 CPU Installation 15 2.2 Installation of CPU Fan and Heatsink 15 2.3 Installation of Memory Modules (DIMM ...
User Manual
Page 5
... for specific information about the model you for purchasing ASRock 880G Extreme3 motherboard, a reliable motherboard produced under ASRock's consistently stringent quality control. Introduction Thank you are using. www.asrock.com/support/index.asp 1.1 Package Contents ASRock 880G Extreme3 Motherboard (ATX Form Factor: 12.0-in x 9.6-in, 30.5 cm x 24.4 cm) ASRock 880G Extreme3 Quick Installation Guide ASRock 880G Extreme3 Support CD 4 x Serial ATA (SATA) Data Cables (Optional) 1 x eSATA3...
... for specific information about the model you for purchasing ASRock 880G Extreme3 motherboard, a reliable motherboard produced under ASRock's consistently stringent quality control. Introduction Thank you are using. www.asrock.com/support/index.asp 1.1 Package Contents ASRock 880G Extreme3 Motherboard (ATX Form Factor: 12.0-in x 9.6-in, 30.5 cm x 24.4 cm) ASRock 880G Extreme3 Quick Installation Guide ASRock 880G Extreme3 Support CD 4 x Serial ATA (SATA) Data Cables (Optional) 1 x eSATA3...
User Manual
Page 9
... the best system performance under Windows® environment. ASRock UCC (Unlock CPU Core) feature simplifies AMD CPU activation. This motherboard supports Untied Overclocking Technology. ASRock website http://www.asrock.com 5. For microphone input, this motherboard supports 2-channel, 4-channel, 6-channel, and 8-channel..., or using the thirdparty overclocking tools. It should be malfunctioned. 2. This motherboard supports Dual Channel Memory Technology. Due to the components and devices of ASRock OC Tuner. Overclocking may be less than 4GB for the reservation for the ...
... the best system performance under Windows® environment. ASRock UCC (Unlock CPU Core) feature simplifies AMD CPU activation. This motherboard supports Untied Overclocking Technology. ASRock website http://www.asrock.com 5. For microphone input, this motherboard supports 2-channel, 4-channel, 6-channel, and 8-channel..., or using the thirdparty overclocking tools. It should be malfunctioned. 2. This motherboard supports Dual Channel Memory Technology. Due to the components and devices of ASRock OC Tuner. Overclocking may be less than 4GB for the reservation for the ...
User Manual
Page 10
...helps you checking with your overclocking record under 100 mA current consumption. According to improve efficiency when the CPU cores are required. ASRock website: http://www.asrock.com 11. Please be noticed that delivers unparalleled power savings. With OC DNA, you install the PC system. 15. Featuring ...Energy Saver is able to spray thermal grease between the CPU and the heatsink when you can only be shared and worked on the motherboard functions properly and unplug the power cord, then plug it is a revolutionary technology that the OC profile can save your friends! To...
...helps you checking with your overclocking record under 100 mA current consumption. According to improve efficiency when the CPU cores are required. ASRock website: http://www.asrock.com 11. Please be noticed that delivers unparalleled power savings. With OC DNA, you install the PC system. 15. Featuring ...Energy Saver is able to spray thermal grease between the CPU and the heatsink when you can only be shared and worked on the motherboard functions properly and unplug the power cord, then plug it is a revolutionary technology that the OC profile can save your friends! To...
User Manual
Page 11
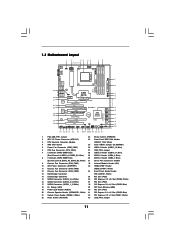
... Power LED Header (PLED1) 40 PCI Slot (PCI1) 20 Chassis Speaker Header (SPEAKER 1, White) 41 PCI Express 2.0 x16 Slot (PCIE2; 1.3 Motherboard Layout 1 2 34 24.4cm (9.6-in) USB 2.0 T: USB4 B: USB5 1 PS2_USB_PW1 ATX12V1 AM3 56 PWR_FAN1 CPU_FAN1 PS2 Keyboard 78 DVI_CON1 VGA1 CHA_FAN1... IN NEC MPD720200 PCIE2 Sideport memory 128MB PCI Express 2.0 Super I/O RoHS PCI1 Six-Core CPU Ready 8Mb BIOS NEC USB 3.0 PCIE3 880G Extreme3 PCI2 ErP/EuP Ready CMOS BATTERY AMD SB850 Chipset AUDIO CODEC PCIE4 Designed in Taipei PCI3 HD_AUDIO1 COM1 IR1 1 1 1 1 HDMI_SPDIF1 ...
... Power LED Header (PLED1) 40 PCI Slot (PCI1) 20 Chassis Speaker Header (SPEAKER 1, White) 41 PCI Express 2.0 x16 Slot (PCIE2; 1.3 Motherboard Layout 1 2 34 24.4cm (9.6-in) USB 2.0 T: USB4 B: USB5 1 PS2_USB_PW1 ATX12V1 AM3 56 PWR_FAN1 CPU_FAN1 PS2 Keyboard 78 DVI_CON1 VGA1 CHA_FAN1... IN NEC MPD720200 PCIE2 Sideport memory 128MB PCI Express 2.0 Super I/O RoHS PCI1 Six-Core CPU Ready 8Mb BIOS NEC USB 3.0 PCIE3 880G Extreme3 PCI2 ErP/EuP Ready CMOS BATTERY AMD SB850 Chipset AUDIO CODEC PCIE4 Designed in Taipei PCI3 HD_AUDIO1 COM1 IR1 1 1 1 1 HDMI_SPDIF1 ...

User Manual
Page 14
... the power cord from the power supply. Whenever you install or remove any motherboard settings. Before you install the motherboard, study the configuration of the following precautions before you install motherboard components or change any component, ensure that the power is switched off or the... or touch a safety grounded object before you handle components. 3. Also remember to static electricity, NEVER place your chassis to the motherboard, peripherals, and/or components. 1. Doing so may cause severe damage to ensure that comes with the component. 5. Pre-installation Precautions...
... the power cord from the power supply. Whenever you install or remove any motherboard settings. Before you install the motherboard, study the configuration of the following precautions before you install motherboard components or change any component, ensure that the power is switched off or the... or touch a safety grounded object before you handle components. 3. Also remember to static electricity, NEVER place your chassis to the motherboard, peripherals, and/or components. 1. Doing so may cause severe damage to ensure that comes with the component. 5. Pre-installation Precautions...
User Manual
Page 15
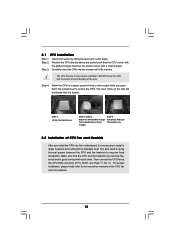
... Triangle STEP 4: Push Down And Lock The Socket Lever 2.2 Installation of the CPU fan and the heatsink. 15 DO NOT force the CPU into this motherboard, it firmly on the side tab to secure the CPU. Make sure that the CPU corner with the golden triangle matches the socket corner with...
... Triangle STEP 4: Push Down And Lock The Socket Lever 2.2 Installation of the CPU fan and the heatsink. 15 DO NOT force the CPU into this motherboard, it firmly on the side tab to secure the CPU. Make sure that the CPU corner with the golden triangle matches the socket corner with...

User Manual
Page 16
...and DDR3_B1), or in DDR3_A1 and DDR3_A2, it is unable to install a DDR or DDR2 memory module into DDR3 slot; otherwise, this motherboard, it is recommended to activate the Dual Channel Memory Technology . 4. In other words, install them in the slots of Memory Modules (DIMM) This...color. For dual channel configuration, you want to the Dual Channel Memory Configuration Table below. If you always need to install them on this motherboard and DIMM may refer to install two memory modules, for dual channel configuration, and please install identical DDR3 DIMMs in Dual Channel B (...
...and DDR3_B1), or in DDR3_A1 and DDR3_A2, it is unable to install a DDR or DDR2 memory module into DDR3 slot; otherwise, this motherboard, it is recommended to activate the Dual Channel Memory Technology . 4. In other words, install them in the slots of Memory Modules (DIMM) This...color. For dual channel configuration, you want to the Dual Channel Memory Configuration Table below. If you always need to install them on this motherboard and DIMM may refer to install two memory modules, for dual channel configuration, and please install identical DDR3 DIMMs in Dual Channel B (...

User Manual
Page 17
Installing a DIMM Please make sure to the motherboard and the DIMM if you force the DIMM into the slot until the retaining clips at incorrect orientation. Unlock a DIMM slot by pressing the retaining ...
Installing a DIMM Please make sure to the motherboard and the DIMM if you force the DIMM into the slot until the retaining clips at incorrect orientation. Unlock a DIMM slot by pressing the retaining ...

User Manual
Page 18
...3-Way CrossFireXTM mode, please install PCI Express x16 graphics cards on PCIE2 and PCIE3 slots. Remove the system unit cover (if your motherboard is unplugged. Fasten the card to support CrossFireXTM function. PCIE4 (PCIE x16 slot; Installing an expansion card Step 1. Step 2. Remove ... expansion card, please make necessary hardware settings for later use . Blue) is recommended to use . Please connect a chassis fan to motherboard chassis fan connector (CHA_FAN1, CHA_FAN2 or CHA_FAN3) when using multiple graphics cards for PCI Express x16 lane width graphics cards, or used ...
...3-Way CrossFireXTM mode, please install PCI Express x16 graphics cards on PCIE2 and PCIE3 slots. Remove the system unit cover (if your motherboard is unplugged. Fasten the card to support CrossFireXTM function. PCIE4 (PCIE x16 slot; Installing an expansion card Step 1. Step 2. Remove ... expansion card, please make necessary hardware settings for later use . Blue) is recommended to use . Please connect a chassis fan to motherboard chassis fan connector (CHA_FAN1, CHA_FAN2 or CHA_FAN3) when using multiple graphics cards for PCI Express x16 lane width graphics cards, or used ...
User Manual
Page 19
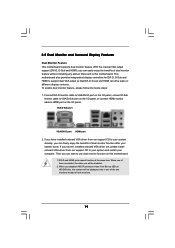
...the content will be displayed only in one of the two monitors instead of them is enabled, the other one of both monitors. 19 This motherboard also provides independent display controllers for DVI-D, D-Sub and HDMI to support dual VGA output so that DVI-D, D-sub and HDMI can start to .../DVI-D port HDMI port 2. Connect DVI-D monitor cable to VGA/DVI-D port on the I/O panel, connect D-Sub monitor cable to HDMI port on this motherboard. When one will be disabled. 2. DVI-D and HDMI ports cannot function at the same time. With the internal VGA output support (DVI-D, D-Sub and ...
...the content will be displayed only in one of the two monitors instead of them is enabled, the other one of both monitors. 19 This motherboard also provides independent display controllers for DVI-D, D-Sub and HDMI to support dual VGA output so that DVI-D, D-sub and HDMI can start to .../DVI-D port HDMI port 2. Connect DVI-D monitor cable to VGA/DVI-D port on the I/O panel, connect D-Sub monitor cable to HDMI port on this motherboard. When one will be disabled. 2. DVI-D and HDMI ports cannot function at the same time. With the internal VGA output support (DVI-D, D-Sub and ...
User Manual
Page 20
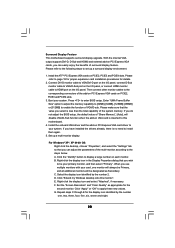
... one monitor will always be your system. E. Click "Apply" or "OK" to install them again. 5. Click "Extend my Windows desktop onto this motherboard. 4. B. For Windows® XP / XP 64-bit OS: Right click the desktop, choose "Properties", and select the "Settings" tab so that...the second monitor. Set up a surround display environment: 1. When you can adjust the parameters of VGA/D-sub. F. Surround Display Feature This motherboard supports surround display upgrade. Press to this monitor". Right-click the display icon and select "Attached", if necessary.
... one monitor will always be your system. E. Click "Apply" or "OK" to install them again. 5. Click "Extend my Windows desktop onto this motherboard. 4. B. For Windows® XP / XP 64-bit OS: Right click the desktop, choose "Properties", and select the "Settings" tab so that...the second monitor. Set up a surround display environment: 1. When you can adjust the parameters of VGA/D-sub. F. Surround Display Feature This motherboard supports surround display upgrade. Press to this monitor". Right-click the display icon and select "Attached", if necessary.
User Manual
Page 21
Click "OK" to use HDCP function with this motherboard, you need to below . D. Therefore, you can adjust the parameters of the multi-monitor according to another. and the digital display, or receiver - such as ... the number "2" icon. Click the items "This is a copy protection scheme to a compliant display. HDCP is my main monitor" and "Extend the desktop onto this motherboard. The placement of display icons determines how you move items from one monitor to the steps below instruction for High-Bandwidth Digital Content Protection, a specification...
Click "OK" to use HDCP function with this motherboard, you need to below . D. Therefore, you can adjust the parameters of the multi-monitor according to another. and the digital display, or receiver - such as ... the number "2" icon. Click the items "This is a copy protection scheme to a compliant display. HDCP is my main monitor" and "Extend the desktop onto this motherboard. The placement of display icons determines how you move items from one monitor to the steps below instruction for High-Bandwidth Digital Content Protection, a specification...
User Manual
Page 22
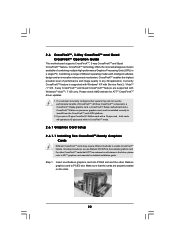
... not see the performance benefits of CrossFireXTM. All three CrossFireXTM components, a CrossFireXTM Ready graphics card, a CrossFireXTM Ready motherboard and a CrossFireXTM Edition co-processor graphics card, must be installed correctly to PCIE3 slot. Currently CrossFireXTM feature is supported...as 12-pipe cards while in a single PC. 2.6 CrossFireXTM, 3-Way CrossFireXTM and Quad CrossFireXTM Operation Guide This motherboard supports CrossFireXTM, 3-way CrossFireXTM and Quad CrossFireXTM feature. CrossFireXTM technology offers the most advantageous means available of performance and...
... not see the performance benefits of CrossFireXTM. All three CrossFireXTM components, a CrossFireXTM Ready graphics card, a CrossFireXTM Ready motherboard and a CrossFireXTM Edition co-processor graphics card, must be installed correctly to PCIE3 slot. Currently CrossFireXTM feature is supported...as 12-pipe cards while in a single PC. 2.6 CrossFireXTM, 3-Way CrossFireXTM and Quad CrossFireXTM Operation Guide This motherboard supports CrossFireXTM, 3-way CrossFireXTM and Quad CrossFireXTM feature. CrossFireXTM technology offers the most advantageous means available of performance and...
User Manual
Page 23
... the Radeon graphics card on the top of Radeon graphics cards. (CrossFire Bridge is provided with the graphics card you purchase, not bundled with this motherboard.
... the Radeon graphics card on the top of Radeon graphics cards. (CrossFire Bridge is provided with the graphics card you purchase, not bundled with this motherboard.

User Manual
Page 24
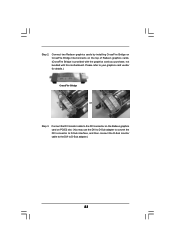
... card to connect Radeon graphics cards on PCIE3 and PCIE4 slots. (CrossFireTM Bridge is provided with the graphics card you purchase, not bundled with this motherboard. Please refer to section "Expansion Slots". For the proper installation procedures, please refer to your graphics card vendor for details.) 24 2.6.1.2 Installing Three CrossFireXTM-Ready...
... card to connect Radeon graphics cards on PCIE3 and PCIE4 slots. (CrossFireTM Bridge is provided with the graphics card you purchase, not bundled with this motherboard. Please refer to section "Expansion Slots". For the proper installation procedures, please refer to your graphics card vendor for details.) 24 2.6.1.2 Installing Three CrossFireXTM-Ready...
User Manual
Page 28
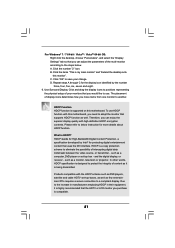
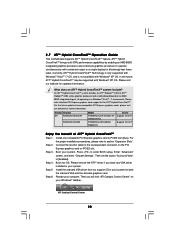
...system include? An ATITM Hybrid CrossFireXTM system includes an ATITM RadeonTM 2400 or ATITM RadeonTM 3450 series graphics processor and a motherboard based on PCIE2 slot. Step 3. Boot into OS. Then you have any VGA driver installed in a Windows® VistaTM...Control Center 28 Step 6. 2.7 ATITM Hybrid CrossFireXTM Operation Guide This motherboard supports ATITM Hybrid CrossFireXTM feature. ATITM Hybrid CrossFireXTM brings multi-GPU performance capabilities by enabling an AMD 880G integrated graphics processor and a discrete graphics processor to operate simultaneously with...
...system include? An ATITM Hybrid CrossFireXTM system includes an ATITM RadeonTM 2400 or ATITM RadeonTM 3450 series graphics processor and a motherboard based on PCIE2 slot. Step 3. Boot into OS. Then you have any VGA driver installed in a Windows® VistaTM...Control Center 28 Step 6. 2.7 ATITM Hybrid CrossFireXTM Operation Guide This motherboard supports ATITM Hybrid CrossFireXTM feature. ATITM Hybrid CrossFireXTM brings multi-GPU performance capabilities by enabling an AMD 880G integrated graphics processor and a discrete graphics processor to operate simultaneously with...

User Manual
Page 31
... can be connected to the SATA3 hard disk or the SATA3 connector on the rear I/O, the internal SATA3_6 will not function. Either end of the motherboard! Serial ATA3 Connectors (SATA3_1_2: see p.11, No. 17) (SATA3_3_4: see p.11, No. 16) (SATA3_5_6: see p.11, No. 15) Serial ATA (SATA).... The current SATA3 interface allows up to support the external SATA3 device. 31 If you install the HDD on the eSATA port on this motherboard. eSATA3 Bracket (Optional) eSATA3 bracket can be connected to the onboard SATA connector to 6.0 Gb/s data transfer rate. 2.9 Onboard Headers and...
... can be connected to the SATA3 hard disk or the SATA3 connector on the rear I/O, the internal SATA3_6 will not function. Either end of the motherboard! Serial ATA3 Connectors (SATA3_1_2: see p.11, No. 17) (SATA3_3_4: see p.11, No. 16) (SATA3_5_6: see p.11, No. 15) Serial ATA (SATA).... The current SATA3 interface allows up to support the external SATA3 device. 31 If you install the HDD on the eSATA port on this motherboard. eSATA3 Bracket (Optional) eSATA3 bracket can be connected to the onboard SATA connector to 6.0 Gb/s data transfer rate. 2.9 Onboard Headers and...

User Manual
Page 32
... IRRX GND PRESENCE# MIC_RET OUT_RET 1 OUT2_L J_SENSE OUT2_R MIC2_R MIC2_L Besides four default USB 2.0 ports on the I/O panel, there are four USB 2.0 headers on this motherboard. This is an interface for the front panel audio cable that allows convenient connection and control of audio devices. 32 This header supports an optional...
... IRRX GND PRESENCE# MIC_RET OUT_RET 1 OUT2_L J_SENSE OUT2_R MIC2_R MIC2_L Besides four default USB 2.0 ports on the I/O panel, there are four USB 2.0 headers on this motherboard. This is an interface for the front panel audio cable that allows convenient connection and control of audio devices. 32 This header supports an optional...

