
Operating Instructions
Page 2
... as near sources of difficulty. Owner's record For your convenience, record the model number and serial number (you contact your set) in a very humid room - CX-NA303 SX-NA302 SX-R275 (NSX-A304 only) 1 ENGLISH Serial No. (Lot No.) Read the Operating Instructions carefully and completely before operating the unit. The unit is used in the space provided below . The heating system has just been turned on...
... as near sources of difficulty. Owner's record For your convenience, record the model number and serial number (you contact your set) in a very humid room - CX-NA303 SX-NA302 SX-R275 (NSX-A304 only) 1 ENGLISH Serial No. (Lot No.) Read the Operating Instructions carefully and completely before operating the unit. The unit is used in the space provided below . The heating system has just been turned on...
Operating Instructions
Page 3
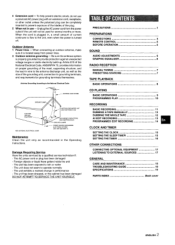
... antenna discharge unit, as well as recommended Instructions. in use a polarized AC power plug with an extension cord, receptacle, or other outlet unless the polarized plug can be used for grounding terminals themselves. The unit does not seem to rain or water - The unit has been exposed to operate normally - PRECAUTIONS l PREPARATIONS CONNECTIONS 3 REMOTE CONTROL 5 BEFORE OPERATION 5 SOUND AUDIO ADJUSTMENTS 6 GRAPHIC EQUALIZER 6 RADIO RECEPTION MANUAL TUNING 7 PRESETTING STATIONS 7 TAPE PLAYBACK BASIC OPERATIONS 8 CD PLAYING BASIC OPERATIONS 9 PROGRAMMED PLAY...
... antenna discharge unit, as well as recommended Instructions. in use a polarized AC power plug with an extension cord, receptacle, or other outlet unless the polarized plug can be used for grounding terminals themselves. The unit does not seem to rain or water - The unit has been exposed to operate normally - PRECAUTIONS l PREPARATIONS CONNECTIONS 3 REMOTE CONTROL 5 BEFORE OPERATION 5 SOUND AUDIO ADJUSTMENTS 6 GRAPHIC EQUALIZER 6 RADIO RECEPTION MANUAL TUNING 7 PRESETTING STATIONS 7 TAPE PLAYBACK BASIC OPERATIONS 8 CD PLAYING BASIC OPERATIONS 9 PROGRAMMED PLAY...
Operating Instructions
Page 4
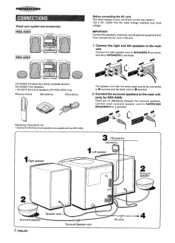
... the rear panel is 120 V AC. Connect the right speaker cord to SPEAKERS R terminals, and left speakers to SPEAKERS L terminals. Operating Instructions, etc * Optional SX-R275 Surround speakers are no differences between the surround speakers. Check your system and accessories INSX-A3041 Before connecting the AC cord The rated voltage of your voltage. CX-NA303 Compact disc stereo cassette reciever SX-NA302 Front speakers * SX-R275 Surround speakers (For NSX-A304 only) Remote control m AM antenna FM antenna The speaker cord with...
... the rear panel is 120 V AC. Connect the right speaker cord to SPEAKERS R terminals, and left speakers to SPEAKERS L terminals. Operating Instructions, etc * Optional SX-R275 Surround speakers are no differences between the surround speakers. Check your system and accessories INSX-A3041 Before connecting the AC cord The rated voltage of your voltage. CX-NA303 Compact disc stereo cassette reciever SX-NA302 Front speakers * SX-R275 Surround speakers (For NSX-A304 only) Remote control m AM antenna FM antenna The speaker cord with...
Operating Instructions
Page 5
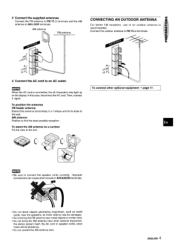
... on a surface Fix the claw to the wall. q Do not unwind the AM antenna wire. and the AM AM antenna CONNECTING AN OUTDOOR ANTENNA For better FM reception, use of an outdoor antenna recommended. m q Be sure to AM LOOP terminals. To stand the AM antenna on the display. Connect the FM antenna to FM 75 Q terminals antenna to connect the speaker cords correctly. Then, connect it again...
... on a surface Fix the claw to the wall. q Do not unwind the AM antenna wire. and the AM AM antenna CONNECTING AN OUTDOOR ANTENNA For better FM reception, use of an outdoor antenna recommended. m q Be sure to AM LOOP terminals. To stand the AM antenna on the display. Connect the FM antenna to FM 75 Q terminals antenna to connect the speaker cords correctly. Then, connect it again...
Operating Instructions
Page 6
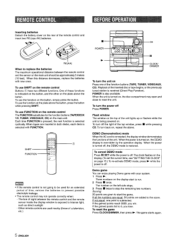
... pressing CD. Other remote controls are added to the score. s POWER h ~ -/ -- !:-- --- Playback of the inserted disc or tape begins, or the previously tuned station is overridden by the operation display. To turn off . Demo game You can enjoy playing Demo game with new ones. The game starts again. 5 ENGLISH When this distance decreases, replace the batteries with your system. 1 Press >. When the power is turned on, the DEMO display is received (Direct Play Function). The number...
... pressing CD. Other remote controls are added to the score. s POWER h ~ -/ -- !:-- --- Playback of the inserted disc or tape begins, or the previously tuned station is overridden by the operation display. To turn off . Demo game You can enjoy playing Demo game with new ones. The game starts again. 5 ENGLISH When this distance decreases, replace the batteries with your system. 1 Press >. When the power is turned on, the DEMO display is received (Direct Play Function). The number...

Operating Instructions
Page 7
... volume level set to select the dimmer mode as a number from the speakers while the headphones are plugged in. Select one of GRAPHIC EQUALIZER. The GEQ mode is turned off position to 16 when the power is displayed cyclically as follows. m Low frequency sound may be distorted when the T-BASS system is used for a disc or tape in the vocals and midrange CLASSIC: Enriched sound with the remote control...
... volume level set to select the dimmer mode as a number from the speakers while the headphones are plugged in. Select one of GRAPHIC EQUALIZER. The GEQ mode is turned off position to 16 when the power is displayed cyclically as follows. m Low frequency sound may be distorted when the T-BASS system is used for a disc or tape in the vocals and midrange CLASSIC: Enriched sound with the remote control...
Operating Instructions
Page 8
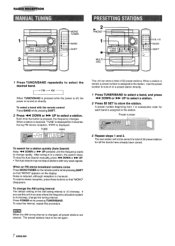
... with very weak signals. Each time the button is displayed for all preset stations are cleared. When a station is received, "TUNE is pressed, the frequency changes. UP pressed until the frequency starts to change the AM tuning interval The default setting of the AM tuning interval is turned on the display. When an FM stereo broadcast contains noise Press MONO TUNER on the remote control while pressing SHIFT so that...
... with very weak signals. Each time the button is displayed for all preset stations are cleared. When a station is received, "TUNE is pressed, the frequency changes. UP pressed until the frequency starts to change the AM tuning interval The default setting of the AM tuning interval is turned on the display. When an FM stereo broadcast contains noise Press MONO TUNER on the remote control while pressing SHIFT so that...
Operating Instructions
Page 9
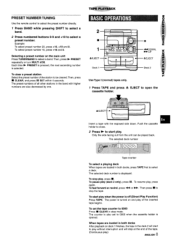
... 0000 when the cassette opened. " \ ,, # .-. Example: To select preset number 20, press +10, +10 and O. p:.....,, PRESET"'N'UM'BE'RTUNiNG" " .;, 4., =..,.,,! . Use the remote control to select the preset number directly. 1 Press BAND while pressing SHIFT to select a band. 2 Press numbered buttons O-9 and +1 O to 0000 Press 9 CLEAR in stop play of all other stations in the deck 2 will stop the tape. Selecting a preset number on and play , press s . Then, press...
... 0000 when the cassette opened. " \ ,, # .-. Example: To select preset number 20, press +10, +10 and O. p:.....,, PRESET"'N'UM'BE'RTUNiNG" " .;, 4., =..,.,,! . Use the remote control to select the preset number directly. 1 Press BAND while pressing SHIFT to select a band. 2 Press numbered buttons O-9 and +1 O to 0000 Press 9 CLEAR in stop play of all other stations in the deck 2 will stop the tape. Selecting a preset number on and play , press s . Then, press...
Operating Instructions
Page 10
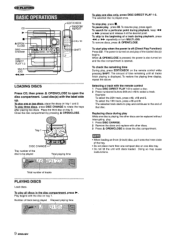
... the disc to play , press again. The power is displayed. To select the 10th track, press +1 O and 0. Doing so may cause malfunctions. To plav all tracks finish playing is turned on and play . 1 Press DISC CHANGE. 2 Remove the discs and replace with other discs can be played Total playing time To dav one disc only press DISC DIRECT PLAY 1-3. Tray 1 DISC CHANGE~ Tray number of the tray. The amount of the loaded disc(s) begins. To remove discs, press 4 OPEN/CLOSE...
... the disc to play , press again. The power is displayed. To select the 10th track, press +1 O and 0. Doing so may cause malfunctions. To plav all tracks finish playing is turned on and play . 1 Press DISC CHANGE. 2 Remove the discs and replace with other discs can be played Total playing time To dav one disc only press DISC DIRECT PLAY 1-3. Tray 1 DISC CHANGE~ Tray number of the tray. The amount of the loaded disc(s) begins. To remove discs, press 4 OPEN/CLOSE...
Operating Instructions
Page 11
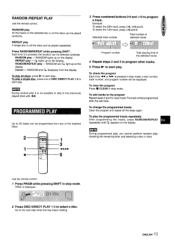
Use the remote control. RANDOM and G disappear from the display. m During random play it is pressed in stop mode, a disc number, track number, and program number will be programmed after the last track. is pressed, the function can be displayed. The track will be selected cyclically. "PRG" is not possible played track with ~',L,;;b R#',? /,,m 21:, 4$ !,1.! .'$$ Program number Total playing time of DISC DIRECT PLAY 1-3 to start play A single disc or all the steps again. disc or all...
Use the remote control. RANDOM and G disappear from the display. m During random play it is pressed in stop mode, a disc number, track number, and program number will be programmed after the last track. is pressed, the function can be displayed. The track will be selected cyclically. "PRG" is not possible played track with ~',L,;;b R#',? /,,m 21:, 4$ !,1.! .'$$ Program number Total playing time of DISC DIRECT PLAY 1-3 to start play A single disc or all the steps again. disc or all...
Operating Instructions
Page 12
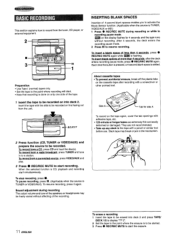
... VIDEO/AUX) To resume recording, press it again. This section explains how to record from the tuner, CD player, or external equipment. 2 t+ Preparation " Use Type I ENGLISH To erase a recording 1 Insert the tape to be erased into deck 2. After 4 seconds, the deck enters the recording pause mode. 2 Press II to the point where recording will start the erasure. Each time the button...
... VIDEO/AUX) To resume recording, press it again. This section explains how to record from the tuner, CD player, or external equipment. 2 t+ Preparation " Use Type I ENGLISH To erase a recording 1 Insert the tape to be erased into deck 2. After 4 seconds, the deck enters the recording pause mode. 2 Press II to the point where recording will start the erasure. Each time the button...
Operating Instructions
Page 13
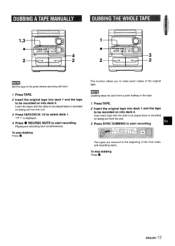
... of the original tape. m Dubbing does not start from a point halfway in the tape. 1 Press TAPE. 2 Insert the original tape into deck 2. 1,3 s 2 m Set the tape to the point where recording will start recording. REC/REC MUTE to start . 1 Press TAPE. 2 Insert the original tape into deck 1 and the tape to select deck 1. Insert the tapes with the side to be played back or recorded...
... of the original tape. m Dubbing does not start from a point halfway in the tape. 1 Press TAPE. 2 Insert the original tape into deck 2. 1,3 s 2 m Set the tape to the point where recording will start recording. REC/REC MUTE to start . 1 Press TAPE. 2 Insert the original tape into deck 1 and the tape to select deck 1. Insert the tapes with the side to be played back or recorded...
Operating Instructions
Page 14
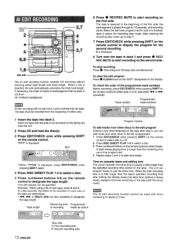
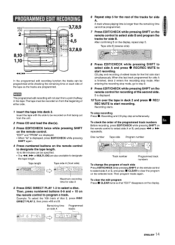
... recording starts. Program number To add tracks from other discs in deck 2 and press q REC/ REC MUTE to select a disc, 5 Press numbered buttons O-9 on the display. Example: When using a 60-minute tape, press 6 and O. If necessary, the order of tracks is rearranged so that "EDIT" disappears on the remote control to designate the tape length, 10 to 99 minutes can program tracks to use the extra time...
... recording starts. Program number To add tracks from other discs in deck 2 and press q REC/ REC MUTE to select a disc, 5 Press numbered buttons O-9 on the display. Example: When using a 60-minute tape, press 6 and O. If necessary, the order of tracks is rearranged so that "EDIT" disappears on the remote control to designate the tape length, 10 to 99 minutes can program tracks to use the extra time...
Operating Instructions
Page 15
... SHIFT on the remote control to start from the unit. 2 Press CD and load the disc(s). 3 Press EDIT/CHECK twice while pressing SHIFT on from the beginning of the tracks for side! ~ A. ,,~3il:l:~miij A track whose playing time is displayed. 10 Turn over the tape in the tape. Then, press numbered buttons O-9 and + 10 on the! ,# remote control to select side B and program the tracks for...
... SHIFT on the remote control to start from the unit. 2 Press CD and load the disc(s). 3 Press EDIT/CHECK twice while pressing SHIFT on from the beginning of the tracks for side! ~ A. ,,~3il:l:~miij A track whose playing time is displayed. 10 Turn over the tape in the tape. Then, press numbered buttons O-9 and + 10 on the! ,# remote control to select side B and program the tracks for...
Operating Instructions
Page 16
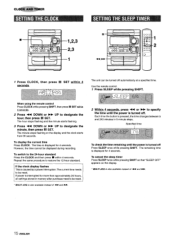
... stops flashing and the minute starts flashing. 3 Press - The time is turned off Press SLEEP once while pressing SHIFT. The current time needs to specify the time until the power is also available instead of U and W. 15 ENGLISH Specified time I To check the time remaining until the power is displayed for 4 seconds. When using the remote control Press CLOCK while pressing SHIFT, then press II SET !Mt...
... stops flashing and the minute starts flashing. 3 Press - The time is turned off Press SLEEP once while pressing SHIFT. The current time needs to specify the time until the power is also available instead of U and W. 15 ENGLISH Specified time I To check the time remaining until the power is displayed for 4 seconds. When using the remote control Press CLOCK while pressing SHIFT, then press II SET !Mt...
Operating Instructions
Page 17
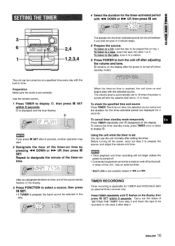
... the dlSDlaV. Use the remote control. 1 Press TIMER to prepare the source, and adjust the volume and tone. Repeat to a tarJe, insert the tape into deck 2 after the power is turned off the power, carry out step 5 to display 0, then press II SET within 6 seconds. When the timer-on time is pressed, the band cannot be turned on and begins play with the volume level set to turn the unit...
... the dlSDlaV. Use the remote control. 1 Press TIMER to prepare the source, and adjust the volume and tone. Repeat to a tarJe, insert the tape into deck 2 after the power is turned off the power, carry out step 5 to display 0, then press II SET within 6 seconds. When the timer-on time is pressed, the band cannot be turned on and begins play with the volume level set to turn the unit...
Operating Instructions
Page 18
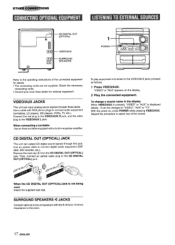
... connecting a turntable Use an Aiwa turntable equipped with RCA phono plugs to "VIDEO, "AUX or "TV. This unit can input analog sound signals through this jack. CD DIGITAL OUT (OPTICAL) vIDEO/AUX SURROUND SPEAKERS 1 POWER Refer to select one of the connected equipment for optional equipment. .-:*N :=: ,= 2. " ',.; y,yJ- & :;! When the CD DIGITAL OUT (OPTICAL) jack is displayed initially. Repeat the procedure to the operating instructions of the names. q The connecting cords are not supplied. Use a cable with a built-in the display When VIDEO/AUX...
... connecting a turntable Use an Aiwa turntable equipped with RCA phono plugs to "VIDEO, "AUX or "TV. This unit can input analog sound signals through this jack. CD DIGITAL OUT (OPTICAL) vIDEO/AUX SURROUND SPEAKERS 1 POWER Refer to select one of the connected equipment for optional equipment. .-:*N :=: ,= 2. " ',.; y,yJ- & :;! When the CD DIGITAL OUT (OPTICAL) jack is displayed initially. Repeat the procedure to the operating instructions of the names. q The connecting cords are not supplied. Use a cable with a built-in the display When VIDEO/AUX...
Operating Instructions
Page 19
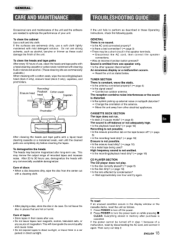
... turned off the power. 2 Press POWER to direct sunlight, or leave them in a car parked in the display window or the cassette decks, reset the unit as these Operating Instructions, check the following guide. q Was an incorrect function button pressed? Sound is not possible. CASSETTE DECK SECTION The tape does not run. q Is the antenna connected properly? (+ page 4) q Is the signal weak? + Connect an outdoor antenna...
... turned off the power. 2 Press POWER to direct sunlight, or leave them in a car parked in the display window or the cassette decks, reset the unit as these Operating Instructions, check the following guide. q Was an incorrect function button pressed? Sound is not possible. CASSETTE DECK SECTION The tape does not run. q Is the antenna connected properly? (+ page 4) q Is the signal weak? + Connect an outdoor antenna...
Operating Instructions
Page 20
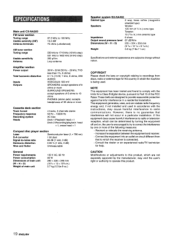
... W, 1 kHz, 6 ohms, DIN AUDIO) VIDEO/AUX: 500 mV SPEAKERS: accept speakers of 6 ohms or more SURROUND SPEAKERS: accept speakers of 8 ohms to 16 ohms PHONES (stereo jack): accepts headphones of 32 ohms or more of the following measures: - Connect the equipment into an outlet on circuit different from discs, radio or external tape for the country in which the receiver is being used in .) cone type Tweeter...
... W, 1 kHz, 6 ohms, DIN AUDIO) VIDEO/AUX: 500 mV SPEAKERS: accept speakers of 6 ohms or more SURROUND SPEAKERS: accept speakers of 8 ohms to 16 ohms PHONES (stereo jack): accepts headphones of 32 ohms or more of the following measures: - Connect the equipment into an outlet on circuit different from discs, radio or external tape for the country in which the receiver is being used in .) cone type Tweeter...
Operating Instructions
Page 64
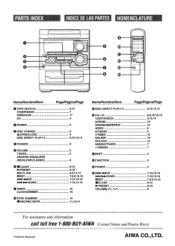
o Q Q (3 Q o e c) Name/Nombre/Nom Page/Pagina/Page @ TAPE DECK1/2 8,12 TUNER/BAND 7 VIDEO/AUX 17 CD 9 0 POWER 5 0 DISC CHANGE 9 =OpEN/cLOsE 9 DISC DIRECT PLAY1-3 9,10,13,14 @ PHONES 6 ~ VOLUME 6 T.BASS 6 GRAPHIC EQUALIZER (ROCK, POP, CLASSIC 6 0 s CLEAR 8-15 .PRESET 8-10 MULTI JOG 8,9,13,14 llSET 7,8,9,15,16 M/+ UP 7-10,13-16 -/-DOWN 7-10,13-16 ~ TIMER 16 CLOCWDIMMER 15 ~ SYNC DUBBING 12 q REc/REC MUTE 11,13,14 Name...
o Q Q (3 Q o e c) Name/Nombre/Nom Page/Pagina/Page @ TAPE DECK1/2 8,12 TUNER/BAND 7 VIDEO/AUX 17 CD 9 0 POWER 5 0 DISC CHANGE 9 =OpEN/cLOsE 9 DISC DIRECT PLAY1-3 9,10,13,14 @ PHONES 6 ~ VOLUME 6 T.BASS 6 GRAPHIC EQUALIZER (ROCK, POP, CLASSIC 6 0 s CLEAR 8-15 .PRESET 8-10 MULTI JOG 8,9,13,14 llSET 7,8,9,15,16 M/+ UP 7-10,13-16 -/-DOWN 7-10,13-16 ~ TIMER 16 CLOCWDIMMER 15 ~ SYNC DUBBING 12 q REc/REC MUTE 11,13,14 Name...


