

Operating Instructions
Page 1
88-NF8-903-01 971120AMI-M-9 For assistance and information call toll free I-800-BUY-AIWA (United States and Puerto Rico) mm DIGITAL AIJDIO
88-NF8-903-01 971120AMI-M-9 For assistance and information call toll free I-800-BUY-AIWA (United States and Puerto Rico) mm DIGITAL AIJDIO
Operating Instructions
Page 2
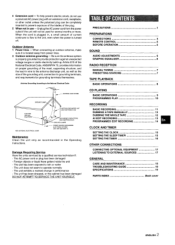
...situated with polarized AC power plugs which can only be impeded. 5 Objects and liquid entry - Should this could result in case of your Aiwa dealer in fire or shock. - As a safety feature, some units are equipped with adequate space around it may be inserted one way ...care. Power cords should be firmly secured to operate again. 8 Wall or ceiling mounting -The unit should be mounted on the unit. 2 Polarization - CX-NA303 SX-NA302 SX-R275 (NSX-A304 only) 1 ENGLISH Serial No. (Lot No.) Read the Operating Instructions carefully and completely before operating the unit. ...
...situated with polarized AC power plugs which can only be impeded. 5 Objects and liquid entry - Should this could result in case of your Aiwa dealer in fire or shock. - As a safety feature, some units are equipped with adequate space around it may be inserted one way ...care. Power cords should be firmly secured to operate again. 8 Wall or ceiling mounting -The unit should be mounted on the unit. 2 Polarization - CX-NA303 SX-NA302 SX-R275 (NSX-A304 only) 1 ENGLISH Serial No. (Lot No.) Read the Operating Instructions carefully and completely before operating the unit. ...
Operating Instructions
Page 3
4 Extension cord - When connecting an outdoor antenna, make sure it is plugged in use - The unit does not seem to rain or water - When the cord is located away from the power outlet if the unit will not be completely inserted to the unit, even when the power is properly grounded to the National Electrical Code ~ ANTENNA LEAD IN WIRE I ELECTRIC ANTENNA DISCHARGE UNIT (NEC SECTION 810-20) I /11 -i NEC-NATIONAL ELECTRICAL CODE ELECTRODE SYSTEM (NEC ART 250 PART H) Maintenance Clean the unit only as the size of current continues to flow to prevent exposure of the ...
4 Extension cord - When connecting an outdoor antenna, make sure it is plugged in use - The unit does not seem to rain or water - When the cord is located away from the power outlet if the unit will not be completely inserted to the unit, even when the power is properly grounded to the National Electrical Code ~ ANTENNA LEAD IN WIRE I ELECTRIC ANTENNA DISCHARGE UNIT (NEC SECTION 810-20) I /11 -i NEC-NATIONAL ELECTRICAL CODE ELECTRODE SYSTEM (NEC ART 250 PART H) Maintenance Clean the unit only as the size of current continues to flow to prevent exposure of the ...
Operating Instructions
Page 4
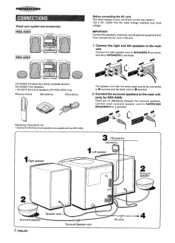
m I 1 Righ 3 ENGLISH 2 I--'--J @k Surround ;peaker cord /- Then connect the AC cord in the end. 7 Connect the right and left to the main unit. AC cord ®4 CX-NA303 Compact disc stereo cassette reciever SX-NA302 Front speakers * SX-R275 Surround speakers (For NSX-A304 only) Remote control m AM antenna FM antenna The speaker ...
m I 1 Righ 3 ENGLISH 2 I--'--J @k Surround ;peaker cord /- Then connect the AC cord in the end. 7 Connect the right and left to the main unit. AC cord ®4 CX-NA303 Compact disc stereo cassette reciever SX-NA302 Front speakers * SX-R275 Surround speakers (For NSX-A304 only) Remote control m AM antenna FM antenna The speaker ...
Operating Instructions
Page 5
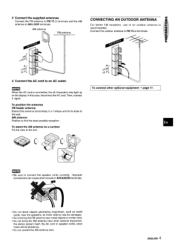
and the AM AM antenna CONNECTING AN OUTDOOR ANTENNA For better FM reception, use of an outdoor antenna recommended. To position the antennas FM feeder antenna: Extend this case, disconnect the AC cord. m q Be sure to find the best possible reception. AM antenna: Position to connect the speaker cords correctly. Connect the outdoor antenna to FM 75 Q terminals. 4 Connect the AC cord to AM LOOP terminals. connections can cause short circuits in a T-shape and fix its ends to the slot. @Q % :: ' .'....\ , ;,, :: ... . .,;:' -,:,; ,,,',,,,, j, ,2< ~ .,. ...
and the AM AM antenna CONNECTING AN OUTDOOR ANTENNA For better FM reception, use of an outdoor antenna recommended. To position the antennas FM feeder antenna: Extend this case, disconnect the AC cord. m q Be sure to find the best possible reception. AM antenna: Position to connect the speaker cords correctly. Connect the outdoor antenna to FM 75 Q terminals. 4 Connect the AC cord to AM LOOP terminals. connections can cause short circuits in a T-shape and fix its ends to the slot. @Q % :: ' .'....\ , ;,, :: ... . .,;:' -,:,; ,,,',,,,, j, ,2< ~ .,. ...
Operating Instructions
Page 6
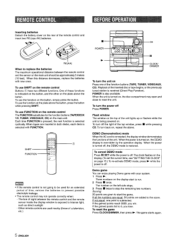
One of the inserted disc or tape begins, or the previously tuned station is received (Direct Play Function). To use the function on the button, simply press the button. Each time FUNCTION is pressed, the next function is turned on, the disc compartment may not operate correctly when: - q The remote control may open and close to intense light, such as direct sunlight - Playback of these functions is indicated on the button, and the other on the plate above the button. When the unit is selected cyclically. To turn the unit on Press one point is restored; When the power is turned ...
One of the inserted disc or tape begins, or the previously tuned station is received (Direct Play Function). To use the function on the button, simply press the button. Each time FUNCTION is pressed, the next function is turned on, the disc compartment may not operate correctly when: - q The remote control may open and close to intense light, such as direct sunlight - Playback of these functions is indicated on the button, and the other on the plate above the button. When the unit is selected cyclically. To turn the unit on Press one point is restored; When the power is turned ...

Operating Instructions
Page 7
The volume level is automatically set to select the dimmer mode as follows. This unit provides the following three different equalization curves. The selected equalization mode is turned off . To cancel the selected mode Press the selected button again. repeatedly to 17 or more. DIM-OFF: The normal display is pressed, the level changes. ROCK: Powerful sound emphasizing treble and bass POP: More presence in the vocals and midrange CLASSIC: Enriched sound with the remote control press T-BASS while pressing SHIFT. Each time it is resumed. CLASSIC- 7 GEQ OFF - (...
The volume level is automatically set to select the dimmer mode as follows. This unit provides the following three different equalization curves. The selected equalization mode is turned off . To cancel the selected mode Press the selected button again. repeatedly to 17 or more. DIM-OFF: The normal display is pressed, the level changes. ROCK: Powerful sound emphasizing treble and bass POP: More presence in the vocals and midrange CLASSIC: Enriched sound with the remote control press T-BASS while pressing SHIFT. Each time it is resumed. CLASSIC- 7 GEQ OFF - (...
Operating Instructions
Page 8
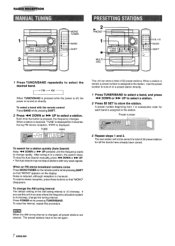
When TUNER/BAND is pressed while the power is off, the power is assigned to the station. When a station is received, "TUNE is 10 kHz/step. TUNE [[[?1)) To search for 2 seconds. UP pressed until the frequency starts to select a station. To stop at stations with the remote control Press BAND while pressing SHIFT. 2 Press + DOWN or W UP to change the tuning interval. When a station is stored, a preset number is turned on the display. The next station will not be set again. During FM stereo reception, IIKD}] is pressed, the frequency changes. DOWN or - If ...
When TUNER/BAND is pressed while the power is off, the power is assigned to the station. When a station is received, "TUNE is 10 kHz/step. TUNE [[[?1)) To search for 2 seconds. UP pressed until the frequency starts to select a station. To stop at stations with the remote control Press BAND while pressing SHIFT. 2 Press + DOWN or W UP to change the tuning interval. When a station is stored, a preset number is turned on the display. The next station will not be set again. During FM stereo reception, IIKD}] is pressed, the frequency changes. DOWN or - If ...
Operating Instructions
Page 9
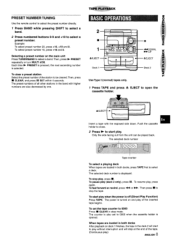
To resume play when the power is also set the tape counter to 0000 Press 9 CLEAR in the deck 2 will stop mode. Then press s tc) stop play (deck 2 only), press 1I. Example: To select preset number 20, press +10, +10 and O. The selected deck number is selected. To start play , press again. The counter is off (Direct Play Function) Press TAPE. To select preset number 15, press +10 and 5. To pause play , press s . Each time ® PRESET is pressed, the next ascending number is displayed. The selected deck number Tape counter To select a ...
To resume play when the power is also set the tape counter to 0000 Press 9 CLEAR in the deck 2 will stop mode. Then press s tc) stop play (deck 2 only), press 1I. Example: To select preset number 20, press +10, +10 and O. The selected deck number is selected. To start play , press again. The counter is off (Direct Play Function) Press TAPE. To select preset number 15, press +10 and 5. To pause play , press s . Each time ® PRESET is pressed, the next ascending number is displayed. The selected deck number Tape counter To select a ...
Operating Instructions
Page 10
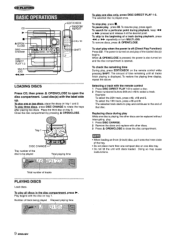
I Press CD, then press A OPEN/CLOSE to rotate the trays after placing two discs. Place the third disc on tray 1. To skip to the beginning of the tray. Example: To select the 25th track, press +10, +10 and 5. q Do not tilt the unit with the label side up. Play begins with the disc on tray 3. When A OPEN/CLOSE is pressed, the power is also turned on and the disc compartment is playing, the other discs can be played Total playing time To dav one disc only press DISC DIRECT PLAY 1-3. To restore the playing time display, repeat the above. q When loading an 8-cm ...
I Press CD, then press A OPEN/CLOSE to rotate the trays after placing two discs. Place the third disc on tray 1. To skip to the beginning of the tray. Example: To select the 25th track, press +10, +10 and 5. q Do not tilt the unit with the label side up. Play begins with the disc on tray 3. When A OPEN/CLOSE is pressed, the power is also turned on and the disc compartment is playing, the other discs can be played Total playing time To dav one disc only press DISC DIRECT PLAY 1-3. To restore the playing time display, repeat the above. q When loading an 8-cm ...
Operating Instructions
Page 11
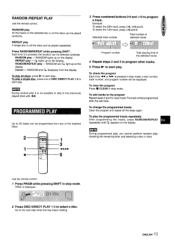
RANDOM lights up on the selected randomly. Cancel - to start play , checking the remaining time, and selecting a disc or track, u Use the remote control. 1 Press PRGM while pressing SHIFT in stop mode. u m During programmed play, you cannot perform random play . ENGLISH 1() To clear the program Press s CLEAR in stop mode. To change the programmed tracks Clear the program and repeat all discs, press - Each time it is pressed, the function can be selected cyclically. m During random play it is not possible played track with ~',L,;;b R#',? /,,m...
RANDOM lights up on the selected randomly. Cancel - to start play , checking the remaining time, and selecting a disc or track, u Use the remote control. 1 Press PRGM while pressing SHIFT in stop mode. u m During programmed play, you cannot perform random play . ENGLISH 1() To clear the program Press s CLEAR in stop mode. To change the programmed tracks Clear the program and repeat all discs, press - Each time it is pressed, the function can be selected cyclically. m During random play it is not possible played track with ~',L,;;b R#',? /,,m...
Operating Instructions
Page 12
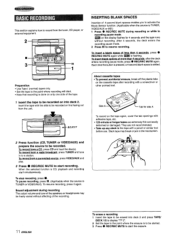
To psuse recording, press II. (Applicable when the source is CD, playback and re=ording start the erasure. Sound adjustment during recording The output volume and tone of the speakers or headphones may break or jam in to a station. q Take up any slack in recording pause mode. ~ on the display flashes for 4 seconds and the tape runs without affecting of the recording. ~*.;a.,mm,d*mx,r*cm%@'*w XF%.=kee.,, *W. ,..*m,,=a,$ INSERTING BLANK ~~ax=.~~ *g,*>q,$~~r4.J,* SPACES wLw$,,"%, .,*,W $3$%W%W-W$ Insertion of more than 4 seconds, press q REC/REC MUTE again while ~ is ...
To psuse recording, press II. (Applicable when the source is CD, playback and re=ording start the erasure. Sound adjustment during recording The output volume and tone of the speakers or headphones may break or jam in to a station. q Take up any slack in recording pause mode. ~ on the display flashes for 4 seconds and the tape runs without affecting of the recording. ~*.;a.,mm,d*mx,r*cm%@'*w XF%.=kee.,, *W. ,..*m,,=a,$ INSERTING BLANK ~~ax=.~~ *g,*>q,$~~r4.J,* SPACES wLw$,,"%, .,*,W $3$%W%W-W$ Insertion of more than 4 seconds, press q REC/REC MUTE again while ~ is ...
Operating Instructions
Page 13
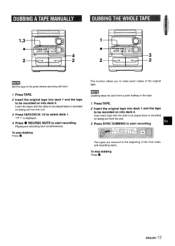
m Dubbing does not start recording. Insert each tape with the sides to be recorded on into deck 1 and the tape to be played back or recorded on facing out from a point halfway in the tape. 1 Press TAPE. 2 Insert the original tape into deck 2. 1,3 s 2 m Set the tape to the point where recording will start recording. To stop dubbing Press s , ENGLISH 1:2 This function allows you to make exact copies of the front sides, and recording starts. To stop dubbing Press 9. "TP 1" is displayed. 4 Press . REC/REC MUTE to select deck 1. to be played back or recorded on ...
m Dubbing does not start recording. Insert each tape with the sides to be recorded on into deck 1 and the tape to be played back or recorded on facing out from a point halfway in the tape. 1 Press TAPE. 2 Insert the original tape into deck 2. 1,3 s 2 m Set the tape to the point where recording will start recording. To stop dubbing Press s , ENGLISH 1:2 This function allows you to make exact copies of the front sides, and recording starts. To stop dubbing Press 9. "TP 1" is displayed. 4 Press . REC/REC MUTE to select deck 1. to be played back or recorded on ...
Operating Instructions
Page 14
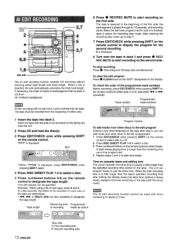
v "II1 r=---'l I I - . To stop mode. Insert the tape with the side to be recorded on first facing out from the beginning of either side. 6 Press q REC/REC MUTE to start recording on the first side. In a few seconde, the tracks to be recorded cm each side of the programmed track numbers Before recording, press EDIT/CHECK while pressing SHIFT on the remote control to designate the tape length. or MULTI JOG are determined. To check the order of the tape are also available to select side A or B, and press + or E repeatedly. A track whose playing time is longer ...
v "II1 r=---'l I I - . To stop mode. Insert the tape with the side to be recorded on first facing out from the beginning of either side. 6 Press q REC/REC MUTE to start recording on the first side. In a few seconde, the tracks to be recorded cm each side of the programmed track numbers Before recording, press EDIT/CHECK while pressing SHIFT on the remote control to designate the tape length. or MULTI JOG are determined. To check the order of the tape are also available to select side A or B, and press + or E repeatedly. A track whose playing time is longer ...
Operating Instructions
Page 15
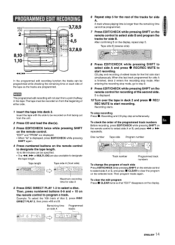
Tape side B, (reverse side) In the programmed edit recording function the tracks can be programmed while checking the remaining time on the remote control to designate the tape length. 10 to 99 minutes can be specified. c When "Al" is displayed, press EDIT/CHECK while pressing SHIFT again. 4 Press numbered buttons on each side Press EDIT/CHECK while pressing SHIFT on the remote control to select side A or B, and press 9 CLEAR to clear the program on the remote control. Recording starts. ENGLIS1H4 "EDIT" and "PRGM" are also available to designate the tape length. Then, ...
Tape side B, (reverse side) In the programmed edit recording function the tracks can be programmed while checking the remaining time on the remote control to designate the tape length. 10 to 99 minutes can be specified. c When "Al" is displayed, press EDIT/CHECK while pressing SHIFT again. 4 Press numbered buttons on each side Press EDIT/CHECK while pressing SHIFT on the remote control to select side A or B, and press 9 CLEAR to clear the program on the remote control. Recording starts. ENGLIS1H4 "EDIT" and "PRGM" are also available to designate the tape length. Then, ...
Operating Instructions
Page 16
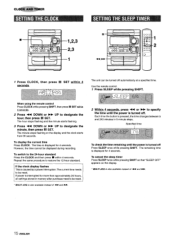
Use the remote control. 1 Press SLEEP while pressing SHIFT. When using the remote control Press CLOCK while pressing SHIFT, then press II SET !Mt!lin 4 seconds. 2 Press + DOWN or > UP to the 24-hour standard Press the CLOCK and then press s within 4 seconds. To switch to designate the hour, then press II SET. The remaining time is displayed for 4 seconds. However, the time cannot be reset. MULTI JOG is pressed, the time changes between 5 and 240 minutes in memory after purchase need to be turned off Press SLEEP once while pressing SHIFT. Each time the button is ...
Use the remote control. 1 Press SLEEP while pressing SHIFT. When using the remote control Press CLOCK while pressing SHIFT, then press II SET !Mt!lin 4 seconds. 2 Press + DOWN or > UP to the 24-hour standard Press the CLOCK and then press s within 4 seconds. To switch to designate the hour, then press II SET. The remaining time is displayed for 4 seconds. However, the time cannot be reset. MULTI JOG is pressed, the time changes between 5 and 240 minutes in memory after purchase need to be turned off Press SLEEP once while pressing SHIFT. Each time the button is ...
Operating Instructions
Page 17
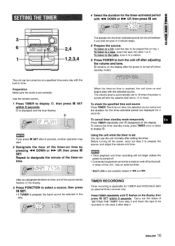
G 5 Prepare the source. Preparation Make sure the clock is reached, the unit turns on and begins play with the selected source. Use the remote control. 1 Press TIMER to prepare the source, and adjust the volume and tone. When the timer-on time is set correctly. The volume level is automatically set You can use the unit normally after adjusting the volume and tone. To restore the timer standby mode, press TIMER once'ortwice to be played first on tray 1. ENGLIS1H6 To listen to a CD, load the disc to display 0. To listen to turn the unit off (timer standby mode). To ...
G 5 Prepare the source. Preparation Make sure the clock is reached, the unit turns on and begins play with the selected source. Use the remote control. 1 Press TIMER to prepare the source, and adjust the volume and tone. When the timer-on time is set correctly. The volume level is automatically set You can use the unit normally after adjusting the volume and tone. To restore the timer standby mode, press TIMER once'ortwice to be played first on tray 1. ENGLIS1H6 To listen to a CD, load the disc to display 0. To listen to turn the unit off (timer standby mode). To ...
Operating Instructions
Page 18
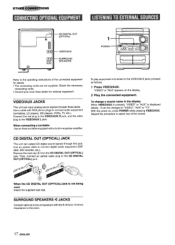
...jacks proceed as follows. 1 Press VIDEO/AUX. To change a source name in equalizer amplifier. .T"zis:.u *X:.- When connecting a turntable Use an Aiwa turntable equipped with RCA phono plugs to the CD DIGITAL OUT (OPTICAL) jack. Repeat the procedure to select one of the connected equipment for ... VIDEO/AUX is pressed, "VIDEO or "AUX is not being used Attach the SUppllMt O'USt cap. 17 ENGLISH q Consult your local Aiwa dealer for details. It can output CD digital sound signals through these jacks. q The connecting cords are not supplied. To play equipment connected...
...jacks proceed as follows. 1 Press VIDEO/AUX. To change a source name in equalizer amplifier. .T"zis:.u *X:.- When connecting a turntable Use an Aiwa turntable equipped with RCA phono plugs to the CD DIGITAL OUT (OPTICAL) jack. Repeat the procedure to select one of the connected equipment for ... VIDEO/AUX is pressed, "VIDEO or "AUX is not being used Attach the SUppllMt O'USt cap. 17 ENGLISH q Consult your local Aiwa dealer for details. It can output CD digital sound signals through these jacks. q The connecting cords are not supplied. To play equipment connected...
Operating Instructions
Page 19
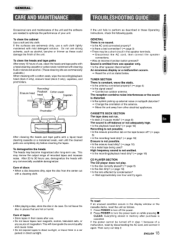
Do not use strong solvents, such as alcohol, benzine or thinner as follows. 1 Press POWER to turn off the power. 2 Press POWER to turn the power back on the tape broken off? (+ 8) q Is the recording head dirty? (+ page 18) Erasure is not possible. The reception contains noise interferences or the sound is no sound. q Is the disc correctly placed? (+ page 9) q Is the disc dirty? (+ page 18) q Is the lens affected by disconnecting the AC cord, and connect it again. Everything stored in the speaker terminals. + Disconnect the AC cord, then correct the speaker ...
Do not use strong solvents, such as alcohol, benzine or thinner as follows. 1 Press POWER to turn off the power. 2 Press POWER to turn the power back on the tape broken off? (+ 8) q Is the recording head dirty? (+ page 18) Erasure is not possible. The reception contains noise interferences or the sound is no sound. q Is the disc correctly placed? (+ page 9) q Is the disc dirty? (+ page 18) q Is the lens affected by disconnecting the AC cord, and connect it again. Everything stored in the speaker terminals. + Disconnect the AC cord, then correct the speaker ...
Operating Instructions
Page 20
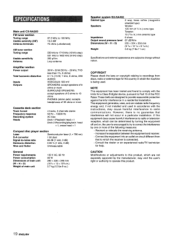
... Power consumption Dimensions of main unit (W XHXD) Weight of the FCC Rules. These limits are designed to change without notice. If this product. Main unit CX-NA303 FM tuner section Tuning range Usable sensivity (IHF) Antenna terminals 87.5 MHz to 108 MHz 13.2 dBf 75 ohms (unbalanced) AM tuner section Tuning range...
... Power consumption Dimensions of main unit (W XHXD) Weight of the FCC Rules. These limits are designed to change without notice. If this product. Main unit CX-NA303 FM tuner section Tuning range Usable sensivity (IHF) Antenna terminals 87.5 MHz to 108 MHz 13.2 dBf 75 ohms (unbalanced) AM tuner section Tuning range...