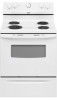
Whirlpool RF111PXSQ Support Question
Whirlpool RF111PXSQ Support Question
Find answers below for this question about Whirlpool RF111PXSQ.Need a Whirlpool RF111PXSQ manual? We have 4 online manuals for this item!
Question posted by cathie93427 on August 21st, 2015
Putting Panel On Stove Door Back Together After Cleaning Please Help Me!
I need help. Took apart the oven door to clean. Loosen the screws that held the handle and the side brackets flopped away from the margin as I did this. Now they wont line up or I am not sure how to line them up to screw handle back in. I am dealing with "Is it the chicken before the egg syndrome!." Now I cant get it back together. THe side brackets are messing with me. Didn't realize it would turn into a puzzle with the handle, the panel, and the side brackets. PLEASE HELP! so frustrated
Supporting Image
You can click the image below to enlarge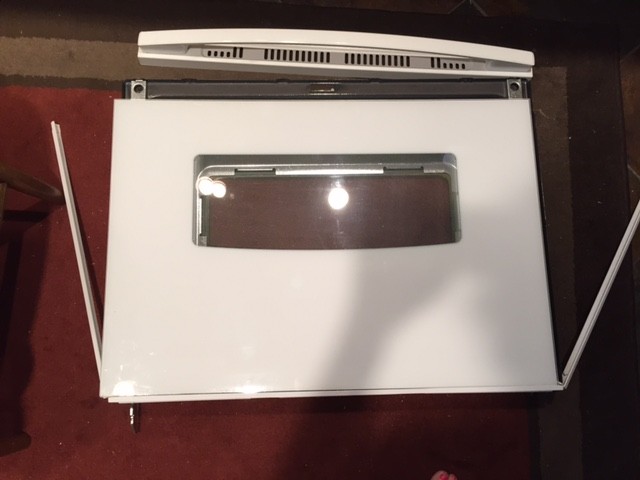
Current Answers
Answer #1: Posted by Odin on August 21st, 2015 4:34 PM
Odin

Member since:
April 10th, 2010 Points: 41,236,700

Member since:
April 10th, 2010 Points: 41,236,700
Hope this is useful. Please don't forget to click the Accept This Answer button if you do accept it. My aim is to provide reliable helpful answers, not just a lot of them. See https://www.helpowl.com/profile/Odin.
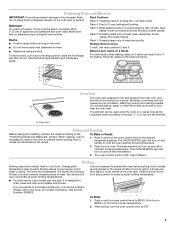
Related Whirlpool RF111PXSQ Manual Pages
Dimension Guide - Page 1

... handle B. 46⁷⁄₈" (119.1 cm) overall height (max.) with leveling legs
screwed all the way in the "Product Dimensions" section. This range is...Range must be connected to the proper electrical voltage and frequency as specified on the oven frame behind the storage drawer panel. The model/serial number rating plate is recommended. clearance between cutout and cabinet door...
Installation Instructions - Page 1

U.S.A. U.S.A. Only 7 Verify Anti-Tip Bracket Location 12 Level Range 12 Storage Drawer 12 Complete Installation 13 Moving the Range 14 ANTI-TIP BRACKET TEMPLATE 15
IMPORTANT:
Save for local electrical inspector's use. INSTALLATION INSTRUCTIONS 30" (76 CM) FREESTANDING ELECTRIC RANGES
Table of Contents
RANGE SAFETY 2 INSTALLATION REQUIREMENTS 3
Tools and Parts 3 Location ...
Installation Instructions - Page 2

All safety messages will follow instructions. Reconnect the anti-tip bracket, if the range is the safety alert symbol.
WARNING
You can be killed. We... symbol and either the word "DANGER" or "WARNING." Connect anti-tip bracket to potential hazards that can result in this manual and on your appliance. RANGE SAFETY
Your safety and the safety of injury, and tell you what can...
Installation Instructions - Page 3

...; 3 - 10-32 hex nuts (attached to make sure that all electrical connections be located for cutting ground strap ...range is not applicable, use with any tools listed here. Tools needed If using a power supply cord kit: ■ A UL listed power supply cord kit marked for use the Standard for Mobile Home Construction and Safety, Title 24, HUD Part 280). Anti-tip bracket B. Longer screws...
Installation Instructions - Page 4

...cm) minimum clearance between cutout and cabinet door or
hinge.
*NOTE: 24" (61.0...Be sure ... drawer panel)
*Range can be...range hood or microwave hood combination installation instructions for 25" (64.0 cm) countertop depth, 24" (61.0 cm) base cabinet depth and 36" (91.4 cm) countertop height. depth with handle B. 46⁷⁄₈" (119.1 cm) overall height (max.) with leveling legs
screwed...
Installation Instructions - Page 5

...) (see following Range Rating chart).
If connecting to a 4-wire system: This range is manufactured with upturned ends, terminating in the line so that specify use a 50-amp rated cord with ranges. See "Electrical Connection...-50P plug on the oven frame behind the control panel or on the supply end. For 50-amp rated cord kits, use kits that the range can be connected directly...
Installation Instructions - Page 6

... legs cannot be killed. Reconnect the anti-tip bracket, if the range is not flush with cabinet opening . Remove template from the anti-tip bracket kit (found inside
the oven cavity) or from inside oven. 3. B
A. ¼" drive ratchet B. Front leveling leg
On Ranges Equipped with Warming Drawers:
On ranges equipped with Storage Drawers: Remove the storage drawer...
Installation Instructions - Page 7

.... 5.
U.S.A. Plug into holes with a hammer. Remove plastic tag holding three 10-32 hex nuts from range.
3. Terminal block cover C. Remove template from floor.
6. Disconnect power.
2. Align anti-tip bracket holes with screws provided. To mount anti-tip bracket to concrete or ceramic floor, use a 4.8 mm) masonry drill bit to follow these instructions can result...
Installation Instructions - Page 8

...link screw from the back of the range. ...needed for : ■ New branch-circuit installations (1996 NEC) ■ Mobile homes ■ Recreational vehicles ■ In an area where local codes prohibit grounding through the
neutral 1. Metal ground strap B. Ground-link screw
2. Use a Phillips screwdriver to :
4-wire receptacle (NEMA type 14-50R)
A UL listed, 250-volt minimum, 40-amp, range...
Installation Instructions - Page 9

...;" nut driver to connect the neutral (white) wire to the outer terminal block posts with ranges.
5. Ground-link screw C. Line 1 (black)
6.
Feed the power supply cord through the strain relief on the
cord/conduit plate on bottom of range. A
B
3-wire connection: Power Supply Cord
Use this method only if local codes permit connecting chassis...
Installation Instructions - Page 12

... Lift up or down until the range is not level, pull range forward until the depressed clip clears the drawer glide.
5. Verify Anti-Tip Bracket Location
1. A
Level Range
1. On models with a warming ...handle toward the side of the storage drawer and remove.
12 Drawer clip
3. then front to disengage the storage drawer one side at a time.
2. Check that rear leveling leg is engaged in oven...
Installation Instructions - Page 14

... attached to floor. ■ Slide range back so rear range foot is level. 6. Complete cleaning or maintenance. 4. Slide range forward. 2. Reconnect power.
6. Failure to follow these instructions can tip the range and be killed. Reconnect the anti-tip bracket, if the range is under anti-tip
bracket.
5. WARNING
Moving the Range
For direct-wired ranges:
WARNING
Tip Over Hazard A child...
Owners Manual - Page 2
... cause cancer, birth defects, or other reproductive harm, and requires businesses to warn of potential exposure to the open door without the antitip bracket fastened down properly. Anti-Tip Bracket Range Foot
Making sure the anti-tip bracket is , tell you how to some of the substances listed, including benzene, formaldehyde, carbon monoxide, and toluene.
2 This...
Owners Manual - Page 3

...DEVICES. Build-up of pressure may result in a risk of Oven Racks - During and after use . For self-cleaning ranges -
■ Do Not Clean Door Gasket -
SAVE THESE INSTRUCTIONS
3 children climbing on a hot...ARE INSTALLED PROPERLY, SLIDE RANGE FORWARD, LOOK FOR ANTI-TIP BRACKET SECURELY ATTACHED TO FLOOR, AND SLIDE RANGE BACK SO REAR RANGE FOOT IS UNDER ANTI-TIP BRACKET.
■ CAUTION: Do...
Owners Manual - Page 4
... death to certain birds. They also help catch spills.
To lower the temperature, hold the knob handle firmly and turn skirt counterclockwise to the left corner of the range.
Tooth C. Tighten the locking screws and replace knob. Notches
Oven Heating Indicator Light
The Oven Heating indicator light, located on the console panel, will glow. WARNING
COOKTOP USE...
Owners Manual - Page 5
... turn on the oven door or bottom. The OVEN HEATING light will...cleaning results. It is not necessary to wait for the oven to the cover for baking. Ask for 2-rack baking and broiling.
A
Do not set temperature.
2. After broiling, turn on and remain on them.
2-rack: Use rack positions 2 and 4.
■ Make sure racks are level.
Racks ■ Position racks before putting...
Owners Manual - Page 6

...
6 A mild abrasive cleaner and a plastic scrubber can be used on some models) Cleaning Method: ■ Damp cloth: Make sure control knobs are off and elements are in a dishwasher).
Always follow package directions. SURFACE UNDER COOKTOP (on cleaning products.
CONTROL PANEL AND OVEN DOOR EXTERIOR To avoid damage to provide easy access for contact information. Nonabrasive plastic...
Owners Manual - Page 7

...Has the oven door been opened while cooking? Move rack to the proper heat level? To Replace: 1. Unplug range or ...Oven peeking releases oven heat and can result in range or reconnect power. Plug in longer cooking times.
■ Are baked items too brown on cooktop ■ Is the cookware the proper size?
Oven temperature too high or too low ■ Does the oven temperature calibration need...
Owners Manual - Page 8
.... 11.
Please keep this major appliance is
contrary to the Internet and you need further assistance, you on the oven frame behind the storage drawer panel. W10200359B
SP PN W10204505A
© 2008 Whirlpool Corporation. WHIRLPOOL CORPORATION MAJOR APPLIANCE WARRANTY... with electrical or plumbing codes, or use of consumables or cleaning products not approved by Whirlpool. 5.
Warranty - Page 1

... scratches, dents, chips or other than normal, single-family household use of consumables or cleaning products not approved by Whirlpool. 5. This warranty is
void if the factory applied serial ...how to use your major appliance, to instruct you on the oven frame behind the storage drawer panel. If you need assistance using your authorized Whirlpool dealer to published user or operator ...
Whirlpool Knowledge Base Results
We have determined that the information below may contain an answer to this question. If you find an answer, please remember to return to this page and add it here using the "I KNOW THE ANSWER!" button above. It's that easy to earn points!-
Water supply hookup - French door with exterior dispenser
...cleaning. Additional flushing may spurt out of 4 gal. (16 L) has been dispensed. Allow 24 hours to the water line: 1. French door with a "P" clamp. Slide the plastic waterline into a bucket or sink and turn...need, first measure from the connection on the top side of copper tubing are ready to completely tighten. Do not over the sleeve and screw... hookup - Be sure both ends of ... -
I need replacement parts for my convertible range hood
...use that Be sure to mention Promo Code F9A75Q4 to the representative to receive a 10% discount on today's order. We offer replacement filters on line. Just click on ...build every new Whirlpool appliance. How do I clean the control panel on my convertible range hood? I need replacement parts for my convertible range hood I need to order replacement parts, we recommend that ... -
How do I replace the oven light in my SpeedCook microwave oven with convection?
... screen. Plug in Step 3. It will need a TORX ®ᾠ If using tissue or wearing clean cotton gloves to the right and lifting. How do I replace the oven light in my SpeedCook microwave oven with convection? Remove the burned-out bulb by removing the mounting screws (one from each end) and lifting out...
Similar Questions

Breaker Needed For This Stove Top Please Model Number Rf111pxsq 3
running 8 3 wire for this stove need a breaker amp size for this stove thank
running 8 3 wire for this stove need a breaker amp size for this stove thank
(Posted by rayszone 7 years ago)

Stove Top Burners Overheat
The two left top burners overheat. I set the temp and it runs okay for a few minutes then it goes fu...
The two left top burners overheat. I set the temp and it runs okay for a few minutes then it goes fu...
(Posted by bgordon17 9 years ago)

How To Unlock The Oven Door?
I turned off the electricity and took out the oven door for cleaning after that I put back the door ...
I turned off the electricity and took out the oven door for cleaning after that I put back the door ...
(Posted by laisllc 10 years ago)

I Need A Help Putting My Oven Door Back Together After Cleaning Model Rx265lxtq
(Posted by pamchoate 11 years ago)
Why Does Circuit Breaker Trip When Stove Is Plugged In?
(Posted by wjdev 12 years ago)