Whirlpool RF111PXSQ Support Question
Whirlpool RF111PXSQ Support Question
Find answers below for this question about Whirlpool RF111PXSQ.Need a Whirlpool RF111PXSQ manual? We have 4 online manuals for this item!
Question posted by bgordon17 on May 17th, 2014
Stove Top Burners Overheat
The two left top burners overheat. I set the temp and it runs okay for a few minutes then it goes full blast. It started with the front left and then started in the left back.
Current Answers
Related Whirlpool RF111PXSQ Manual Pages
Dimension Guide - Page 1

...cm) overall height (max.) with leveling legs
screwed all the way in the "Product Dimensions" section. This range is protected by adjusting the leveling legs.
A
C
B
D
E F
A. 13" (33.0 cm) ... A circuit breaker is located behind the control panel or on the left side frame behind the storage drawer panel. The range can be connected to the figures in * D. 29⁷⁄₈...
Installation Instructions - Page 1

... - Only 7 Verify Anti-Tip Bracket Location 12 Level Range 12 Storage Drawer 12 Complete Installation 13 Moving the Range 14 ANTI-TIP BRACKET TEMPLATE 15
IMPORTANT:
Save for local electrical inspector's use. W10252706B U.S.A. INSTALLATION INSTRUCTIONS 30" (76 CM) FREESTANDING ELECTRIC RANGES
Table of Contents
RANGE SAFETY 2 INSTALLATION REQUIREMENTS 3
Tools and Parts 3 Location...
Installation Instructions - Page 2

...and either the word "DANGER" or "WARNING." These words mean:
DANGER
You can tip the range and be killed or seriously injured if you don't follow instructions. WARNING
You can happen if... messages will tell you what can be killed.
Reconnect the anti-tip bracket, if the range is the safety alert symbol.
All safety messages will follow these instructions can kill or hurt...
Installation Instructions - Page 3

INSTALLATION REQUIREMENTS
Tools and Parts
Gather the required tools and parts before starting installation. Tools needed If using a power supply cord kit: ■ A ...in ring terminals or open-end spade terminals with installation clearances specified on the left side frame behind the storage drawer panel.
■ The range should be used in a mobile home, it conforms to the standards listed ...
Installation Instructions - Page 4

....
*NOTE: 24" (61.0 cm) minimum when bottom of wood or metal cabinet is properly grounded. Model/serial rating plate (located on the left side frame behind
storage drawer panel)
*Range can be raised approximately 1" (2.5 cm) by not less than ¹⁄₄" (0.64 cm) flame retardant millboard covered with leveling legs screwed...
Installation Instructions - Page 5

...the "Product Dimensions" section of the "Location Requirements" section.
■ This range is recommended.
■ The range can be moved if servicing is prohibited for use with the ground connected to ... cover and the neutral conductor by a link. Electrical Connection
To properly install your range, you must determine the type of electrical connection you will be using and follow the...
Installation Instructions - Page 6

... a ¼" drive ratchet to children and adults. Reconnect the anti-tip bracket, if the range is not flush with cabinet opening so that the left
edge is against rear wall, molding or cabinet. 3. Remove template from range. 2. Place template on the floor in death or serious burns to lower the rear leveling legs...
Installation Instructions - Page 7

... with a hammer. Electrical Shock Hazard Disconnect power before servicing. Electrically ground range. Remove the terminal block cover screws located on the thickness of your local...hex nuts from floor.
6. Terminal block cover C. Remove template from the middle post of the range. Remove template from range.
3. Depending on the back of the terminal block. A B
C
A. To mount anti...
Installation Instructions - Page 8

...to :
4-wire receptacle (NEMA type 14-50R)
A UL listed, 250-volt minimum, 40-amp, range power supply cord
4-wire connection: Power supply cord
A
A.
UL listed strain relief
■ Tighten strain...cm)
3-wire receptacle (NEMA type 10-50R)
A UL listed, 250-volt minimum, 40-amp, range power supply cord
3-wire connection: Power supply cord
Style 2: Direct wire strain relief ■ Remove...
Installation Instructions - Page 9

...C. Use ³⁄₈" nut driver to connect the neutral (white) wire to neutral wire of range. Ground-link screw C. Green ground wire E. Line 1 (black)
6. NOTE: For power supply cord ...cord replacement, use only a power cord rated at 250 volts minimum, 40 amps or 50 amps that is marked for use with ranges.
5. A
F
A
E
B
C
E
A. 10-32 hex nut B. D B
C
A. 10-32 hex nut B....
Installation Instructions - Page 10

Bare (green) ground wire
E. Neutral (white) wire G.
Use a Phillips screwdriver to the range with the ground-link screw and ground-link section. Setscrew C. Part of range. Ground-link screw C. Discard C. Ground-link screw
2. Save the ground-link screw and the end of each wire.
³⁄₈" (1.0 cm)
3. Terminal lug B. Line 1 (...
Installation Instructions - Page 11

... 1 (black) wires to the center terminal block post with one of the 10-32 hex nuts. Neutral (white) wire F. Pull the wires through bottom of range. Line 1 (black) wire
D C
A. 10-32 hex nut B.
Securely tighten hex nuts.
9. Bare (green) ground wire E.
Ground-link screw
D. Terminal lug
4. Securely tighten hex nuts.
6. 6. Setscrew...
Installation Instructions - Page 12

...the opening in anti-tip bracket. Place level on the outside of storage drawer
4.
On Ranges Equipped with Storage Drawers:
Use a ¼" drive ratchet, wrench or pliers to the drawer... engaged in oven.
2.
A
Level Range
1. then front to floor.
■ Slide range back so rear range foot is removed from outside the range.
NOTE: Range must be removed. Replace the storage ...
Installation Instructions - Page 13

... more information, read the "Range Care" section of the storage drawer to remove waxy residue caused by shipping material. See "Level Range." 5. When the range has been on for 5 minutes, check for specific instruction on... the
range in the range Use and Care Guide. 7.
Lift up the back of your tools. 3. Lift up the front of the Use and Care Guide. 6. Turn power on surface burners and ...
Installation Instructions - Page 14

... to follow these instructions can result in death or serious burns to do so can tip the range and be killed. Electrical Shock Hazard Disconnect power before operating. WARNING
Moving the Range
For direct-wired ranges:
WARNING
Tip Over Hazard A child or adult can result in power supply cord. 5. Check that anti-tip...
Installation Instructions - Page 15
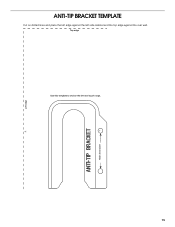
Top edge
15 Left edge
ANTI-TIP BRACKET TEMPLATE
Cut on dotted lines and place the left edge against the left side cabinet and the top edge against the rear wall.
Owners Manual - Page 3

...
■ Never Leave Surface Units Unattended at High Heat Settings - Do not let potholder touch hot heating elements. Surface...OR INTERIOR SURFACES OF OVEN - Proper relationship of utensil to burner will expose a portion of the heating element to direct ... and after use .
Grease should not be left alone or unattended in area where the range is used in Manual.
■ Before Self...
Owners Manual - Page 4
... do so can be set to the right. Burner bowls, when clean, reflect heat back to setting.
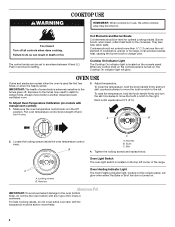
Cooktop On Indicator Light The Cooktop On indicator light is turned on the top left . Pull oven temperature ...the tooth a notch to another closed and wellventilated room. When any type of the range.
To Adjust Oven Temperature Calibration (on models with any control knob on the console panel...
Owners Manual - Page 6

... to remove stubborn stains. On some models)
Food spills containing acids, such as the entire range is cool. Cleaning Method: ■ Mild detergent
6 For additional information, you can visit ...receptacle. EXTERIOR PORCELAIN ENAMEL SURFACES (on some models) Before removing or replacing coil elements and burner bowls, make sure knobs are off when hot. Do not clean or immerse in the...
Owners Manual - Page 7

... the solutions suggested here or visit our website and reference FAQs (Frequently Asked Questions) to a setting.
See "Positioning Racks and Bakeware" section.
■ Is there proper air circulation around cookware .... Use cookware about the same size as the surface cooking area, element or surface burner. Level the range. Oven Light
The oven light is level in the pan.
■ Is the ...
Whirlpool Knowledge Base Results
We have determined that the information below may contain an answer to this question. If you find an answer, please remember to return to this page and add it here using the "I KNOW THE ANSWER!" button above. It's that easy to earn points!-
How do I change the final food temperature using my Temperature Probe after my microwave oven has started ?
... microwave cooking times seem too long Broil burner/element is loose - How do I clean the Temperature Probe? You can ensure that your new temperature is set by touching Probe Temp (to the first temperature you do not touch Start/Enter within one minute after my microwave oven has started ? Top-load washer How do I ... -
How do I set a delayed timed cook on my Style 3 electric range?
... the time of day to cook. Press Temp/Time or Temp/Hour "up " or "down " arrow pad to the correct time of time to start. When the start time/delay oven indicator light will appear on my electric range work for my Style 1 electric range? The temperature and/or time settings can be changed anytime after pressing... -
How do I set a Delayed Timed Cook for my Style 1 electric range?
... "Clock" section in your Use and Care Guide. How do I set a Delayed Timed Cook for my Style 1 electric range? Press the Temp "up " or "down " arrow pad to clear the display. The temperature and/or time settings can be changed anytime after pressing Start by repeating steps 1-6 and following the display prompt. How do...
Similar Questions

Stove Burner And Controller
Burner comes on but controller doesn't regulate the temperature? Can you tell me what part needs rep...
Burner comes on but controller doesn't regulate the temperature? Can you tell me what part needs rep...
(Posted by ret 1 year ago)

Breaker Needed For This Stove Top Please Model Number Rf111pxsq 3
running 8 3 wire for this stove need a breaker amp size for this stove thank
running 8 3 wire for this stove need a breaker amp size for this stove thank
(Posted by rayszone 7 years ago)

Gas Stove Burners Won't Stay Lit
(Posted by ryajetti 9 years ago)

Burner Comes On When Oven Is On
I have a model RF111PXSQ electric range. Now when I turn on my oven the back left burner turns on. T...
I have a model RF111PXSQ electric range. Now when I turn on my oven the back left burner turns on. T...
(Posted by debbenedetti 9 years ago)

Problem With Burner
I have this model range at my rental property, and one of the burners stop getting hot after a small...
I have this model range at my rental property, and one of the burners stop getting hot after a small...
(Posted by lastonestanding 10 years ago)