Ricoh Aficio SP C242SF Support Question
Ricoh Aficio SP C242SF Support Question
Find answers below for this question about Ricoh Aficio SP C242SF.Need a Ricoh Aficio SP C242SF manual? We have 1 online manual for this item!
Question posted by kimrealkleen on April 19th, 2012
How Do I Set The Reduce/enlarge Back To 100% Perminately
The person who posted this question about this Ricoh product did not include a detailed explanation. Please use the "Request More Information" button to the right if more details would help you to answer this question.
Current Answers
Answer #1: Posted by autumnoaks9 on September 5th, 2012 10:09 AM
autumnoaks9

Member since:
September 5th, 2012 Points: 0
Member since:
September 5th, 2012 Points: 0
Related Ricoh Aficio SP C242SF Manual Pages
User Manual - Page 5
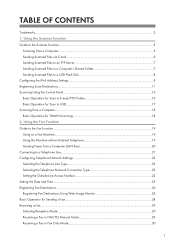
......6 Sending Scanned Files to an FTP Server...7 Sending Scanned Files to a Computer's Shared Folder 7 Sending Scanned Files to a USB Flash Disk 8 Configuring the IPv4 Address Settings...9 Registering Scan Destinations...11 Scanning Using the Control Panel...16 Basic Operation for Scan to E-mail/FTP/Folder 16 Basic Operation for Scan to USB...
User Manual - Page 10
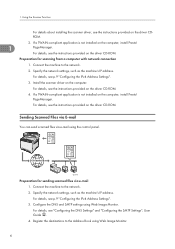
... not installed on the driver CD-ROM. PageManager. Sending Scanned Files via E-mail
You can send scanned files via e-mail 1. Configure the DNS and SMTP settings using Web Image Monitor. Preparation for sending scanned files via e-mail using Web Image Monitor.
6 Install the scanner driver on the computer, install Presto! For...
User Manual - Page 11
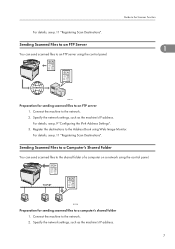
...to the network. 2. For details, see p.11 "Registering Scan Destinations". Specify the network settings, such as the machine's IP address.
Guide to the Scanner Function
1
CES187
Preparation for sending... scanned files to an FTP server 1. Specify the network settings, such as the machine's IP address.
7 Register the destinations to an FTP server...
User Manual - Page 12
Using the Scanner Function
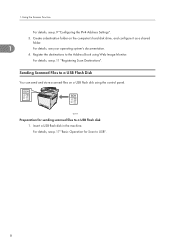
For details, see p.11 "Registering Scan Destinations".
For details, see p.9 "Configuring the IPv4 Address Settings".
3. Insert a USB flash disk in the machine. Create a destination folder on a USB flash disk using Web Image Monitor. Register the destinations to the Address Book ...
User Manual - Page 13
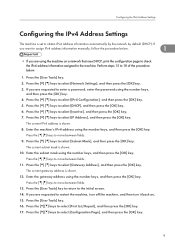
...IPv4 address information manually, follow the procedure below .
1. Press the [ ][ ] keys to select [Network Settings], and then press the [OK] key. 3. If
you want to move between fields. 9. Press the ... current gateway address is shown. 12. Configuring the IPv4 Address Settings
Configuring the IPv4 Address Settings
The machine is set to select [IPv4 Configuration], and then press the [OK] ...
User Manual - Page 14

Press [Yes] in the confirmation screen. The IPv4 address setting will appear under "TCP/IP" on the configuration page.
1
10 1. The configuration page is printed. Using the Scanner Function
18.
User Manual - Page 15
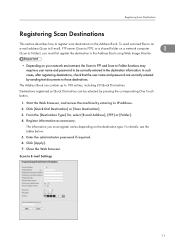
...or [Scan Destination]. 3. Enter the administrator password if required. 6. Click [Apply]. 7. Scan to 100 entries, including 20 Quick Dial entries. To send scanned files to an
e-mail address (Scan to... information. Register information as Quick Dial entries can contain up to E-mail Settings
11
The information you must register varies depending on your network environment, the...
User Manual - Page 16
.... Scan to which a notification is sent after transmission. Using the Scanner Function
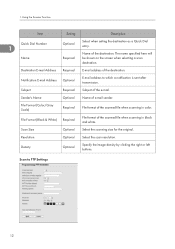
Item
Setting
Description
Quick Dial Number
1
Name
Optional Required
Select when setting the destination as a Quick Dial entry. Notification E-mail Address Optional
E-mail address to FTP Settings
12 Subject
Required Subject of the destination. Scan Size
Optional Select the scanning size...
User Manual - Page 17
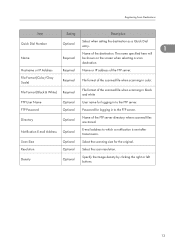
... the FTP server.
Density
Optional
Specify the image density by clicking the right or left buttons.
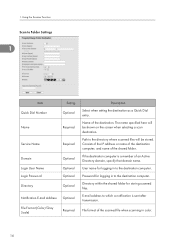
13 Registering Scan Destinations
Item
Setting
Description
Quick Dial Number Name
Optional
Select when setting the destination as a Quick Dial entry.
1
Name of the scanned file when scanning in color. FTP Password
Optional Password for logging...
User Manual - Page 18
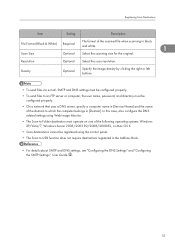
...
Required
Domain Login User Name Login Password Directory
Optional Optional Optional Optional
Notification E-mail Address Optional
File Format (Color/Gray Scale)
Required
Description
Select when setting the destination as a Quick Dial entry.
Using the Scanner Function
Scan to the destination computer.
Consists of the IP address or name of the destination...
User Manual - Page 19
... belongs in [Domain]. Density
Optional
Specify the image density by clicking the right or left buttons.
• To send files via e-mail, SMTP and DNS settings must be configured properly. • To send files to an FTP server or computer, the user name, password, and directory must be registered using the...
User Manual - Page 20
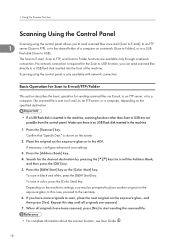
Press the [Address Book] key. 4. Depending on the machine's settings, you have been scanned, press [No] to start sending the scanned file.../FTP/Folder
This section describes the basic operation for the Scan to a computer. If necessary, configure advanced scan settings.
3. When all originals are available only through a network connection. Place the original on the exposure glass, and...
User Manual - Page 21
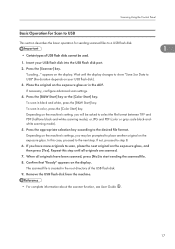
...you have been scanned, press [No] to place another original on the machine's setting, you may be prompted to start sending the scanned file. 8. Repeat this case, proceed to .... Wait until all originals have more originals to the desired file format. If necessary, configure advanced scan settings. 4. To scan in the root directory of USB flash disks cannot be asked to step 8. 6. ...
User Manual - Page 23

... a fax machine.
2
Using as a fax machine and also use the same telephone line for using Web Image Monitor. For details, see p.23 "Configuring Telephone Network Settings". 3. Connect the machine to the Address Book using as a fax machine 1.
For details, see p.21 "Connecting to the Fax Function
This section describes basic procedures...
User Manual - Page 25

.... 2. Connecting to a Telephone Line
Connecting to a Telephone Line
You can connect an external telephone to use the same telephone line for voice calls.
2
• To reduce the risk of fire, use only No. 26 AWG or larger telecommunication line cord.
• Pour réduire le risque d'incendie, utiliser uniquement des conducteurs...
User Manual - Page 27
... tone and
pulse dial.
2
This function is connected to the telephone network through a PBX, set the dial number to select [Dial/Push Phone], and then press the [OK] key.
5....telephone service, and then press the [OK] key.
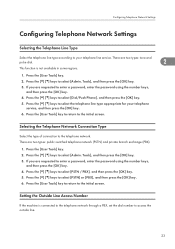
6. Configuring Telephone Network Settings
Configuring Telephone Network Settings
Selecting the Telephone Line Type
Select the telephone line type according to select [PSTN...
User Manual - Page 28

... enter a password, enter the password using the number keys, and then press the [OK] key.
6. If you may not be able to send faxes to set the outside line access number using the number keys,
and then press the [OK] key.
4. Otherwise, you are requested to the initial screen.
24 Enter...
User Manual - Page 29

...], press the [ ][ ] keys to move between fields. 11. Press the [ ][ ] keys to select [Set Time], and then press the [OK] key. 9. You can press the [ ][ ] keys to select [AM... current date using the number keys,
and then press the [OK] key. 4. Press the [ ][ ] keys to select [Set Date], and then press the [OK] key. 6. Press the [ ][ ] keys to the initial screen.
25 You can ...
User Manual - Page 33
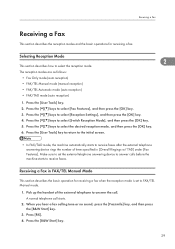
...reception modes and the basic operations for receiving a fax when the reception mode is set the external telephone answering device to answer calls before the machine starts to FAX/TEL Manual mode.
1. Press ... call . Press the [ ][ ] keys to receive faxes after the external telephone answering device rings the number of the external telephone to answer the call starts.
2. Pick up the...
User Manual - Page 34
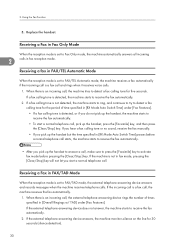
... Switch Time] passes before pressing the [Clear/Stop] key.
Using the Fax Function
5.
2. Replace the handset.
If a fax calling tone is set to FAX/TAD mode, the external telephone answering device answers and records messages when the machine receives telephone calls. If a fax calling tone is not detected, the machine starts to...
Similar Questions

Ricoh Aficio Sp C242sf Service Mode
Hi,I have a RICOH Aficio SP C242SF. Does anyone know the key sequence to enter service mode? Thank y...
Hi,I have a RICOH Aficio SP C242SF. Does anyone know the key sequence to enter service mode? Thank y...
(Posted by sunnykhh 8 years ago)
Ricoh Aficio Sp C242sf Service Call Sc542
I have a Ricoh Aficio SP C242SF with a service call SC542 at startup. I have seen posts about reset ...
I have a Ricoh Aficio SP C242SF with a service call SC542 at startup. I have seen posts about reset ...
(Posted by sunnykhh 8 years ago)

How To Set Up Scan To Email On Ricoh Aficio Mp C2500
(Posted by locfer 10 years ago)

How To Set Up The Email System On Ricoh Aficio Mp C3000
(Posted by dakev 10 years ago)

Have A Richo Aficio Sp C242sf, There Is Not An Online Button.
Have A Richo Aficio Sp C242sf, there is not an online button, but there is an escape button. Which b...
Have A Richo Aficio Sp C242sf, there is not an online button, but there is an escape button. Which b...
(Posted by kfpyle 10 years ago)