Ricoh Aficio SP C242SF Support Question
Ricoh Aficio SP C242SF Support Question
Find answers below for this question about Ricoh Aficio SP C242SF.Need a Ricoh Aficio SP C242SF manual? We have 1 online manual for this item!
Question posted by sunnykhh on July 18th, 2015
Ricoh Aficio Sp C242sf Service Call Sc542
I have a Ricoh Aficio SP C242SF with a service call SC542 at startup. I have seen posts about reset it in an engineering mode. The direction is to press and hold online + escape and then power on. But, I cannot find any online button on the machine. I suspect it is for a different model. Can someone help me further?
Current Answers
Answer #1: Posted by freginold on July 19th, 2015 10:51 AM
freginold

Member since:
December 20th, 2011 Points: 23,253,885

Member since:
December 20th, 2011 Points: 23,253,885
Hello, you're right, the instructions you have are for a different model. You can see how to get into service mode here:
http://www.copytechnet.com/forums/ricoh-savin-gest...
http://www.copytechnet.com/forums/ricoh-savin-gest...
---------------------
If this answer helped you to solve your problem, please let us know by clicking on the "Helpful" icon below. If your question wasn't answered to your satisfaction, feel free to resubmit your question, with as much information as possible so that we can provide a more complete solution. Thank you for using HelpOwl!
Related Ricoh Aficio SP C242SF Manual Pages
User Manual - Page 5
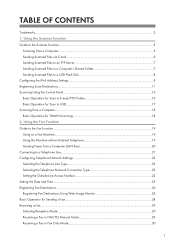
... to the Scanner Function...5
Scanning from a Computer...18 Basic Operation for Sending a Fax...28 Receiving a Fax...29 Selecting Reception Mode...29 Receiving a Fax in FAX/TEL Manual Mode 29 Receiving a Fax in Fax Only Mode...30
1 TABLE OF CONTENTS
Trademarks...3 1. Using the Fax Function Guide to the Fax Function...19 Using as a Fax...
User Manual - Page 9
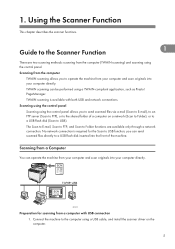
TWAIN scanning can send scanned files directly to a USB flash disk inserted into the front of a computer on the computer.
...Connect the machine to Folder functions are two scanning methods: scanning from your computer and scan originals into your computer directly.
PageManager. CES185
Preparation for the Scan to operate the machine from the computer (TWAIN scanning) and scanning using...
User Manual - Page 13
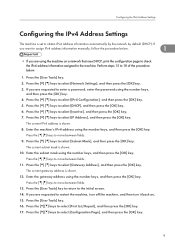
... subnet mask using the number keys, and then press the [OK] key. Press the [ ][ ] keys to select [Network Settings], and then press the [OK] key. 3. Press the [ ] [ ] keys to select [Inactive], and then press the [OK] key. 7. Press the [ ] [ ] keys to select [IPv4 Configuration], and then press the [OK] key. 5. Press the [ ] [ ] keys to the initial screen. 14...
User Manual - Page 14

The IPv4 address setting will appear under "TCP/IP" on the configuration page.
1
10 1. Using the Scanner Function
18. Press [Yes] in the confirmation screen. The configuration page is printed.
User Manual - Page 15
... the destination type. Destinations registered as necessary. Scan to 100 entries, including 20 Quick Dial entries.
Start the Web browser, and access the machine by pressing the corresponding One Touch button.
1. Enter the administrator password if required. 6.
User Manual - Page 18
... logging in to which a notification is a member of the scanned file when scanning in to Folder Settings
1
Item Quick Dial Number
Name
Setting Optional
Required
Service Name
Required
Domain Login User Name Login Password Directory
Optional Optional Optional Optional
Notification E-mail Address Optional
File Format (Color/Gray Scale)
Required
Description
Select...
User Manual - Page 19
... R2/2008/2008 R2, or Mac OS X. • Scan destinations cannot be
configured properly. • On a network that uses a DNS server, specify a computer name in [Service Name] and the name
of the scanned file when scanning in [Domain]. In this case, also configure the DNS related settings using Web Image Monitor...
User Manual - Page 20
...no USB flash disk inserted in the machine.
1.
The scanned file is inserted in the ADF. Press the [Address Book] key. 4. Search for sending scanned files via E-mail, to an FTP...depending on the machine's settings, you can send scanned files directly to USB are available only through a network connection. To scan in color, press the [Color Start] key. When all originals are scanned....
User Manual - Page 21
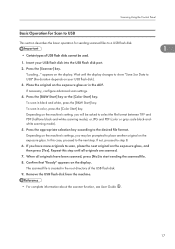
...(the duration depends on the machine's setting, you will be used. 1. The scanned file is created in black and white, press the [B&W Start] key. Insert your USB flash disk). 3. Confirm that "Ready" appears on the display. Scanning Using the Control... the file format between TIFF and PDF (halftone black-and-white scanning mode), or JPG and PDF (color or gray scale black-andwhite scanning...
User Manual - Page 22
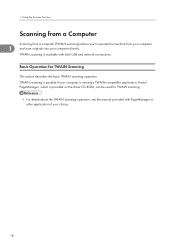
... be used for TWAIN Scanning
This section describes the basic TWAIN scanning operation. 1. TWAIN scanning is available with PageManager or other application of your computer directly.
Basic Operation for TWAIN scanning.
• For details about the TWAIN scanning operation, see the manual provided with both USB and network connections. Using the...
User Manual - Page 24

... R2/2008/2008 R2. For details, see p.29 "Receiving a Fax". Select the fax reception mode.
Using the Fax Function
2
CES189
Preparation for using the machine with an external telephone 1. For ...support this machine to the machine. Sending Faxes from a Computer (LAN-Fax)
You can send a document directly from a Computer (LAN-Fax)", User Guide .
20 CES191
• For details about the LAN-Fax ...
User Manual - Page 25

CES041
21 Connect a telephone line cord to the public switched telephone network (PSTN) directly or through a private branch exchange (PBX). Remove the cable cover. 2.
Connecting to a Telephone Line
Connecting to a Telephone Line
You can connect an external telephone to ...
User Manual - Page 27
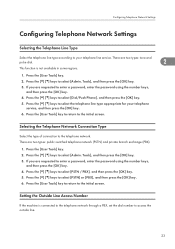
... [ ] [ ] keys to select [PSTN] or [PBX], and then press the [OK] key. 6. Press the [ ] [ ] keys to select [Admin. Press the [ ] [ ] keys to select [Dial/Push Phone], and then press the [OK] key.
5. Press the [ ] [ ] keys to select the telephone line type appropriate for your telephone line service. Press the [User Tools] key. 2. Configuring Telephone Network Settings
Configuring...
User Manual - Page 28

... the outside line access number that matches the setting of your PBX. Tools], and then press the [OK] key.
2
3. Press the [User Tools] key to return to outside line access number using the number keys,
and then press the [OK] key.
4. If you may not be able to send faxes to the initial...
User Manual - Page 29

... [OK] key. 5. or 24-hour), and AM/PM stamp (when 12-hour time format is selected)
1. You can press the [ ][ ] keys to select [Admin. Tools], and then press the [OK] key. 3. Press the [User Tools] key to return to move between fields. 11. Enter the current time using the number keys, and then...
User Manual - Page 30

...2
Quick Dial entries
Destinations registered as Quick Dial entries can be selected by pressing the corresponding One
Touch button. Using the Fax Function
Registering Fax Destinations
This ...Dial Destination] or [Fax Speed Dial Destination]. 3.
Start the Web browser and access the machine by pressing the [Address Book] key, and then selecting the desired entry using the [ ][ ] keys....
User Manual - Page 32
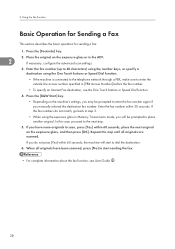
... within 60 seconds, place the next original on the machine's settings, you have been scanned, press [No] to start to enter the outside line access number specified in the ADF.
2
If...) using the number keys, or specify a destination using the exposure glass in Memory Transmission mode, you manually entered the destination fax number. Using the Fax Function
Basic Operation for Sending...
User Manual - Page 33
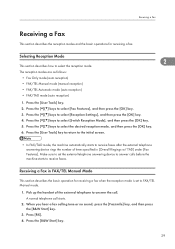
.... 5. A normal telephone call . Receiving a Fax
Receiving a Fax
This section describes the reception modes and the basic operations for receiving a fax when the reception mode is set the external telephone answering device to answer calls before the machine starts to FAX/TEL Manual mode.
1.
Press [RX]. 4. Press the [ ][ ] keys to receive faxes after the external telephone answering...
User Manual - Page 34
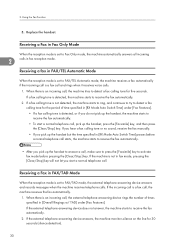
...mode, pressing the [Clear/Stop] key will not let you pick up the handset but the time specified in [RX Mode Auto Switch Time] under [Fax Features]. Replace the handset.
If the external telephone answering device... there is an incoming call, the external telephone answering device rings the number of time specified in [RX Mode Auto Switch Time] passes before a normal telephone call ...
User Manual - Page 35

The external telephone answering device records messages.
2
31 Receiving a Fax
• If a fax calling tone or no sound is detected, the machine starts to receive the fax automatically.
• If a voice is detected, a normal telephone call starts.
Similar Questions

Ricoh Printer Aficio Sp 232sf Service Call Sc300 How To Fix It
ricoh printer aficio sp 232sf service call sc300 how to fix it
ricoh printer aficio sp 232sf service call sc300 how to fix it
(Posted by ahmedezzatali 6 years ago)

Ricoh Aficio Sp C242sf Service Mode
Hi,I have a RICOH Aficio SP C242SF. Does anyone know the key sequence to enter service mode? Thank y...
Hi,I have a RICOH Aficio SP C242SF. Does anyone know the key sequence to enter service mode? Thank y...
(Posted by sunnykhh 8 years ago)

Directions On How To Refill Staples In Copier Machine Ricoh Aficio Mp 4000
(Posted by gsreggi 9 years ago)

Have A Richo Aficio Sp C242sf, There Is Not An Online Button.
Have A Richo Aficio Sp C242sf, there is not an online button, but there is an escape button. Which b...
Have A Richo Aficio Sp C242sf, there is not an online button, but there is an escape button. Which b...
(Posted by kfpyle 10 years ago)
Have A Richo Aficio Sp C242sf
Have a service call SC542 messaage how can I clear this?
Have a service call SC542 messaage how can I clear this?
(Posted by kfpyle 10 years ago)