Ricoh Aficio MP 5001 Support Question
Ricoh Aficio MP 5001 Support Question
Find answers below for this question about Ricoh Aficio MP 5001.Need a Ricoh Aficio MP 5001 manual? We have 4 online manuals for this item!
Question posted by tony36377 on December 7th, 2011
Greyscale Scans Don't Adjust In Photoshop
I am freelancing at an agency who just installed the ricoh Aticio MP-5001. When we scan pencil drawings into the machine, and have them sent to our email adress,teh resulting images do not adjust in the "Adjustment>Levels" in Photoshop. This consequently has seriously hampered our ability to deliver our work on time. Please help. We have tried various ways of "Save AS" and saving as differetn file types, to no avail.
Current Answers
Answer #1: Posted by freginold on December 20th, 2011 6:01 PM
freginold

Member since:
December 20th, 2011 Points: 23,253,885

Member since:
December 20th, 2011 Points: 23,253,885
You could try increasing the resolution when you scan, maybe that would help. On the Scan screen on the copier, select Scan Settings and choose a higher resolution. Hope that helps!
Related Ricoh Aficio MP 5001 Manual Pages
Quick Start Guide - Page 10
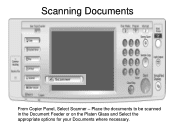
Scanning Documents
From Copier Panel, Select Scanner - Place the documents to be scanned in the Document Feeder or on the Platen Glass and Select the appropriate options for your Documents where necessary.
Quick Start Guide - Page 12

Select destination [email address or folder location
4. Press [Start]
(Note: Screenshots are provided for reference purposes only. Basic Scanning
1. Select [E-mail] or [Folder] Tab 3. Place Originals in Feeder or on your operating system and device.) Your display may vary depending on Glass 5. At copier Screen Press [Scanner]
2.
Quick Start Guide - Page 13
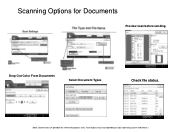
Drop Out Color From Documents
Select Document Types
Check file status.
(Note: Screenshots are provided for Documents
Preview scan before sending. Your display may vary depending on your operating system and device.) Scanning Options for reference purposes only.
Quick Start Guide - Page 16
... [Exit] key then press the
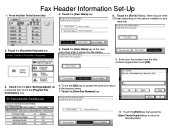
[User Tools/Counter] key to return to the previous menu 7. Settings/Adjust] tab is selected then touch the [Program Fax Information] key
6. Touch the [Facsimile Features] key
5....Name] key
8. Enter your
machine)
2. Touch the [Own Fax Number] key
10. Touch the [For G3-1] key ( there may be other G3 keys depending on the options installed on your fax number from...
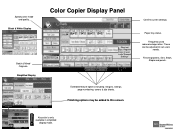
User Guide - Page 3
...
Settings"
Paper tray status.
Register keys in simplified
display mode.
Extended feature options including; margins, stamps, page numbering, covers & slip sheets.
Finishing options may be adjusted to this screen. Black & White Display
Batch & Mixed Originals. These can be added to suit users
needs. Sort, Stack, Staple and punch. Finishing options. Short...
User Guide - Page 4

... you [Suspend] to cancel job or change settings [Continue] if job is correct to complete remaining copy sets
Or press START to skip [Sample Copy]
Adjust paper guides
Note: When copying from the glass and requesting multiple copies, press the # key after feeding your last original to collate document (if not...
User Guide - Page 5

...magazines) • Copied Photo: • Use when copying copies or originals generated by color
copiers
Auto Image Density is suitable for your originals to enhance
your document settings.
There are
printed on • paper ... to lighten or darken document Press [] or [] to adjust the image density
Pale For originals that have lighter lines written in pencil, or faintly copied slips.
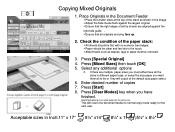
User Guide - Page 10
....
6. Press [Special Original] 4. Press [Mixed Sizes] then touch [OK] 5. If there are multiple paper sizes you must either have all the sizes in the image Adjust the Side Guide flush against the largest original. Ensure that the right edges of the stack as staples, tags or tapes must all originals...
User Guide - Page 14

...
Edit Image - used to replicate images, center images, invert images or duplicate images
Copy Quality - used to adjust contrast and image background erase color, change or adjust color
Scan Position -
used to move margins for background numbering, page numbering, watermarks, date stamping
Erase -
Edit/Stamp or Edit/Color Tab
Options
Vary by machine type and hard drive installed
Edit...
User Guide - Page 19
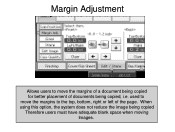
When using this option, the system does not reduce the image being copied, i.e. Margin Adjustment
Allows users to move the margins to move the margins of a document being copied for better placement of the page. used to the top, bottom, right or left of documents being copied Therefore users must have adequate blank space when moving
Images.
User Guide - Page 22
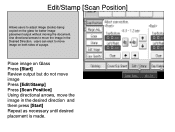
users can elect to adjust image (books) being copied on the glass for better image placement output without moving the document.
Edit/Stamp [Scan Position]
Allows users to move image on both sides of a page. Use directional arrows to move the image in the Desired Direction. Place image on Glass Press [Start] Review output but do not move...
User Guide - Page 30
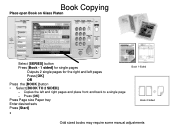
... page - Press [OK]
Press Page size Paper tray Enter desired sets Press [Start]
•
Book 1-Sided Book 2-Sided
Odd sized books may require some manual adjustments Copies the left pages Press [OK] OR
Press the [BOOK ]button • Select [BOOK TO 2 SIDED]
-
User Guide - Page 32
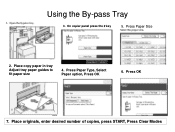
Place copy paper in tray Adjust tray paper guides to fit paper size
4. Press OK
7. Press Paper Type, Select Paper option, Press OK
6. Press Paper Size
2. On copier panel press the # key
5. Place originals, enter desired number of copies, press START, Press Clear Modes Using the By-pass Tray
3.
User Guide - Page 34

To Copy Tabs Place the Tab Copy Originals in the Document Feeder Select the Paper Tray containing the Tab Paper (tray 2 or tray 3) Press START Adjust the back fence position so that it will fit the tab stock. TAB Copying
Set tab stock so that the tab sheet holder will be fed from the side without the tab edges first.
User Guide - Page 36
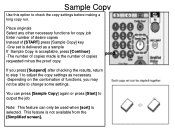
... is delivered as necessary. -Depending on the combination of functions, you press [Suspend] after checking the results, return to step 1 to output the job
Note: This feature can press [Sample Copy] again or press [Start] to adjust the copy settings as a sample
SIfcrSeaenmspeltetinCgospwyillischaacncgeepatnadbldeis, pplareyss"c[Coonntitninuuee"] or Suspend.
-The number of copies made...
Troubleshooting Guide - Page 5
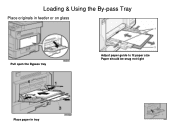
Loading & Using the By-pass Tray
Place originals in feeder or on glass
Pull open the Bypass tray
Adjust paper guide to fit paper size Paper should be snug not tight
Place paper in tray
Troubleshooting Guide - Page 8
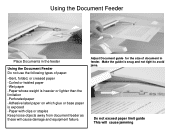
Make the guide is exposed -Paper with clips or staples Keep loose objects away from document feeder as these will cause jamming Adjust Document guide for the size of paper:
-Bent, folded, or creased paper
-Curled or twisted paper -Wet paper -Paper whose weight is heavier or lighter ...
Reference Guide - Page 5
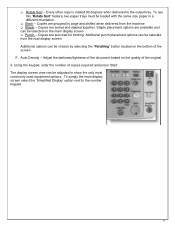
... and stapled together. F. Using the keypad, enter the number of the original 4. Stack - Adjust the darkness/lightness of the document based on the quality of copies required and press 'Start'. To...Sort' feature, two paper trays must be chosen by page and shifted when delivered from the machine Staple - The display screen view can be loaded with the same size paper in a different ...
Reference Guide - Page 8
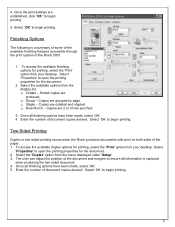
...options for the document.
2. Select
'Properties' to begin printing
5. The user can adjust the position of the document and margins to ensure all information is a summary of ...Finishing Options
The following is captured
when producing the two-sided document. 4.
Enter the number of the Ricoh 5001.
1. Select 'Properties' to begin printing. Staple - Select 'OK' to begin printing.
8 ...
Reference Guide - Page 9

... and then select the recipient you want to send the scan to change this setting.
9
Scan Settings are defaulted to a 4MB file size. Scanning to email is limited to Auto Select Color which means if the ... Glass
1. Press the [Start] key. Set your device.
2. Basic Scanning to Email or Folder Features
Figure 1: Document is placed Face Up in the Document Feeder
Figure 2: Document...
Similar Questions

How To Set The Default Scanned File Type On A Ricoh Mp 5001
(Posted by lorjami 9 years ago)

How To Set The Default Scanned File Type For An Individual Folder On A Ricoh Mp
5001
5001
(Posted by 1dewwinch1 9 years ago)


Scan Default (file Type) To Pdf
How do I set"file type" in the scanner todefault to PDFona Ricoh MP2550b photocopier, rather than ha...
How do I set"file type" in the scanner todefault to PDFona Ricoh MP2550b photocopier, rather than ha...
(Posted by ttrofas 11 years ago)

How Do I Setup Scanning From The Machine To Emails?
(Posted by Anonymous-45541 12 years ago)