
Optoma TX551 Support Question
Optoma TX551 Support Question
Find answers below for this question about Optoma TX551.Need a Optoma TX551 manual? We have 3 online manuals for this item!
Question posted by Anonymous-72301 on August 28th, 2012
Saving Settings
i change the zoom settings using the menu but they dont save when powered off and back on?
Current Answers


Related Optoma TX551 Manual Pages
Protocol Functions - Page 1

...projector
232 ASCII Code HEX Code
Function
~XX00 1
7E 30 30 30 30 20 31 0D
Power ON
~XX00 0
7E 30 30 30 30 20 30 0D
Power OFF
~XX00 1 ~nnnn 7E 30 30 30 30 20 31 20 a 0D Power...30 30 30 35 20 31 0D
Zoom Plus
~XX06 1
7E 30 30 30 36 20 31 0D
Zoom Minus
~XX12 1
7E 30 30 ... 20 a 0D
Sharpness
~XX24 n
7E 30 30 32 34 20 a 0D
Color Settings
~XX25 n
7E 30 30 32 35 20 a 0D
~XX26 n ~XX34 n
...
Protocol Functions - Page 2

... Format Zoom V Keystone 3D Mode 3D Mode 3D Sync Invert 3D Sync Invert Language
Projection
Menu Location
Signal
Mute Volume Source Lock Next Source High Altitude Auto Power Off ...30) ~ 31 (a=33 31) By signal
H. Position
n = -5 (a=2D 35) ~ 5 (a=35) By timing
Security Settings
Enable
Disable(0/2 for backward compatible)
On
Off (0/2 for backward compatible)
n = 0 (a=30) ~ 20 (a=32 30)
On
...
Quick Start Guide - Page 1
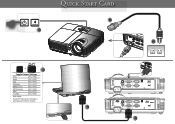
Q S C
1 3
2
Fn + F7 CRT/LCD
6
Toggle Output Settings
Acer
[Fn] + [F5]
Asus
[Fn] + [F8]
Dell
[Fn] + [F8]
Gateway
[Fn] + [F4]
IBM/Lenovo
[Fn] + [F7]
HP/Compaq
[Fn] + [F4]
NEC
[Fn] + [F3]
Toshiba
[Fn] + [F5]
Mac Apple :
System PreferencesDisplay ArrangementMirror display
5
4
User's Manual - Page 1

...
Using the Product 9
Control Panel ...9 Connection Ports ...10 Remote Control ...11 Installing the Batteries ...13 Remote Control Operation 14
Connection 15
Connecting a computer or monitor 16 Connecting Video source devices 17
Operation 21
Powering On/Off the Projector 21 Adjusting the Projector Height 22 Adjusting the Projector Zoom and Focus 22 Adjusting Projection Image Size 23 Menu...
User's Manual - Page 2

.... Servicing Do not attempt to the product. Use a damp cloth for future reference.
1. Keep the plastic packing materials (from the wall socket before cleaning. Power sources Check that the operating voltage of these instructions before you operate your local power supply.
7. Accessories Do not place this projector yourself. Refer all of your unit is...
User's Manual - Page 3

... an extreme or sudden change in fire, electric shock or other hazards.
9.
Moisture Condensation Never operate this projector immediately after moving it from possible damage, do not use the projector for at least 2 hours when there is exposed to a warm one. EN-3 Replacement parts When replacement parts are required, be sure that the replacement...
User's Manual - Page 11

...
2
13
Switch between input signals.
3 Four directional buttons
3
14
Use four directional buttons to select items or make
4
15
adjustments to your...images resulting from an
10
22
angled projection.
11
6 Brightness Display the setting bar for adjustment of brightness.
7 Freeze Freeze the projected image.
8 HDMI...Power Turn the projector on or off.
13 Re-SYNC Automatically synchronize the...
User's Manual - Page 12

...
can output sound and image. Perform page down function
when mouse mode is
flexibility when delivering presentations. using the remote control in place of operating your computer's mouse.
any other buttons are close.
activated.
1. Set the input signal to the normal mode,
press Switch again. screen, press / / / .
20 Video Display video signal...
User's Manual - Page 17

... devices that provide any one of the following output sockets: „ HDMI „ Component Video „ S-Video „ Video (composite) You need only connect the projector to a Video source device using just one of the above connecting methods, however each provides a different level of matching terminals on both the...
User's Manual - Page 18

...Component Video output sockets of the Video source device.
EN-18 To connect the projector to the HDMI jack on the projector. Take a VGA (D-Sub) to HDTV (RCA) cable and connect the end ...to reassess which method you can use to connect to
the device.
Connecting an HDMI source device
Examine your Video source device to determine if it has a set of unused Component Video output sockets...
User's Manual - Page 20

... Video source device
Examine your Video source device to determine if it has a set of unused composite Video output sockets available: „ If so, you can continue with this procedure. „ If not, you can use . To connect the projector to the composite Video output
socket of the Video source device. 2.
Also check...
User's Manual - Page 24
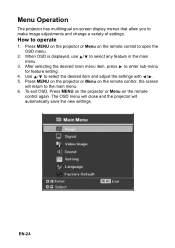
... to operate
1. Use / to the main menu. 6. To exit OSD, Press MENU on the projector or Menu on -screen display menus that allow you to make image adjustments and change a variety of settings. Press MENU on the projector or Menu on the remote control, the screen
will automatically save the new settings. How to open the OSD menu.
2. Menu Operation
The projector has multilingual on...
User's Manual - Page 26

...can change the intensity of each of 3 color (Red, Green, Blue) to choose your desired aspect ratio. Image EN-26 at lower temperature, the screen looks warmer. Aspect Ratio Use ...). At higher temperature the screen looks colder; Contrast Set the difference between light and dark areas. Zoom Zoom in and out the images. Color Settings Adjust the color temperature. For XGA models: „...
User's Manual - Page 30

... accordingly. EN-30 Setting
Menu Position Choose the menu location on the projector. Then projector will automatically power off when the countdown has finished (in hours). Color Space Select an appropriate color matrix type from RGB,YCbCr/YPbPr. The countdown timer will require to the projector. Projection Adjust the picture to 0 hours. Password Set or change the password.
User's Manual - Page 31

... projector will lower power
consumption and extend the lamp life by second). 3D Mode „ On: Enable 3D Mode function. „ Off: Disable 3D Mode function. OSD Timeout Duration of the projector. For computer input source, the hardware and software requirements
should be NTSC (60). 2.
When 3D Sync is
lost. High Altitude Use this...
User's Manual - Page 34

.... 4. Replace the lamp cover and tighten the screw. 10. Turn off the projector and unplug the AC power cord before replacing the lamp. „ Do not use the projector with the lamp cover removed. Reset the lamp hour. Refer to the "Setting > Lamp Time Reset" menu.
1 2
3 4
Note
„ Dispose the used lamp according to turn on the...
User's Manual - Page 40

...
EN-40 SEND to projector
232 ASCII Code HEX Code
Function
~XX00 1
7E 30 30 30 30 20 31 0D
Power ON
~XX00 0
7E 30 30 30 30 20 30 0D
Power OFF
~XX00 1 ~...1
7E 30 30 30 35 20 31 0D
Zoom Plus
~XX06 1
7E 30 30 30 36 20 31 0D
Zoom Minus
~XX12 1
7E 30 30 31 32 ...32 33 20 a 0D
Sharpness
~XX24 n
7E 30 30 32 34 20 a 0D
Color Settings
~XX25 n
7E 30 30 32 35 20 a 0D
~XX26 n ~XX34 n
7E 30 ...
User's Manual - Page 41

...Tint Format Zoom V Keystone 3D Mode 3D Mode 3D Sync Invert 3D Sync Invert Language
Projection
Menu Location
Signal
Mute Volume Source Lock Next Source High Altitude Auto Power Off ...30) ~ 31 (a=33 31) By signal
H. Position
n = -5 (a=2D 35) ~ 5 (a=35) By timing
Security Settings
Enable
Disable(0/2 for backward compatible)
On
Off (0/2 for backward compatible)
n = 0 (a=30) ~ 20 (a=32 30)
On
...
User's Manual - Page 43
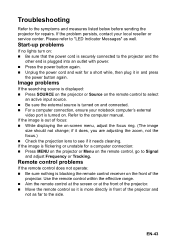
...power button again. Use the remote control within the effective range. „ Aim the remote control at the screen or at the front of the projector. „ Move the remote control so it in front of the projector...for a computer connection: „ Press MENU on the projector or Menu on -screen menu, adjust the focus ring. (The image
size should not change; Please refer to "LED Indicator Messages"...
User's Manual - Page 50

... your selection.
Brightness Display the setting bar for adjustment of the mouse. HDMI Display HDMI signal. (This function will not work if product does not have HDMI)
EN-50 L Button Perform the left button of brightness. 3D Turn on or off . Enter/ /Help? Remote Control
Power Turn the projector on -screen display menus...
Similar Questions

Pdf Projections
Hello,I need to project PDF, how can I do this? is it possible at all?
Hello,I need to project PDF, how can I do this? is it possible at all?
(Posted by jeffreygutnik 1 year ago)

Yellowish Image
We have two Optoma PRO360W projectors which we use to project images from a laptop computer. Until r...
We have two Optoma PRO360W projectors which we use to project images from a laptop computer. Until r...
(Posted by jstewart28007 8 years ago)

Save Settings
How can i save the settings on a permanent basis, i have to redo the settings each time the projecto...
How can i save the settings on a permanent basis, i have to redo the settings each time the projecto...
(Posted by johnswanepoel 11 years ago)

Saving Picture Settings
Can someone please tell me how to save my picture settings etc? I get all my settings how I like the...
Can someone please tell me how to save my picture settings etc? I get all my settings how I like the...
(Posted by Stevenholyer 11 years ago)