
Lexmark T652 Support Question
Lexmark T652 Support Question
Find answers below for this question about Lexmark T652.Need a Lexmark T652 manual? We have 9 online manuals for this item!
Question posted by edhorgeojma on October 18th, 2013
How To Remove Power Supply From Lexmark T652
The person who posted this question about this Lexmark product did not include a detailed explanation. Please use the "Request More Information" button to the right if more details would help you to answer this question.
Current Answers
Related Lexmark T652 Manual Pages
Embedded Web Server Administrator's Guide - Page 31

... Settings
What it does Protects access to the Supplies menu from the printer control panel Protects access to the Supplies menu from the Embedded Web Server Controls access to Profiles, such as scanning shortcuts, workflows, or eSF applications Controls the ability to import and export printer settings files (UCF files) from the Embedded Web...
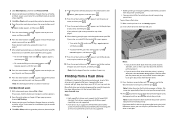
Clearing Jams Guide - Page 2
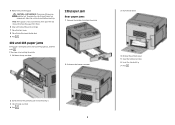
... paper out, and then press . If the paper is not exiting the printer: 1 Pull down the top rear door.
230 paper jam
Rear paper jams
1 Remove the standard tray from the printer.
2 Pull down the bottom rear door.
3 Push the tab down.
4 Remove the jammed paper. 5 Close the bottom rear door. 6 Insert the standard...
Clearing Jams Guide - Page 3
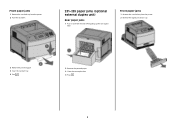
... (optional external duplex unit)
Rear paper jams
1 Push in and hold the latch while pulling up the rear duplex door.
Front paper jams
1 Remove the standard tray from the printer. 2 Remove the duplex jam access tray.
3 Remove the jammed paper. 4 Insert the standard tray. 5 Press .
2 Remove the jammed paper. 3 Close the rear duplex door. 4 Press .
3
Troubleshooting Guide - Page 1
... solutions. Lexmark™ T65x Troubleshooting Guide
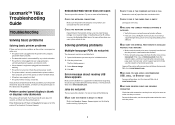
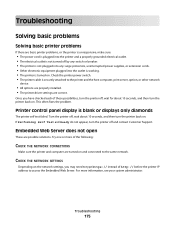
Troubleshooting
Solving basic problems
Solving basic printer problems
If there are basic printer problems, or the printer is unresponsive, make sure the network is functioning correctly. Turn the printer off by any switch or breaker. • The printer is not plugged into any surge protectors,
uninterrupted power supplies, or extension...
User's Guide - Page 26

d Remove the thumbscrews that attach the printer hard disk mounting bracket to the printer hard disk, and
then remove the bracket.
Set the printer hard disk aside.
4 Remove the metal cover from the ISP opening. Additional printer setup
26
User's Guide - Page 66
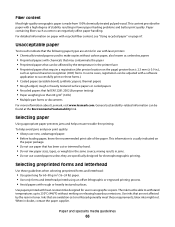
... g/m2 (16 lb) • Multiple part forms or documents
For more information about Lexmark, visit www.lexmark.com. To help avoid jams and poor print quality:
• Always use in fewer...Paper and specialty media guidelines
66 mixing results in jams. • Do not use with laser printers:
• Chemically treated papers used to make copies without melting or releasing hazardous emissions....
User's Guide - Page 73
... problems, avoid getting fingerprints on the envelopes being considered for use envelopes made from sticking together. • We recommend Lexmark part number 12A5010 for A4-size transparencies and Lexmark part number 70X7240
for laser printers. Have postage stamps attached - Use up to 230°C (446°F) without melting, discoloring, offsetting, or releasing hazardous emissions...
User's Guide - Page 74
..."Ordering supplies" on ...Lexmark Web site at least 1 mm (0.04 in a jam. Tips on using labels
Print samples on the labels being considered for label
applications.
Check with adhesive, and could void the warranty.
• If zone coating of the adhesive is not possible, remove... Print samples on the card stock being considered for laser printers. Notes:
• Paper, dual-web paper, ...
User's Guide - Page 77
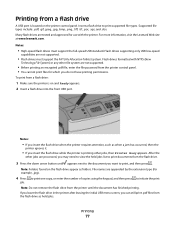
...full-speed USB standard. Note: Do not remove the flash drive from the printer until appears next to the document you may... need to view the held jobs.
Printing from a flash drive
A USB port is located on and Ready appears. 2 Insert a flash drive into the front USB port.
For more information, visit the Lexmark Web site at www.lexmark...
User's Guide - Page 175
... is not turned off by any switch or breaker. • The printer is not plugged into any surge protectors, uninterrupted power supplies, or extension cords. • Other electronic equipment plugged into the outlet is working. • The printer is turned on .
Troubleshooting
175 Turn the printer off, wait about 10 seconds, and then turn the...
User's Guide - Page 200
...):
30 (T650n, T652, T654); 10 (T650dn/dtn)
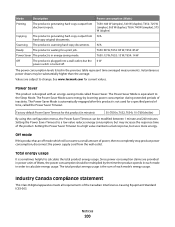
By using the configuration menus, the Power Saver Timeout can be substantially higher than the average. The Power Saver Mode saves energy by the time the product spends in energy-saving mode.
Since power consumption claims are subject to completely stop product power consumption, disconnect the power supply cord from...
User's Guide - Page 214

... bin full 152 Parallel 152 Parallel 152 Power Saver 152 Printer busy, Continue, Quit 152 Printing 152 Printing from USB drive DO NOT
REMOVE 152 Programming disk 152 Programming flash 152 ... disk 157 Unsupported USB device, please
remove 157 Unsupported USB hub, please
remove 157 USB drive removed 157 USB/USB 157 View supplies 157 Waiting 157 printer options troubleshooting 2000-sheet tray 180 5-...
Quick Reference - Page 5
... .
11 Press the arrow buttons until appears next to see more information, visit the Lexmark Web site at www.lexmark.com. 3 Click Other Options, and then click Print and Hold. 4 Select your job...6 Press the arrow buttons until the document has finished printing. Note: Do not remove the flash drive from the printer control panel.
• You cannot print files for example, .jpg).
4 Press...
Service Manual - Page 25
... to verify the repair. After you to most computer networks.
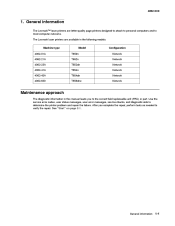
General information
1-1 The Lexmark laser printers are letter-quality page printers designed to attach to personal computers and to the correct field replaceable unit (FRU) or part. General information
The Lexmark™ laser printers are available in the following models: Machine type 4062-01A 4062-21A 4062...
Service Manual - Page 33
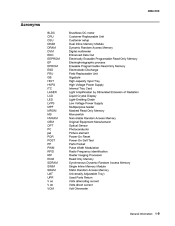
... CRU CSU DIMM DRAM DVM EDO EEPROM EP EPROM ESD FRU GB HCIT HVPS ITC LASER LCD LED LVPS MPF MROM MS NVRAM OEM OPT PC pel POR POST PP PWM ... Gigabyte High-capacity Input Tray High Voltage Power Supply Internal Tray Card Light Amplification by Stimulated Emission of Radiation Liquid Crystal Display Light-Emitting Diode Low Voltage Power Supply Multipurpose feeder Masked Read Only Memory Microswitch ...
Service Manual - Page 35
... assembly. Never touch the live even while the power supply is live parts.
WARNING: When operating the driving units using diagnostics or other tools, never touch the driving units.
CAUTION: Be careful to remove static electricity from the electrical outlet before you lift or set the printer down. Go to follow the procedures in...
Service Manual - Page 36
... the power cord ground terminal. • The printer is installed on . 4. The printer is not installed at the specified intervals. Check all attached options for proper installation. The Lexmark splash screen... from the wall outlet, check that occur during the POR sequence: 1. Power-on . 2.
The printer is loaded. 3. Refer to the User's Guide for proper attachment and ...
Service Manual - Page 50
... remains on page 2-132. Go to sensor (input) lingering jam service check. Go to "Output cover assembly removal (T650, T652, T654)" on printhead or system card assembly.
200.16
Main drive motor assembly load error
The main drive motor... jam
The media reached the sensor (input) sooner than the specified time.
200.15
Laser power did not settle
Laser circuit failure on page 4-54.
Service Manual - Page 288
...low voltages 5V for logic circuits, 5 V for laser diodes and 24V for cooling fans.
HVPS card assembly
The HVPS card assembly generates AC power and feeds it to work with 100V, 110 and...the LVPS card assembly to the high volt power supply (HVPS) card assembly, printer system card assembly and to the main drive motor assembly, while the printer front door assembly is open. 4062-XXX
...
Service Manual - Page 523
... following items:
• Damaged, missing, or altered parts, especially in the area of the on/off switch and the power supply. • Damaged, missing, or altered covers, especially in the area of this printer. Individual maintenance part expected life
Description Charge roll assembly with tool Transfer roll assembly with tool Pick roll assembly...
Similar Questions


How To Replace The Power Supply Unit On A Lexmark E360d
(Posted by Emailwsi 10 years ago)


