
Lexmark T652 Support Question
Lexmark T652 Support Question
Find answers below for this question about Lexmark T652.Need a Lexmark T652 manual? We have 9 online manuals for this item!
Question posted by Bihunte on August 27th, 2014
How To Remove Toner From T652
The person who posted this question about this Lexmark product did not include a detailed explanation. Please use the "Request More Information" button to the right if more details would help you to answer this question.
Current Answers
Answer #1: Posted by freginold on November 9th, 2014 6:04 AM
freginold

Member since:
December 20th, 2011 Points: 23,253,885

Member since:
December 20th, 2011 Points: 23,253,885
Related Lexmark T652 Manual Pages
Service Manual - Page 10
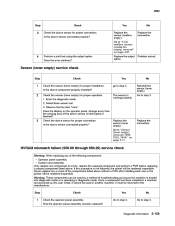
... cover, left removal (T652 and T654) ...4-66 Side cover, right removal (T650) ...4-67 Side cover, right removal (T652, T654) ...4-68 Sensor (duplex input) removal (T652, T654) ...4-68 Sensor (media level) removal (T650, T652, T654) ...4-70 Sensor (media out) removal (T650, T652, T654) ...4-70 Sensor (toner empty) removal (T650, T652, T654) ...4-71 Sensor (input) removal (T650, T652, T654) ...4-71...
Service Manual - Page 37

...; Install the proper print cartridge. It may take the printer 10-20 seconds to "Print cartridge ID connector assembly removal (T650, T652, T654)" on page 4-59. Ensure the media tray ... assembly if problem remains. It may take the printer 10-20 seconds to determine if the print cartridge is too short to "Switch (media size) assembly removal (T650, T652, T654)" on . wait a few seconds, ...
Service Manual - Page 49
... when the media reaches the sensor (input).
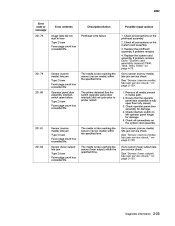
200.12
Laser power signal error
The printhead laser power signal has failed
Diagnostic information
2-15 Replace the system card if problem remains. Go to "System card assembly removal (T650, T652, T654, T656)" on the system card assembly. 4. Remove all connections on page 4-61. 1. Replace the printhead if...
Service Manual - Page 50
... on page 4-76. 1. Go to sensor (input) lingering jam service check. Go to "System card assembly removal (T650, T652, T654, T656)" on the system card assembly. 4. Go to paper jam or bind.
200.17
Sensor (...= Tray 1 Tray level = Low
The media reached the sensor (input) but did not settle
Laser circuit failure on page 2-132.
200.14
Sensor (input) early jam
The media reached the sensor (...
Service Manual - Page 54

... main drive motor assembly has failed or caused high mechanical load due to "Output cover assembly removal (T650, T652, T654)" on page 4-76.
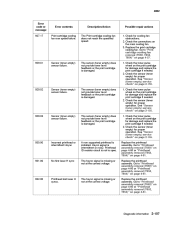
201.29
Sensor (narrow media) late jam Type 2 fuser...on page 2-139.
201.30
Operator panel door assembly interlock switch failure Type 2 fuser
The printer detected that the operator panel door assembly is late reaching the sensor (narrow media) within ...
Service Manual - Page 56
...Sensor (narrow media) late jam service check." on page 4-54. Go to "Output cover assembly removal (T650, T652, T654)" on page 2-135. The media is late reaching the sensor (narrow media) within the ...fuser output) late jam Type 2 fuser Fuser page count has exceeded life.
Go to printer restart.
1.
Remove all media present in media path. 2. 4062
Error code or message 201.55
Error ...
Service Manual - Page 57
...removal (T650, T652, T654, T656)" on page 4-76.
201.79
Sensor (narrow media) late jam Type 2 fuser Fuser page count has exceeded life
The media is fully open failure Type 2 fuser Fuser page count has exceeded life
The printer... the specified time. See "Sensor (narrow media) late jam service check." Remove all connections on page 2-135.
201.80
Operator panel door assembly interlock switch...
Service Manual - Page 141
... the correct voltage.
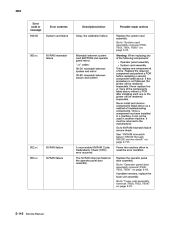
932.00
Printhead lost laser H syncs. The sensor (toner empty) does not provide toner level feedback or the print cartridge is damaged.
929.03
Sensor (toner empty) sensor failure.
Printhead ID resistor circuit is not to "Printhead assembly removal (T650)" on page 4-60 or "Printhead assembly removal (T652, T654)" on page 2-155. 1. The hsync...
Service Manual - Page 142

... main drive motor assembly. Go to "Printhead assembly removal (T650)" on page 4-60 or "Printhead assembly removal (T652, T654)" on page 4-54. 4.
No first laser H sync received. Go to "Output cover assembly removal (T650, T652, T654)" on page 4-61. 1. Go to "Printhead assembly removal (T650)" on page 4-60 or "Printhead assembly removal (T652, T654)" on the system card assembly...
Service Manual - Page 150
...; System card assembly Only replace one or the printer will be used in a machine, it can not be rendered inoperable.
Go to "Fuser unit assembly removal (T650, T652, T654)" on to the manufacturer. Never install and remove components listed above . Go to "Operator panel door assembly removal (T650, T652, T654)" on the operator panel door assembly...
Service Manual - Page 151

... failed on page 4-76.
Replace the system card assembly. Replace the system card assembly. Go to "System card assembly removal (T650, T652, T654, T656)" on the system card assembly.
958.xx
NAND failure
Printer has performed more than 100 "shift and reflash" operations as a result of ECC bit corrections
Replace the system card...
Service Manual - Page 153

...page 4-76.
Replace the system card assembly.
Diagnostic information
2-119 Go to "System card assembly removal (T650, T652, T654, T656)" on . 4. Command response error on page 4-76.
Replace the system card... device. Go to "System card assembly removal (T650, T652, T654, T656)" on the paper port.
982.13
Hot plug failure
The printer has detected a hot plug of input or...
Service Manual - Page 154
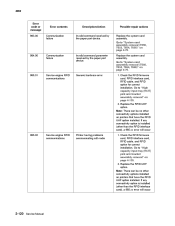
... message 983.00
Error contents
Description/Action
Possible repair actions
Communication failure
Invalid command received by the paper port device.
Go to "System card assembly removal (T650, T652, T654, T656)" on printers that have the RFID UHF option installed. Go to "High capacity input tray (HCIT) pick arm bracket assembly...
Service Manual - Page 157

... card, RFID cable, and RFID option for correct installation. Replace the RFID UHF option. Go to "System card assembly removal (T650, T652, T654, T656)" on page 4-130. 2. Note: There can be no other than the RFID interface card), a 985...Service engine RFID communications
Antenna is installed (other connectivity options installed on printers that have the RFID UHF option installed.
Service Manual - Page 189
... to the manufacturer. Replace the output option. Go to "Sensor (toner empty) removal (T650, T652, T654)" on the operator panel, change every time the sensing area of the following components: • Operator panel assembly • System card assembly Only replace one or the printer will be rendered inoperable. Is the above sensor connected properly...
Service Manual - Page 192

... Yes Problem solved.
Is the laser beam route free of debris and the glass window, in the media path. Is the above component free of contamination? No Go to "HVPS card assembly removal (T650, T652, T654)" on page 4-78. Is the toner level normal?
Go to step 2.
2 3
Check the toner level.
Inspect, clean and reinstall...
Service Manual - Page 194

... the print cartridge.
2-160 Service Manual
Replace the print cartridge.
Go to step 7. Go to "Transfer roll assembly removal (T650, T652, T654)" on page 4-61. Is the print cartridge properly installed? Is the toner level normal? Are the above component properly installed?
Go to step 3. Is the above components free from damage? Is...
Service Manual - Page 202

Does the problem remain? Is the toner level normal? Is the laser beam route free of debris and the glass window, in the printhead assembly, free of excess wear and contamination?
Is the above component properly installed?
Go to "Printhead assembly removal (T650)" on page 4-60 or "Printhead assembly removal (T652, T654)" on page 4-78.
5
Check...
Service Manual - Page 380
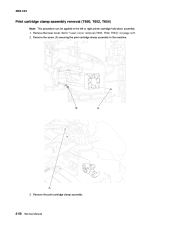
... the print cartridge clamp assembly to the left or right printer cartridge hold down assembly. 1. Remove the print cartridge clamp assembly.
4-58 Service Manual Remove the laser cover. 4062-XXX
Print cartridge clamp assembly removal (T650, T652, T654)
Note: This procedure can be applied to the machine.
B
A
A
3. Go to "Laser cover removal (T650, T652, T654)" on page 4-27. 2.
Service Manual - Page 395

... (standard bin exit) removal (T650, T652, T654)" on page 4-27. 2. Disconnect the connection (B) to "Laser cover removal (T650, T652, T654)" on page 4-73. 2. 4062-XXX
Sensor (standard bin exit) removal (T650, T652, T654)
1. Remove standard bin actuator assembly. Sensor (toner density) removal (T650, T652, T654)
1. B
A
Standard bin actuator assembly removal (T650, T652, T654)
1. Go to...
Similar Questions


Lexmark Printer Waste Toner Box Full Can You Remove Toner
(Posted by PLOPEZbaa 10 years ago)

How To Remove Paper Rollers From Lexmark Printer T652?
(Posted by wacksdougr 10 years ago)


How To Remove Toner Cartridge For The Lexmark E260dn In English
(Posted by detnle 10 years ago)