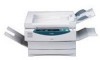
Canon PC980 Support Question
Canon PC980 Support Question
Find answers below for this question about Canon PC980 - PC 980 B/W Laser.Need a Canon PC980 manual? We have 1 online manual for this item!
Question posted by dennisr on April 25th, 2011
Have A Grinding Noise Coming From The Back Right Corner Whenever It Is Warming U
Occurs when warming as well as when scanning.
Current Answers
Related Canon PC980 Manual Pages
Service Manual - Page 10
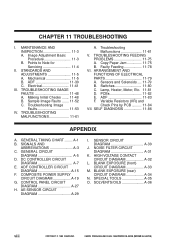
... 11-5 B. Sample Image Faults ....... 11-52 C. Sensors and Solenoids .... 11-79 B. GENERAL TIMING CHART ........ A-1 B. DC CONTROLLER CIRCUIT
DIAGRAM A-7 E. COMPOSITE POWER SUPPLY
CIRCUIT DIAGRAM A-19 G. NOISE FILTER CIRCUIT DIAGRAM A-31
K. SPECIAL TOOLS A-35 O. Image Adjustment Basic Procedure 11-3 B. Electrical 11-41
III. TROUBLESHOOTING FEEDING PROBLEMS 11-75 A. Copy Paper Jam...
Service Manual - Page 15
...), postcard*3
With claws Universal cassette (250 sheets of 80 g/m2)
100 sheets (A4; 80 g/m2)
Leading edge: 2.0 ±1.5 mm (Direct; 4.0 mm or less otherwise) Left/right: 0.0 +2.0, -0.0 mm (0 +4.0, -0.0 mm for LTR)
Provided (5 min, approx.; A4/LGL to 80 g/m2; A4R/B5R), transparency*2,*4 (A4R/LTRR*3), colored paper, business card (200 g/m2 or less...
Service Manual - Page 17
...;F 5% to 85% RH 607.95 to 1013.25 hPa (0.6 to 1 atm)
120 V 60 Hz 220/240 V 50 Hz, 60 Hz
Serial number
Maximum power consumption Noise Ozone
TVBxxxxx TVCxxxxx TVDxxxxx TVExxxxx TVFxxxxx TVGxxxxx TVHxxxxx TVJxxxxx
PUDxxxxx PUExxxxx PUFxxxxx PUGxxxxx TYAxxxxx TZAxxxxx UAAxxxxx
PUHxxxxx
0.9 kW or less Standby: 1.2W (approx.; Toner: Avoid...
Service Manual - Page 22
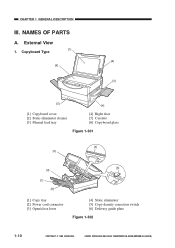
.../900s REV.0 AUG. 1999 PRINTED IN JAPAN (IMPRIME AU JAPON) External View
[1]
1. Copyboard Type
[2] [6]
[3]
[5] [4]
[1] Copyboard cover [2] Static eliminator cleaner [3] Manual feed tray
[4] Right door [5] Cassette [6] Copyboard glass
Figure 1-301
[4] [3]
[5] [2] [1]
[6]
[1] Copy tray [2] Power cord connector [3] Open/close lever
[4] Static eliminator [5] Copy density correction switch...
Service Manual - Page 23
CANON PC800s/900s REV.0 AUG. 1999 PRINTED IN JAPAN (IMPRIME AU JAPON)
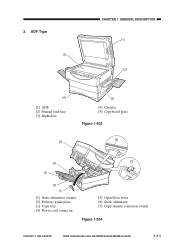
1-11 2.
ADF Type
[5]
CHAPTER 1 GENERAL DESCRIPTION [1] [2]
[4]
[1] ADF [2] Manual feed tray [3] Right door
[5]
[3]
[4] Cassette [5] Copyboard glass Figure 1-303
[6]
[4]
[7]
[3]
[2]
[1]
[1] Static eliminator cleaner [2] Delivery guide plate [3] Copy tray [4] Power cord connector
[5] Open/close lever [6] Static ...
Service Manual - Page 45
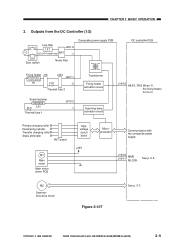
... filter LF1
J201-2
(220/240V model only) NF1
-1
DS1 Door switch
Noise filter
Composite power supply PCB
DC controller PCB
Fixing heater J16
J434 J207-1
H1
FU2
-2
Thermal fuse 2
Scanning lamp
FU1 LA1 Thermal fuse 1
J910-3 -1
Transformer Fixing heater activation circuit
Scanning lamp activation circuit
J104-2 HEAT_TRG When '0', the fixing heater turns on...
Service Manual - Page 62

... screws by reversing the steps used to ensure electrical continuity.) 5. Do not use any of the screws used to mount the grounding wire and
Varistors come with the following in mind: 1. ! Unless otherwise instructed, assemble the parts by type (length, diameter) and location. 4. As a rule, do not operate the machine with...
Service Manual - Page 72
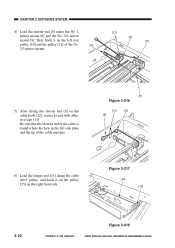
.... then, hook it on the left side plate and the tip of the No.
[10]
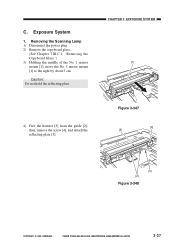
2/3 mirror mount.
[11] [9] [8]
5) After fitting the shorter end [6] on the right front side.
CHAPTER 3 EXPOSURE SYSTEM
4) Lead the shorter end [6] under the No. 1
mirror mount [8] and the No. 2/3 mirror
mount [9];
Service Manual - Page 74
... as shown, and hook it on the pulley [6] on the pulley [8] of the cable
drive pulley [1], and wind it on the right front side.
[1]
Figure 3-321
[1]
[5]
[6]
Figure 3-322
3) Lead the longer end [5] under the No. 1 mirror mount [7];
... mount, and lead it between the No. 1 mirror mount [7] and the scanning lamp [9].
[8]
[7]
[9]
[5]
3-24
Figure 3-323
COPYRIGHT © 1999 CANON INC.
Service Manual - Page 75
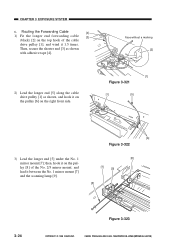
...lead it on the pulley [12] of the longer end [5] on the hole [10] on the right rear side.
[5]
Figure 3-324
[11]
6) Lead the shorter end [3] under the No. 1 mirror mount [7],... and hook it between the No. 1 mirror mount [7] and the scanning lamp [9]. Figure 3-325
[12] [3] [9]
COPYRIGHT © 1999 CANON INC.
[7]
Figure 3-326
CANON PC800s/900s REV.0...
Service Manual - Page 76
...]
Figure 3-328
3-26
COPYRIGHT © 1999 CANON INC. CHAPTER 3 EXPOSURE SYSTEM
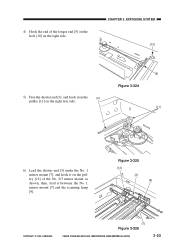
7) Hook the end of the shorter end [3] on the
[3]
[13]
hole [13] on the right side.
8) Free the shorter end [3] and the longer end [5] (reversing cable), and connect both with a spring [14];
Service Manual - Page 85
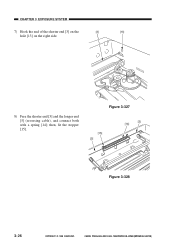
... mount and the marking [3] on the power; CHAPTER 3 EXPOSURE SYSTEM
[2] [1]
2) While keeping the condition in step 1), turn off the power. • The lens will not come into contact when the cam gear rotates). Figure 3-344
[2] [3]
[1]
Figure 3-345
COPYRIGHT © 1999 CANON INC. 2.
Service Manual - Page 87
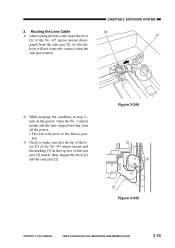
...Copyboard Glass.") 3) Holding the middle of the No. 1 mirror mount [1], move the No. 1 mirror mount [1] to the right by about 5 cm. Figure 3-347
[4] [5]
[3] [2]
Figure 3-348
COPYRIGHT © 1999 CANON INC. then, remove the... [1]
4) Free the harness [3] from the guide [2];
Removing the Scanning Lamp 1) Disconnect the power plug. 2) Remove the copyboard glass.
(See Chapter 7.III.C.1.
Service Manual - Page 109
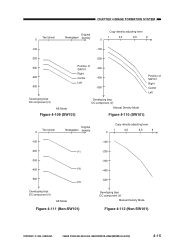
... FORMATION SYSTEM
Test sheet 0
Original Newspaper density
Copy density adjusting lever
1
3.5
0
6.5
9
-100
-100
-200
-200
-300 -400 -500
Position of SW101 Right Center Left
-300 -400 -500
Position of SW101 Right Center Left
Developing bias DC component (V)
AE Mode
Figure 4-109 (SW101)
Developing bias DC component (V)
Manual Density Mode
Figure 4-110 (SW101...
Service Manual - Page 116

... the screws used to ensure electrical continuity.) 5.
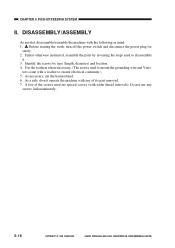
DISASSEMBLY/ASSEMBLY
As needed, disassemble/assemble the machine with a washer to mount the grounding wire and Varis- tors come with the following in mind: 1. !
Service Manual - Page 142
... to disassemble
it. 3. Use the washers where necessary. (The screws used are special screws (with any
screws indiscriminately.
5-18
COPYRIGHT © 1999 CANON INC. tors come with the following in mind: 1. ! Do not use any of the screws used to ensure electrical continuity.) 5. Before starting the work, turn off the power...
Service Manual - Page 152

... JAPAN (IMPRIME AU JAPON) then, se- Pickup gear unit
Figure 5-220
5-28
COPYRIGHT © 1999 CANON INC.
Multifeeder Assembly
1. Removing the Multifeeder Unit 1) Open the right door. 2) Remove the two screws [1], and detach
the multifeeder unit [2].
[1] [2]
[1]
Figure 5-219
Caution: When mounting the multifeeder unit, perform the following first: 1) Turn on the...
Service Manual - Page 155

Removing the Single-feeder Unit
1) Open the right door.
[1]
2) Remove the two screws [1], and remove
the single-feeder unit [2].
2.
Removing the Single-feeder Pickup Roller
1) Remove the single-feeder unit. (See 1. Single-feeder ...
Service Manual - Page 245
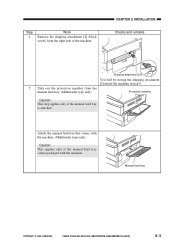
... be storing the shipping attachment [2] inside the machine in step 9.
5 Take out the protective member from the right side of the machine. Manual feed tray
COPYRIGHT © 1999 CANON INC. Attach the manual feed tray that comes with the machine. (Multifeeder type only)
Caution: This applies only if the manual feed tray...
Service Manual - Page 250
... B.
If a non-English language is cor-
"Placing Copy Paper.")
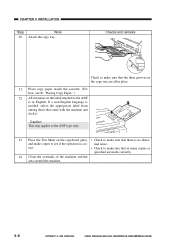
22 All notations on the copyboard glass, • Check to make copies to make sure that come with the machine and stick it. mal noise. CHAPTER 9 INSTALLATION
Step
Work
20 Attach the copy tray.
Similar Questions

Pc 940 Copier Makes Grinding Noise. What Is The Cause?
(Posted by Anonymous-143110 9 years ago)

What Does Error Code 5c20 Mean?
Upon turn on a clicking/whirring noise comes from the right carriage area of printer.
Upon turn on a clicking/whirring noise comes from the right carriage area of printer.
(Posted by ben79059 10 years ago)

Does My Canon Pc950 Have A Hard Drive
(Posted by mdawahojnoski 11 years ago)

What Is Error 5100 On A Cannon Mp530 Printer
(Posted by PATRICIAHQ 12 years ago)

Why When I Make A Copy Is Comes Out All Black?
(Posted by Vmiles6145 13 years ago)