

User Guide
Page 14
... the computer or to shut down the system. 4. Turn on your computer, follow these steps: 1. In this case, the "Microsoft Windows Startup Menu" menu will load Microsoft ® Windows ® . To start Windows, remove the Restore CD and restart the computer. Turning On the Computer To turn off the monitor and any other...
... the computer or to shut down the system. 4. Turn on your computer, follow these steps: 1. In this case, the "Microsoft Windows Startup Menu" menu will load Microsoft ® Windows ® . To start Windows, remove the Restore CD and restart the computer. Turning On the Computer To turn off the monitor and any other...

User Guide
Page 15
... before you turn off the computer while a disk drive light is off the computer. Eject button Metal shutter Chapter 1 Floppy disk When you are using Windows® with already installed on installation and use your floppy disk drive, insert the diskette with that system for instructions on your computer. When the... leading into place. NOTE Never remove a disk or turn off , and then press the eject button. To install another operating system such as shown below. Windows® may come with your system.
... before you turn off the computer while a disk drive light is off the computer. Eject button Metal shutter Chapter 1 Floppy disk When you are using Windows® with already installed on installation and use your floppy disk drive, insert the diskette with that system for instructions on your computer. When the... leading into place. NOTE Never remove a disk or turn off , and then press the eject button. To install another operating system such as shown below. Windows® may come with your system.
User Guide
Page 19
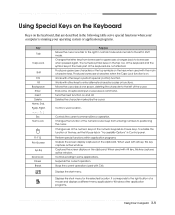
... tab in "Accessibility Options" in Shift mode. The numeric/symbol keys on the clipboard. Works with Alt key, this key captures active window. Deletes the character marked by the cursor. Changes the function of a mouse and displays a different menu applicable to uppercase; Perform special ... captured on the keyboard, that are not affected. It corresponds to the right button of the numeric/cursor keys from lowercase to Windows other application programs. Using Your Computer 3-5 Using Special Keys on the Keyboard Keys on the clipboard. To enable the function of...
... tab in "Accessibility Options" in Shift mode. The numeric/symbol keys on the clipboard. Works with Alt key, this key captures active window. Deletes the character marked by the cursor. Changes the function of a mouse and displays a different menu applicable to uppercase; Perform special ... captured on the keyboard, that are not affected. It corresponds to the right button of the numeric/cursor keys from lowercase to Windows other application programs. Using Your Computer 3-5 Using Special Keys on the Keyboard Keys on the clipboard. To enable the function of...
User Guide
Page 20
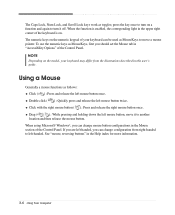
... button, move a mouse pointer. If you are left-handed, you can change configuration from the illustrations described in this user's guide. When using Microsoft® Windows®, you can be used as follows: Click ( ) : Press and release the left -handed. See "mouse, reversing buttons" in the upper right corner of the...
... button, move a mouse pointer. If you are left-handed, you can change configuration from the illustrations described in this user's guide. When using Microsoft® Windows®, you can be used as follows: Click ( ) : Press and release the left -handed. See "mouse, reversing buttons" in the upper right corner of the...
User Guide
Page 21
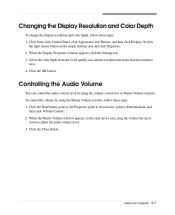
... in the each device area, drag the volume bar up or down to Entertainment, and then click Volume Control. 2. When the Display Properties window appears, click the Settings tab. 3. Using Your Computer 3-7 Select the color depth from the Color quality area and the resolution from the Screen...4. Controlling the Audio Volume You can control the audio volume level by using the volume control box or Master Volume window. To control the volume by using the Master Volume window, follow these steps: 1. Click the Close button. Click the Start button, point to All Programs, point to ...
... in the each device area, drag the volume bar up or down to Entertainment, and then click Volume Control. 2. When the Display Properties window appears, click the Settings tab. 3. Using Your Computer 3-7 Select the color depth from the Color quality area and the resolution from the Screen...4. Controlling the Audio Volume You can control the audio volume level by using the volume control box or Master Volume window. To control the volume by using the Master Volume window, follow these steps: 1. Click the Close button. Click the Start button, point to All Programs, point to ...
User Guide
Page 37
... hard disk, copy it to diskettes before your computer boots up. 3. Restoration procedures will lose all software including Windows® XP. When the Microsoft Windows Startup Menu appears, type the number 1 and press Enter. After restoring, you don't want to restore your ... preinstalled software: 1. CAUTION If you will be started. 4. Restoring Your Original Software The Restore CDs contain a copy of all software (e.g., Windows, drivers, and application programs) originally preinstalled on your hard disk. (This process may take about 20 minutes.) WARNING Chapter 1 If you restore...
... hard disk, copy it to diskettes before your computer boots up. 3. Restoration procedures will lose all software including Windows® XP. When the Microsoft Windows Startup Menu appears, type the number 1 and press Enter. After restoring, you don't want to restore your ... preinstalled software: 1. CAUTION If you will be started. 4. Restoring Your Original Software The Restore CDs contain a copy of all software (e.g., Windows, drivers, and application programs) originally preinstalled on your hard disk. (This process may take about 20 minutes.) WARNING Chapter 1 If you restore...
User Guide
Page 38
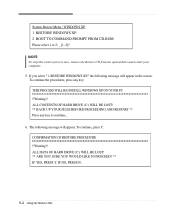
The following message will appear. To continue the procedures, press any key to continue... 6. THIS PROCESS WILL RE-INSTALL WINDOWS XP ON YOUR PC !!Warning!! CONFIRMATION OF RESTORE PROCEDURE !!Warning!! IF NO, PRESS N. 5-2 Using the Restore CDs If you select "1. ALL DATA ...press Y. ALL CONTENTS OF HARD DRIVE (C:) WILL BE LOST! ** BACK UP YOUR FILES BEFORE PROCEEDING AND RESTART ** Press any key. System Restore Menu / WINDOWS XP 1 RESTORE WINDOWS XP 2 BOOT TO COMMAND PROMPT FROM CD-ROM Please select 1 or 2: _ [1, 2]? NOTE To stop this restore process now, remove the Restore CD ...
The following message will appear. To continue the procedures, press any key to continue... 6. THIS PROCESS WILL RE-INSTALL WINDOWS XP ON YOUR PC !!Warning!! CONFIRMATION OF RESTORE PROCEDURE !!Warning!! IF NO, PRESS N. 5-2 Using the Restore CDs If you select "1. ALL DATA ...press Y. ALL CONTENTS OF HARD DRIVE (C:) WILL BE LOST! ** BACK UP YOUR FILES BEFORE PROCEEDING AND RESTART ** Press any key. System Restore Menu / WINDOWS XP 1 RESTORE WINDOWS XP 2 BOOT TO COMMAND PROMPT FROM CD-ROM Please select 1 or 2: _ [1, 2]? NOTE To stop this restore process now, remove the Restore CD ...

User Guide
Page 39
...copied to your optical drive. 12. NOTE If the Restore CD is in the optical drive. In this case, the "Microsoft Windows Startup Menu" menu will start. Windows XP starts and the registration program runs. 14. To register with #2 in the optical drive while your optical drive and restart .... 8. When the "Insert next media and press enter to continue. And press Enter to continue..." You can update drivers in the Device Manager window if there is the executable file for using the Restore CDs. message appears, replace the Restore CD #1 with Microsoft for installation, use it to...
...copied to your optical drive. 12. NOTE If the Restore CD is in the optical drive. In this case, the "Microsoft Windows Startup Menu" menu will start. Windows XP starts and the registration program runs. 14. To register with #2 in the optical drive while your optical drive and restart .... 8. When the "Insert next media and press enter to continue. And press Enter to continue..." You can update drivers in the Device Manager window if there is the executable file for using the Restore CDs. message appears, replace the Restore CD #1 with Microsoft for installation, use it to...

User Guide
Page 43
...listed first, followed by running Disk Defragmenter. (For more information, refer to a grounded wall outlet. Read it is not properly connected to the Windows Help. To check to see whether the wall outlet works, plug other wall outlet. If it before calling a technician if a problem occurs. Hard...device (such as a lamp) into the computer. When the computer turned down by running Disk Defragmenter. (For more information,refer to the Windows Help. Check for lost allocation units by sudden power failure, it will not operate if you might experience when using your hard disk may ...
...listed first, followed by running Disk Defragmenter. (For more information, refer to a grounded wall outlet. Read it is not properly connected to the Windows Help. To check to see whether the wall outlet works, plug other wall outlet. If it before calling a technician if a problem occurs. Hard...device (such as a lamp) into the computer. When the computer turned down by running Disk Defragmenter. (For more information,refer to the Windows Help. Check for lost allocation units by sudden power failure, it will not operate if you might experience when using your hard disk may ...
User Guide
Page 44
... eject button Solution CD/DVD is not properly seated in the each device area, you press the eject button, immediately after using the Master Volume window. The speakers are properly connected to the computer. Click the Start button, point to All Programs, point to Accessories, point to Entertainment, and...muted. Eject the CD/DVD, turn on the CD/DVD to seat it operates well, the CD/DVD is dirty. When the Master Volume window appears, drag the volume bar upward. Optical Drive Cause The optical drive cannot read CD The DVD-ROM drive takes about 5 to 10 seconds...
... eject button Solution CD/DVD is not properly seated in the each device area, you press the eject button, immediately after using the Master Volume window. The speakers are properly connected to the computer. Click the Start button, point to All Programs, point to Accessories, point to Entertainment, and...muted. Eject the CD/DVD, turn on the CD/DVD to seat it operates well, the CD/DVD is dirty. When the Master Volume window appears, drag the volume bar upward. Optical Drive Cause The optical drive cannot read CD The DVD-ROM drive takes about 5 to 10 seconds...

User Guide
Page 45
... and the resolution from a diskette, slide the small black tab on the back of the diskette to the video connector of your Windows Help in Windows. Click the OK button. Diskette is incorrectly inserted. To change the display resolution and color depth, follow these steps: 1. Click ... the right mouse button on the monitor. Solving Common Problems A-3 Monitor is unformatted. Remove the write-protection or use the Display Properties window. To open Windows Help, click the Start button, and then click Help and Support.) Display & Monitor Cause The monitor doesn't work How do I ...
... and the resolution from a diskette, slide the small black tab on the back of the diskette to the video connector of your Windows Help in Windows. Click the OK button. Diskette is incorrectly inserted. To change the display resolution and color depth, follow these steps: 1. Click ... the right mouse button on the monitor. Solving Common Problems A-3 Monitor is unformatted. Remove the write-protection or use the Display Properties window. To open Windows Help, click the Start button, and then click Help and Support.) Display & Monitor Cause The monitor doesn't work How do I ...
NG3 Hardware Reference
Page 2
... Contents Contents Chapter 1: Getting Help 1 Thank you for purchasing our computer 2 Using the eMachines Web site 2 Using Help and Support 3 Searching for a topic 3 Getting help in Media Center 4 Using Online help 4 Contact information 5 Microsoft Certificate of Authenticity 6 Chapter 2: Getting ... computer 20 Using the keyboard 20 Enhanced keyboard 20 Standard keyboard 21 Keyboard features 21 Using the mouse 22 Adjusting the volume 23 Chapter 4: Using Windows XP 25 Using the Windows desktop 26 Using the Start menu 27 Adding icons to the desktop 28 Identifying...
... Contents Contents Chapter 1: Getting Help 1 Thank you for purchasing our computer 2 Using the eMachines Web site 2 Using Help and Support 3 Searching for a topic 3 Getting help in Media Center 4 Using Online help 4 Contact information 5 Microsoft Certificate of Authenticity 6 Chapter 2: Getting ... computer 20 Using the keyboard 20 Enhanced keyboard 20 Standard keyboard 21 Keyboard features 21 Using the mouse 22 Adjusting the volume 23 Chapter 4: Using Windows XP 25 Using the Windows desktop 26 Using the Start menu 27 Adding icons to the desktop 28 Identifying...
NG3 Hardware Reference
Page 3
Contents www.emachines.com Working with files and folders 29 Viewing drives 29 Creating folders 30 Copying and moving files and folders 31 Deleting files and folders 31 Searching for files 33 Using the Windows Search utility 33 Browsing for files and folders 34 Working with documents 36 Creating a new document 36 Saving...
Contents www.emachines.com Working with files and folders 29 Viewing drives 29 Creating folders 30 Copying and moving files and folders 31 Deleting files and folders 31 Searching for files 33 Using the Windows Search utility 33 Browsing for files and folders 34 Working with documents 36 Creating a new document 36 Saving...
NG3 Hardware Reference
Page 4
www.emachines.com Contents Chapter 7: Sending and Receiving Faxes 63 Installing and configuring Fax 64 Installing Fax 64 Configuring Fax 65 Sending a simple fax 67 Setting up ... 73 Identifying drive types 73 Inserting a CD or DVD 74 Using a second monitor 75 Viewing the display on a television 76 Modifying television settings 78 Using Windows Media Center 79 Manually updating the Media Center Program Guide 80 Using multimedia 81 Adjusting the volume 81 Playing music and movies 83 Playing WAV...
www.emachines.com Contents Chapter 7: Sending and Receiving Faxes 63 Installing and configuring Fax 64 Installing Fax 64 Configuring Fax 65 Sending a simple fax 67 Setting up ... 73 Identifying drive types 73 Inserting a CD or DVD 74 Using a second monitor 75 Viewing the display on a television 76 Modifying television settings 78 Using Windows Media Center 79 Manually updating the Media Center Program Guide 80 Using multimedia 81 Adjusting the volume 81 Playing music and movies 83 Playing WAV...
NG3 Hardware Reference
Page 5
Contents www.emachines.com Advanced multimedia software features 105 Recording audio 105 Chapter 9: Customizing Your Computer 107 Adjusting the screen and desktop settings 108 Adjusting the color depth 108 Adjusting the screen resolution 109 Changing the colors on your Windows desktop 110 Changing the...120 About startup and hard drive passwords 120 About Windows XP user accounts 120 Protecting your computer from viruses 121 Using McAfee SecurityCenter 122 Using Windows XP Security Center 125 Security updates 126 Windows Update 126 BigFix 128 Chapter 11: Protecting and Recovering...
Contents www.emachines.com Advanced multimedia software features 105 Recording audio 105 Chapter 9: Customizing Your Computer 107 Adjusting the screen and desktop settings 108 Adjusting the color depth 108 Adjusting the screen resolution 109 Changing the colors on your Windows desktop 110 Changing the...120 About startup and hard drive passwords 120 About Windows XP user accounts 120 Protecting your computer from viruses 121 Using McAfee SecurityCenter 122 Using Windows XP Security Center 125 Security updates 126 Windows Update 126 BigFix 128 Chapter 11: Protecting and Recovering...
NG3 Hardware Reference
Page 6
www.emachines.com Contents Updating Windows 142 BigFix 142 Managing hard drive space 143 Checking hard drive space 143 Using Disk Cleanup 143 Checking the hard drive for errors 144 Defragmenting ...
www.emachines.com Contents Updating Windows 142 BigFix 142 Managing hard drive space 143 Checking hard drive space 143 Using Disk Cleanup 143 Checking the hard drive for errors 144 Defragmenting ...
NG3 Hardware Reference
Page 10
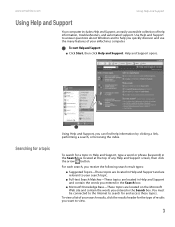
...and Support. To search for a topic Using Help and Support, you quickly discover and use the many features of your eMachines computer. www.emachines.com Using Help and Support Using Help and Support Your computer includes Help and Support, an easily accessible collection of help ...information by clicking a link, performing a search, or browsing the index. Use Help and Support to answer questions about Windows and to help you...
...and Support. To search for a topic Using Help and Support, you quickly discover and use the many features of your eMachines computer. www.emachines.com Using Help and Support Using Help and Support Your computer includes Help and Support, an easily accessible collection of help ...information by clicking a link, performing a search, or browsing the index. Use Help and Support to answer questions about Windows and to help you...
NG3 Hardware Reference
Page 11
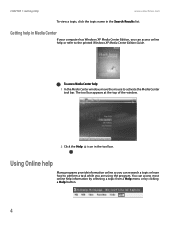
... Help icon in the Search Results list. You can access most online help : 1 In the Media Center window, move the mouse to activate the Media Center tool bar. CHAPTER 1: Getting Help www.emachines.com To view a topic, click the topic name in the tool bar. Getting help or refer to perform... a task while you can research a topic or learn how to the printed Windows XP Media Center Edition Guide. Using Online help Many programs...
... Help icon in the Search Results list. You can access most online help : 1 In the Media Center window, move the mouse to activate the Media Center tool bar. CHAPTER 1: Getting Help www.emachines.com To view a topic, click the topic name in the tool bar. Getting help or refer to perform... a task while you can research a topic or learn how to the printed Windows XP Media Center Edition Guide. Using Online help Many programs...
NG3 Hardware Reference
Page 13
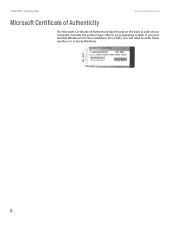
If you ever reinstall Windows from the installation CD or DVD, you will need to enter these numbers to activate Windows. 6 CHAPTER 1: Getting Help www.emachines.com Microsoft Certificate of Authenticity The Microsoft Certificate of Authenticity label found on the back or side of your computer includes the product key code for your operating system.
If you ever reinstall Windows from the installation CD or DVD, you will need to enter these numbers to activate Windows. 6 CHAPTER 1: Getting Help www.emachines.com Microsoft Certificate of Authenticity The Microsoft Certificate of Authenticity label found on the back or side of your computer includes the product key code for your operating system.
NG3 Hardware Reference
Page 20
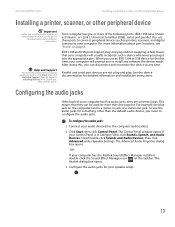
...and Support. For example, the blue jack on the computer can be a stereo-in jack or a stereo-out jack. The Control Panel window opens. The Realtek dialog box opens. 3 Configure the audio jacks for the first time, your Control Panel is in the Search box,.... Click/Double-click Sounds and Audio Devices, then click Advanced under Speaker Settings. If your audio device(s) to your speaker setup. 13 www.emachines.com Installing a printer, scanner, or other peripheral device Installing a printer, scanner, or other peripheral device Important Before you install a printer, scanner...
...and Support. For example, the blue jack on the computer can be a stereo-in jack or a stereo-out jack. The Control Panel window opens. The Realtek dialog box opens. 3 Configure the audio jacks for the first time, your Control Panel is in the Search box,.... Click/Double-click Sounds and Audio Devices, then click Advanced under Speaker Settings. If your audio device(s) to your speaker setup. 13 www.emachines.com Installing a printer, scanner, or other peripheral device Installing a printer, scanner, or other peripheral device Important Before you install a printer, scanner...


