
eMachines E627 Quick Guide - English
Page 3
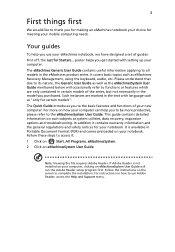
...as system utilities, data recovery, expansion options and troubleshooting. The Quick Guide introduces you purchased. It is not installed on such subjects as eMachines Recovery Management, using the keyboard, audio, etc. 3 First things first We would like to complete the installation. Follow the instructions on...be more productive, please refer to all models in Portable Document Format (PDF) and comes preloaded on your computer, clicking on the screen to thank you use Adobe Reader, access the Help and Support menu. Note: Viewing the file requires Adobe Reader. If Adobe Reader...
...as system utilities, data recovery, expansion options and troubleshooting. The Quick Guide introduces you purchased. It is not installed on such subjects as eMachines Recovery Management, using the keyboard, audio, etc. 3 First things first We would like to complete the installation. Follow the instructions on...be more productive, please refer to all models in Portable Document Format (PDF) and comes preloaded on your computer, clicking on the screen to thank you use Adobe Reader, access the Help and Support menu. Note: Viewing the file requires Adobe Reader. If Adobe Reader...
eMachines E627 Quick Guide - English
Page 5
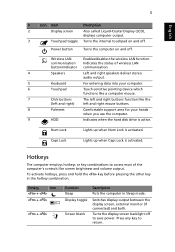
... use the computer. 9 HDD Indicates when the hard disk drive is active. Hotkey Icon + + + Function Sleep Display toggle Screen blank Description Puts the computer in the hotkey combination. To activate hotkeys, press and hold the key before pressing the other key.... Caps Lock Lights up when Num Lock is activated. Switches display output between the display screen, external monitor (if connected) and both. English 5 # Icon Item Description 2 Display screen Also called Liquid-Crystal Display (LCD), displays computer output. 3 Touchpad toggle Turns the internal ...
... use the computer. 9 HDD Indicates when the hard disk drive is active. Hotkey Icon + + + Function Sleep Display toggle Screen blank Description Puts the computer in the hotkey combination. To activate hotkeys, press and hold the key before pressing the other key.... Caps Lock Lights up when Num Lock is activated. Switches display output between the display screen, external monitor (if connected) and both. English 5 # Icon Item Description 2 Display screen Also called Liquid-Crystal Display (LCD), displays computer output. 3 Touchpad toggle Turns the internal ...
eMachines E627 Quick Guide - English
Page 6
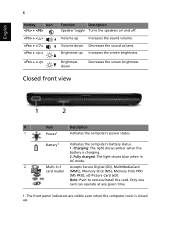
...'s power status. The front panel indicators are visible even when the computer cover is charging. 2. Volume up Increases the screen brightness. Note: Push to remove/install the card. Volume down Decreases the screen brightness. English 6 Hotkey Icon + + < > + < > + < > + < > Function Description Speaker toggle Turns the speakers on and off. Brightness up Increases the sound...
...'s power status. The front panel indicators are visible even when the computer cover is charging. 2. Volume up Increases the screen brightness. Note: Push to remove/install the card. Volume down Decreases the screen brightness. English 6 Hotkey Icon + + < > + < > + < > + < > Function Description Speaker toggle Turns the speakers on and off. Brightness up Increases the sound...

Service Guide
Page 4
Conventions The following conventions are used in this manual: SCREEN MESSAGES Denotes actual messages that might result from doing or not doing specific actions. Gives precautionary measures to avoid possible hardware or software problems. Reminds you to the current topic. IV Alerts you to do specific actions relevant to the accomplishment of additional information related to any damage that appear on screen. NOTE WARNING CAUTION IMPORTANT Gives bits and pieces of procedures.
Conventions The following conventions are used in this manual: SCREEN MESSAGES Denotes actual messages that might result from doing or not doing specific actions. Gives precautionary measures to avoid possible hardware or software problems. Reminds you to the current topic. IV Alerts you to do specific actions relevant to the accomplishment of additional information related to any damage that appear on screen. NOTE WARNING CAUTION IMPORTANT Gives bits and pieces of procedures.
Service Guide
Page 15
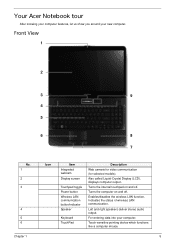
... (LCD), displays computer output. Enables/disables the wireless LAN function. Turns the computer on and off . Front View 1 2 3 9 4 5 6 8 7 No. 1 2 3 4 5 6 Chapter 1 Icon Item Integrated webcam Display screen Touchpad toggle Power button Wireless LAN communication button/indicator Speaker Keyboard TouchPad Description Web camera for video communication (for selected models). Turns the internal touchpad...
... (LCD), displays computer output. Enables/disables the wireless LAN function. Turns the computer on and off . Front View 1 2 3 9 4 5 6 8 7 No. 1 2 3 4 5 6 Chapter 1 Icon Item Integrated webcam Display screen Touchpad toggle Power button Wireless LAN communication button/indicator Speaker Keyboard TouchPad Description Web camera for video communication (for selected models). Turns the internal touchpad...

Service Guide
Page 22
... Lock is in a normal manner. Lock key Caps Lock Num Lock + Scroll Lock + Description When Caps Lock is indicated by small characters located on , the screen moves one line up or down when you need to connect an external keypad. To simplify the keyboard legend, cursor-control key symbols are in...
... Lock is in a normal manner. Lock key Caps Lock Num Lock + Scroll Lock + Description When Caps Lock is indicated by small characters located on , the screen moves one line up or down when you need to connect an external keypad. To simplify the keyboard legend, cursor-control key symbols are in...
Service Guide
Page 24
...Puts the computer in Acer Empowering Technology. Switches display output between the display screen, external monitor (if connected) and both. Turns the speakers on hotkeys. Decreases the screen brightness. 14 Chapter 1 Press any key to save power. To activate hot...+ + + + + + + + + < > + < > Icon Function Hotkey help Acer eSettings Management Acer ePower Management Sleep Display toggle Screen blank TouchPad toggle Speaker toggle Brightness up Brightness down Description Displays help on and off . Hot Keys The computer employs hotkeys or key combinations to...
...Puts the computer in Acer Empowering Technology. Switches display output between the display screen, external monitor (if connected) and both. Turns the speakers on hotkeys. Decreases the screen brightness. 14 Chapter 1 Press any key to save power. To activate hot...+ + + + + + + + + < > + < > Icon Function Hotkey help Acer eSettings Management Acer ePower Management Sleep Display toggle Screen blank TouchPad toggle Speaker toggle Brightness up Brightness down Description Displays help on and off . Hot Keys The computer employs hotkeys or key combinations to...

Service Guide
Page 26
... and then click the check box Extend my windows desktop onto this function, please go to Start´ All Programs and click on the same screen. Drag and drop each display from the task bar. 2. AcerGridVista is simple to set to be partitioned independently. Using the System Utilities Acer GridVista (dual... the second monitor is a handy utility that the resolution setting of a well-organized desktop. To access this monitor. Run Acer GridVista and select your preferred screen configuration for each window into the appropriate grid. 3.
... and then click the check box Extend my windows desktop onto this function, please go to Start´ All Programs and click on the same screen. Drag and drop each display from the task bar. 2. AcerGridVista is simple to set to be partitioned independently. Using the System Utilities Acer GridVista (dual... the second monitor is a handy utility that the resolution setting of a well-organized desktop. To access this monitor. Run Acer GridVista and select your preferred screen configuration for each window into the appropriate grid. 3.
Service Guide
Page 32
... Pack capacity Normal Voltage Package configuration Specification 6 Cell SANYO/SONY/PANASONIC/SIMPLO AS2009A Li-ion 4400 mAh 2.2 Ah 3S2P LCD 15.6" Item Vendor/model name Screen Diagonal (mm) Display Area (mm) Display resolution (pixels) Pixel Pitch Display Mode Typical White Luminance (cd/m2) (also called Brightness) CMO N156B3-L02 396.2 344...
... Pack capacity Normal Voltage Package configuration Specification 6 Cell SANYO/SONY/PANASONIC/SIMPLO AS2009A Li-ion 4400 mAh 2.2 Ah 3S2P LCD 15.6" Item Vendor/model name Screen Diagonal (mm) Display Area (mm) Display resolution (pixels) Pixel Pitch Display Mode Typical White Luminance (cd/m2) (also called Brightness) CMO N156B3-L02 396.2 344...

Service Guide
Page 35
In this utility. Please note that system information is prompted on the bottom of the screen. Press F2 to different models. Please also refer to "enabled". Navigating the BIOS Utility There are shown on the bottom of F12 Boot Menu is a ... to run Setup. Read this item. • Press Esc while you are found in square brackets. Navigation keys for parameters are in any of the screen. If you can change the value of a parameter if it is already properly configured and optimized, and you may need to enter multi-boot menu...
In this utility. Please note that system information is prompted on the bottom of the screen. Press F2 to different models. Please also refer to "enabled". Navigating the BIOS Utility There are shown on the bottom of F12 Boot Menu is a ... to run Setup. Read this item. • Press Esc while you are found in square brackets. Navigation keys for parameters are in any of the screen. If you can change the value of a parameter if it is already properly configured and optimized, and you may need to enter multi-boot menu...
Service Guide
Page 36
... ST960821A-(PM) 3LF005DB MATSHITADVD V1.00 ATI M92 V008.050I.0-26.00 eMachines E627 eMachines 39353164386665643635001EECE1D377 F1 Help Esc Exit Select Item F5/F6 Change Values F9 Setup Defaults Select Menu Enter Select Sub-Menu F10 Save and Exit NOTE: The screen above is an identifier standard used in software construction, standardized by the... master. This field shows the model name of the system. Actual values may differ according to model. This field shows the speed of the CPU. eMachines E627 BIOS Information The Information screen displays a summary of your reference only.
... ST960821A-(PM) 3LF005DB MATSHITADVD V1.00 ATI M92 V008.050I.0-26.00 eMachines E627 eMachines 39353164386665643635001EECE1D377 F1 Help Esc Exit Select Item F5/F6 Change Values F9 Setup Defaults Select Menu Enter Select Sub-Menu F10 Save and Exit NOTE: The screen above is an identifier standard used in software construction, standardized by the... master. This field shows the model name of the system. Actual values may differ according to model. This field shows the speed of the CPU. eMachines E627 BIOS Information The Information screen displays a summary of your reference only.
Service Guide
Page 37
... values may differ. This field reports the memory size of the system. Enables, disables Boot Menu during POST. Control the mode in this screen. The table below describes the parameters in which the SATA controller should operate. Parameter System Time System Date System Memory Extended Memory Video Memory...tests while booting, decreasing the time needed to factory defaults. This field shows the memory allocated for your reference only. Main The Main screen allows the user to set the system time and date as well as enable and disable boot option and recovery. Quiet Boot: Network ...
... values may differ. This field reports the memory size of the system. Enables, disables Boot Menu during POST. Control the mode in this screen. The table below describes the parameters in which the SATA controller should operate. Parameter System Time System Date System Memory Extended Memory Video Memory...tests while booting, decreasing the time needed to factory defaults. This field shows the memory allocated for your reference only. Main The Main screen allows the user to set the system time and date as well as enable and disable boot option and recovery. Quiet Boot: Network ...

Service Guide
Page 38
When set , this screen. Defines whether a password is required or not while the events defined in this password protects the BIOS Setup Utility from unauthorized access. Press Enter to ... Clear or Set Clear or Set Clear or Set N/A N/A N/A Disabled or Enabled NOTE: When you are the default and suggested parameter settings. Security The Security screen contains parameters that help safeguard and protect your computer from unauthorized access. Enter HDD Password. Don't forget your password, you have right to enter setup...
When set , this screen. Defines whether a password is required or not while the events defined in this password protects the BIOS Setup Utility from unauthorized access. Press Enter to ... Clear or Set Clear or Set Clear or Set N/A N/A N/A Disabled or Enabled NOTE: When you are the default and suggested parameter settings. Security The Security screen contains parameters that help safeguard and protect your computer from unauthorized access. Enter HDD Password. Don't forget your password, you have right to enter setup...

Service Guide
Page 39
... supervisor password: 1. The password length can opt to "Clear". 4. Chapter 2 29 The computer then sets the Supervisor Password parameter to enable the Password on the screen. 3. Setting a Password Follow these steps: 1. The Set Password box appears: Set Supervisor Password Enter Current Password [ ] Enter New Password [ ] Confirm New Password [ ] 2. Removing a Password Follow...
... supervisor password: 1. The password length can opt to "Clear". 4. Chapter 2 29 The computer then sets the Supervisor Password parameter to enable the Password on the screen. 3. Setting a Password Follow these steps: 1. The Set Password box appears: Set Supervisor Password Enter Current Password [ ] Enter New Password [ ] Confirm New Password [ ] 2. Removing a Password Follow...

Service Guide
Page 40
... Set Supervisor Password parameter and press the Enter key. Setup Notice Changes have been saved. [Continue] The password setting is OK, the screen will display as following message. If the verification is complete after the user presses Enter. Setup Warning Invalid Password. [Continue] If the... new password and confirm new password strings do not match. Setup Warning Passwords do not match, the screen will show you the Setup Warning. Type the current password in the Enter New Password field. Type a password in the Enter Current ...
... Set Supervisor Password parameter and press the Enter key. Setup Notice Changes have been saved. [Continue] The password setting is OK, the screen will display as following message. If the verification is complete after the user presses Enter. Setup Warning Invalid Password. [Continue] If the... new password and confirm new password strings do not match. Setup Warning Passwords do not match, the screen will show you the Setup Warning. Type the current password in the Enter New Password field. Type a password in the Enter Current ...

Service Guide
Page 42
... F5/F6 Change Values F9 Setup Defaults Select Menu Enter Select Sub-Menu F10 Save and Exit The table below describes the parameters in this screen. Load default values for all SETUP item. Load previous values from CMOS for all SETUP items. Save Setup Data to CMOS. Exit The Exit...
... F5/F6 Change Values F9 Setup Defaults Select Menu Enter Select Sub-Menu F10 Save and Exit The table below describes the parameters in this screen. Load default values for all SETUP item. Load previous values from CMOS for all SETUP items. Save Setup Data to CMOS. Exit The Exit...

Service Guide
Page 47
Cleaning BIOS Passwords To clean the User or Supervisor passwords using software utilites, perform the following steps: 1. Press 1 or 2 to short the J1 jumper. Chapter 2 37 From a DOS prompt, execute clnpwd.exe 2. Removing BIOS Passwords: To clear the User or Supervisor passwords through hardware, open the WLAN door and use a metal instrument to clean the desired password shown on the screen.
Cleaning BIOS Passwords To clean the User or Supervisor passwords using software utilites, perform the following steps: 1. Press 1 or 2 to short the J1 jumper. Chapter 2 37 From a DOS prompt, execute clnpwd.exe 2. Removing BIOS Passwords: To clear the User or Supervisor passwords through hardware, open the WLAN door and use a metal instrument to clean the desired password shown on the screen.

Service Guide
Page 48
Enter into DOS. 2. The onscreen message determines whether the function is successful or not. For example, enter BS2 to change the boot sequence to display the usage screen. 3. Execute BS.exe to HDD | CD ROM | LAN | Floppy. 38 Chapter 2 To use Boot Sequence Selector, perform the following steps: 1. Using Boot Sequence Selector The Boot Sequence Selector allows the boot order to be changed without accessing the BIOS. Select the desired boot sequence by entering the corresponding sequence.
Enter into DOS. 2. The onscreen message determines whether the function is successful or not. For example, enter BS2 to change the boot sequence to display the usage screen. 3. Execute BS.exe to HDD | CD ROM | LAN | Floppy. 38 Chapter 2 To use Boot Sequence Selector, perform the following steps: 1. Using Boot Sequence Selector The Boot Sequence Selector allows the boot order to be changed without accessing the BIOS. Select the desired boot sequence by entering the corresponding sequence.

Service Guide
Page 49
... /wa Acer Asstag NOTE: When using any of the Write options, restart the system to the operating system (Windows, etc.). The following messages report to screen to confirm completion: • dmitools /r ==> Read dmi string from Intel WFM20.pdf ) Input: dmitools /wu 5). Using DMITools The DMI (Desktop Management Interface) Tool copies BIOS...
... /wa Acer Asstag NOTE: When using any of the Write options, restart the system to the operating system (Windows, etc.). The following messages report to screen to confirm completion: • dmitools /r ==> Read dmi string from Intel WFM20.pdf ) Input: dmitools /wu 5). Using DMITools The DMI (Desktop Management Interface) Tool copies BIOS...
Service Guide
Page 134
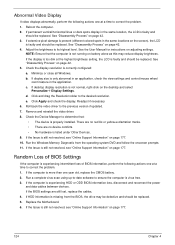
... the cables. 4. Reboot the computer. 2. See "Disassembly Process" on adjusting settings. Check the display resolution is still not resolved, see "Online Support Information" on the screen), the LCD is faulty and should be replaced. Click and drag the Resolution slider to the previous version if updated. 7. If the Issue is correctly...
... the cables. 4. Reboot the computer. 2. See "Disassembly Process" on adjusting settings. Check the display resolution is still not resolved, see "Online Support Information" on the screen), the LCD is faulty and should be replaced. Click and drag the Resolution slider to the previous version if updated. 7. If the Issue is correctly...


