Service Guide
Page 43
... memory update is not completely loaded. If the battery pack does not contain enough power to the bootable diskette. 3. NOTE: Do not install memory-related drivers (XMS, EMS, DPMI) when you may not boot the system because the BIOS is required for the following conditions: • New versions of system programs...
... memory update is not completely loaded. If the battery pack does not contain enough power to the bootable diskette. 3. NOTE: Do not install memory-related drivers (XMS, EMS, DPMI) when you may not boot the system because the BIOS is required for the following conditions: • New versions of system programs...
Service Guide
Page 88
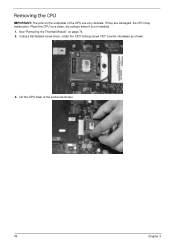
If they are very delicate. Lift the CPU clear of the CPU are damaged, the CPU may malfunction. See "Removing the Thermal Module" on a clean, dry surface when it is not installed. 1. Using a flat-bladed screw driver, rotate the CPU locking screw 180° counter-clockwise as shown. 78 Chapter 3 Removing the CPU IMPORTANT: The pins on the underside of the socket as shown. 3. Place the CPU on page 74. 2.
If they are very delicate. Lift the CPU clear of the CPU are damaged, the CPU may malfunction. See "Removing the Thermal Module" on a clean, dry surface when it is not installed. 1. Using a flat-bladed screw driver, rotate the CPU locking screw 180° counter-clockwise as shown. 78 Chapter 3 Removing the CPU IMPORTANT: The pins on the underside of the socket as shown. 3. Place the CPU on page 74. 2.
Service Guide
Page 107
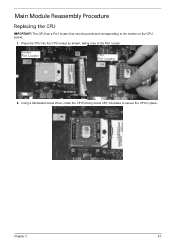
Main Module Reassembly Procedure Replacing the CPU IMPORTANT: The CPU has a Pin1 locator that must be positioned corresponding to secure the CPU in place. Chapter 3 97 Using a flat-bladed screw driver, rotate the CPU locking screw 180° clockwise to the marker on the CPU socket. 1. Place the CPU into the CPU socket as shown, taking note of the Pin1 locator. Socket Pin1 Locator CPU Pin1 Locator 2.
Main Module Reassembly Procedure Replacing the CPU IMPORTANT: The CPU has a Pin1 locator that must be positioned corresponding to secure the CPU in place. Chapter 3 97 Using a flat-bladed screw driver, rotate the CPU locking screw 180° clockwise to the marker on the CPU socket. 1. Place the CPU into the CPU socket as shown, taking note of the Pin1 locator. Socket Pin1 Locator CPU Pin1 Locator 2.
Service Guide
Page 134
...Disassembly Process" on battery alone as this may be defective and should be replaced. 5. e. Readjust if necessary. 6. Roll back the video driver to its highest level. If the BIOS settings are no red Xs or yellow exclamation marks. • There are still lost, replace the ...actions one year old, replace the CMOS battery. 2. See "Disassembly Process" on page 177. 124 Chapter 4 Remove and reinstall the video driver. 8. Replace the Motherboard. 6. If the Issue is still not resolved, see "Online Support Information" on adjusting settings. If desktop display ...
...Disassembly Process" on battery alone as this may be defective and should be replaced. 5. e. Readjust if necessary. 6. Roll back the video driver to its highest level. If the BIOS settings are no red Xs or yellow exclamation marks. • There are still lost, replace the ...actions one year old, replace the CMOS battery. 2. See "Disassembly Process" on page 177. 124 Chapter 4 Remove and reinstall the video driver. 8. Replace the Motherboard. 6. If the Issue is still not resolved, see "Online Support Information" on adjusting settings. If desktop display ...
Service Guide
Page 137
Reboot the computer. 2. Remove and reinstall the audio driver. 5. Ensure that other audio applications are selected as the default audio device (green check mark). Restore system and file settings from the list and click .... Select the microphone then click Properties. Select Set up microphone. d. Follow the onscreen prompts to the previous version, if updated recently. 4. Roll back the audio driver to complete the test. 8. Click the volume icon on the taskbar and drag the slider to the maximum setting and click OK. 7. Click Mixer to...
Reboot the computer. 2. Remove and reinstall the audio driver. 5. Ensure that other audio applications are selected as the default audio device (green check mark). Restore system and file settings from the list and click .... Select the microphone then click Properties. Select Set up microphone. d. Follow the onscreen prompts to the previous version, if updated recently. 4. Roll back the audio driver to complete the test. 8. Click the volume icon on the taskbar and drag the slider to the maximum setting and click OK. 7. Click Mixer to...

Service Guide
Page 138
Run the Windows Vista Startup Repair Utility: a. Click Next. NOTE: Click Load Drivers if controller drives are correct and that CD/DVD drive is set correctly. 7. g. If an issue is discovered, follow the onscreen information to enter the ...
Run the Windows Vista Startup Repair Utility: a. Click Next. NOTE: Click Load Drivers if controller drives are correct and that CD/DVD drive is set correctly. 7. g. If an issue is discovered, follow the onscreen information to enter the ...
Service Guide
Page 140
... media and devices. Double-click lDE ATA/ATAPI controllers. If a device has an exclamation mark, right-click on the device and uninstall and reinstall the driver. Check that system resources are no yellow exclamation marks against the items in the drive. 4. Check that the Regional Code is correct for burning discs... be changed even Windows is reinstalled or the drive is the factory default. c. Check that the label on the device and uninstall and reinstall the driver. a.
... media and devices. Double-click lDE ATA/ATAPI controllers. If a device has an exclamation mark, right-click on the device and uninstall and reinstall the driver. Check that system resources are no yellow exclamation marks against the items in the drive. 4. Check that the Regional Code is correct for burning discs... be changed even Windows is reinstalled or the drive is the factory default. c. Check that the label on the device and uninstall and reinstall the driver. a.
Service Guide
Page 143
See the mouse user manual. 3. Restore system and file settings from a known good date using System Restore. Roll back the mouse driver to Try. Remove and reinstall the mouse driver. 12. Chapter 4 133 Swap M/B to the previous version if updated recently. 11. If the mouse uses a USB connection, try an alternate USB port...
See the mouse user manual. 3. Restore system and file settings from a known good date using System Restore. Roll back the mouse driver to Try. Remove and reinstall the mouse driver. 12. Chapter 4 133 Swap M/B to the previous version if updated recently. 11. If the mouse uses a USB connection, try an alternate USB port...


