

Quick Start Guide
Page 3
Overview • Before You Begin, on page 4 • Hardware Connections, on page 5 • Initial Configuration, on page 7 • WLAN Setup with WPS, on page 10 • Wall-mounting, on page 11 3 The P-870H/HW Series has a built-in switch that provides super highspeed Internet access through a telephone line. The P-870HW Series provides IEEE 802.11b/g wireless networking capability. Introduction The P-870H/HW Series is a VDSL2 gateway that allows you to connect up to four network devices.
Overview • Before You Begin, on page 4 • Hardware Connections, on page 5 • Initial Configuration, on page 7 • WLAN Setup with WPS, on page 10 • Wall-mounting, on page 11 3 The P-870H/HW Series has a built-in switch that provides super highspeed Internet access through a telephone line. The P-870HW Series provides IEEE 802.11b/g wireless networking capability. Introduction The P-870H/HW Series is a VDSL2 gateway that allows you to connect up to four network devices.
Quick Start Guide
Page 4
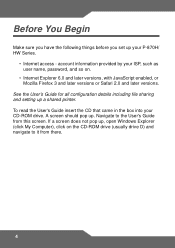
See the User's Guide for all configuration details including file sharing and setting up your P-870H/ HW Series. • Internet access - To read the User's Guide insert the CD that came in the box into your ISP, such as user name, password, and so on the CD-ROM drive (usually drive D) and navigate to the User's Guide from there. 4 If a screen does not pop up . Navigate to it...
See the User's Guide for all configuration details including file sharing and setting up your P-870H/ HW Series. • Internet access - To read the User's Guide insert the CD that came in the box into your ISP, such as user name, password, and so on the CD-ROM drive (usually drive D) and navigate to the User's Guide from there. 4 If a screen does not pop up . Navigate to it...
Quick Start Guide
Page 5
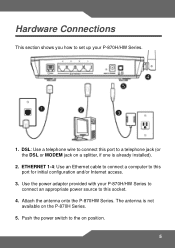
... Series. 1. ETHERNET 1-4: Use an Ethernet cable to connect a computer to this socket. 4. Attach the antenna onto the P-870HW Series. The antenna is already installed). 2. Push the power switch to set up your P-870H/HW Series to connect an appropriate power source to this port to a telephone jack (or the DSL or MODEM jack on a splitter, if one is not available on position. 5 DSL: Use a telephone wire to connect this port for initial configuration and/or Internet access. 3. Hardware Connections...
... Series. 1. ETHERNET 1-4: Use an Ethernet cable to connect a computer to this socket. 4. Attach the antenna onto the P-870HW Series. The antenna is already installed). 2. Push the power switch to set up your P-870H/HW Series to connect an appropriate power source to this port to a telephone jack (or the DSL or MODEM jack on a splitter, if one is not available on position. 5 DSL: Use a telephone wire to connect this port for initial configuration and/or Internet access. 3. Hardware Connections...
Quick Start Guide
Page 6
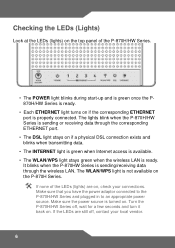
... seconds and turn it back on . If the LEDs are on, check your local vendor. 6 The lights blink when the P-870H/HW Series is sending or receiving data through the corresponding ETHERNET port. • The DSL light stays on if a physical DSL connection exists and blinks when transmitting data. • The INTERNET light is green when Internet access is available. • The WLAN/WPS light stays green when the wireless LAN is sending...
... seconds and turn it back on . If the LEDs are on, check your local vendor. 6 The lights blink when the P-870H/HW Series is sending or receiving data through the corresponding ETHERNET port. • The DSL light stays on if a physical DSL connection exists and blinks when transmitting data. • The INTERNET light is green when Internet access is available. • The WLAN/WPS light stays green when the wireless LAN is sending...
Quick Start Guide
Page 7
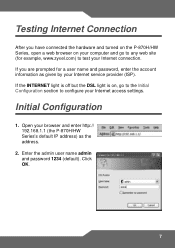
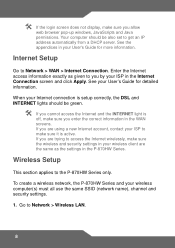
... Internet Connection After you are prompted for example, www.zyxel.com) to test your browser and enter http:// 192.168.1.1 (the P-870H/HW Series's default IP address) as given by your Internet service provider (ISP). Enter the admin user name admin and password 1234 (default). Open your Internet connection. If you have connected the hardware and turned on the P-870H/HW Series, open a web browser on , go to configure your Internet access settings. Initial Configuration 1. If the INTERNET light is off but the DSL light...
... Internet Connection After you are prompted for example, www.zyxel.com) to test your browser and enter http:// 192.168.1.1 (the P-870H/HW Series's default IP address) as given by your Internet service provider (ISP). Enter the admin user name admin and password 1234 (default). Open your Internet connection. If you have connected the hardware and turned on the P-870H/HW Series, open a web browser on , go to configure your Internet access settings. Initial Configuration 1. If the INTERNET light is off but the DSL light...
Quick Start Guide
Page 8
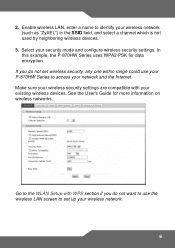
... IP address automatically from a DHCP server. Wireless Setup This section applies to access the Internet wirelessly, make sure you are the same as given to Network > WAN > Internet Connection. If you enter the correct information in the P-870HW Series. If you allow web browser pop-up windows, JavaScripts and Java permissions. Go to make sure it is off, make sure the wireless and security settings in your wireless computer(s) must all use the same SSID (network name), channel...
... IP address automatically from a DHCP server. Wireless Setup This section applies to access the Internet wirelessly, make sure you are the same as given to Network > WAN > Internet Connection. If you enter the correct information in the P-870HW Series. If you allow web browser pop-up windows, JavaScripts and Java permissions. Go to make sure it is off, make sure the wireless and security settings in your wireless computer(s) must all use the same SSID (network name), channel...
Quick Start Guide
Page 9
... wireless security settings are compatible with WPS section if you do not want to use your P-870HW Series to set up your wireless network (such as "ZyXEL") in the SSID field, and select a channel which is not used by neighboring wireless devices. 3. If you do not set wireless security, any one within range could use the wireless LAN screen to access your network and the Internet. Select your existing wireless devices. Enable wireless LAN, enter a name to identify your wireless network. 9 See the User's Guide...
... wireless security settings are compatible with WPS section if you do not want to use your P-870HW Series to set up your wireless network (such as "ZyXEL") in the SSID field, and select a channel which is not used by neighboring wireless devices. 3. If you do not set wireless security, any one within range could use the wireless LAN screen to access your network and the Internet. Select your existing wireless devices. Enable wireless LAN, enter a name to identify your wireless network. 9 See the User's Guide...
Quick Start Guide
Page 10
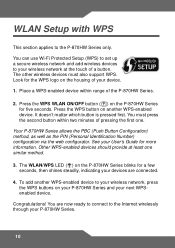
... User's Guide for five seconds. Your P-870HW Series allows the PBC (Push Button Configuration) method, as well as the PIN (Personal Identification Number) configuration via the web configurator. To add another WPS-enabled device. It doesn't matter which button is pressed first. Other WPS-enabled devices should provide at the touch of the P-870HW Series. 2. You are connected. 4. The other wireless devices must press the second button within range of a button. You must also support WPS. The WLAN/WPS LED...
... User's Guide for five seconds. Your P-870HW Series allows the PBC (Push Button Configuration) method, as well as the PIN (Personal Identification Number) configuration via the web configurator. To add another WPS-enabled device. It doesn't matter which button is pressed first. Other WPS-enabled devices should provide at the touch of the P-870HW Series. 2. You are connected. 4. The other wireless devices must press the second button within range of a button. You must also support WPS. The WLAN/WPS LED...

Quick Start Guide
Page 11
... Series with the connection cables. 6. Wall-mounting Take the following steps to hang your P-870H/HW Series on the screws. 11 Hang the P-870H/HW Series on a wall. 1. Drill two holes for the screws. 4. Make sure the screws are snugly fastened to the wall. Leave a small gap of about 0.5 cm between the heads of obstructions on the wall. Select a position free...
... Series with the connection cables. 6. Wall-mounting Take the following steps to hang your P-870H/HW Series on the screws. 11 Hang the P-870H/HW Series on a wall. 1. Drill two holes for the screws. 4. Make sure the screws are snugly fastened to the wall. Leave a small gap of about 0.5 cm between the heads of obstructions on the wall. Select a position free...
Quick Start Guide
Page 12
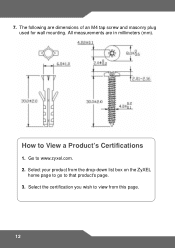
7. Select the certification you wish to view from the drop-down list box on the ZyXEL home page to go to that product's page. 3. The following are in millimeters (mm). Select your product from this page. 12 All measurements are dimensions of an M4 tap screw and masonry plug used for wall mounting. How to www.zyxel.com. 2. Go to View a Product's Certifications 1.
7. Select the certification you wish to view from the drop-down list box on the ZyXEL home page to go to that product's page. 3. The following are in millimeters (mm). Select your product from this page. 12 All measurements are dimensions of an M4 tap screw and masonry plug used for wall mounting. How to www.zyxel.com. 2. Go to View a Product's Certifications 1.


