
User Guide
Page 25
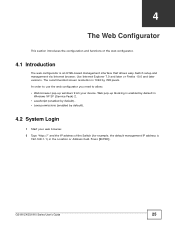
...: • Web browser pop-up blocking is enabled by default in the Location or Address field. GS1910/XGS1910 Series User's Guide 25 Press [ENTER]. CHAPTER 4 The Web Configurator This section introduces the configuration and functions of the Switch (for example, the default management IP address is 192.168.1.1) in Windows XP SP (Service Pack...
...: • Web browser pop-up blocking is enabled by default in the Location or Address field. GS1910/XGS1910 Series User's Guide 25 Press [ENTER]. CHAPTER 4 The Web Configurator This section introduces the configuration and functions of the Switch (for example, the default management IP address is 192.168.1.1) in Windows XP SP (Service Pack...
User Guide
Page 32
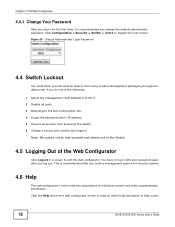
...1). 2 Disable all ports. 3 Misconfigure the text configuration file. 4 Forget the password and/or IP address. 5 Prevent all others out of the Switch. 4.5 Logging Out of the Web Configurator Click...Switch > Users to exit the web configurator. This is recommended after you change the default administrator password. Figure 26 Change Administrator Login Password 4.4 Switch Lockout You could block yourself ...your password again after you do one of the following: 1 Delete the management VLAN (default is recommended you log out. Chapter 4 The Web Configurator 4.3.1 Change Your Password After ...
...1). 2 Disable all ports. 3 Misconfigure the text configuration file. 4 Forget the password and/or IP address. 5 Prevent all others out of the Switch. 4.5 Logging Out of the Web Configurator Click...Switch > Users to exit the web configurator. This is recommended after you change the default administrator password. Figure 26 Change Administrator Login Password 4.4 Switch Lockout You could block yourself ...your password again after you do one of the following: 1 Delete the management VLAN (default is recommended you log out. Chapter 4 The Web Configurator 4.3.1 Change Your Password After ...
User Guide
Page 33
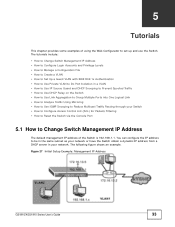
Figure 27 Initial Setup Example: Management IP Address GS1910/XGS1910 Series User's Guide 33 The tutorials include: • How to Change Switch Management IP Address • How to Configure Login Accounts and Privilege Levels • How to Manage a Configuration File • How to Create a VLAN • ... Multicast Traffic Passing through your network. CHAPTER 5 Tutorials This chapter provides some examples of using the Web Configurator to Change Switch Management IP Address The default management IP address of the Switch is 192.168.1.1. The following figure shows an example.
Figure 27 Initial Setup Example: Management IP Address GS1910/XGS1910 Series User's Guide 33 The tutorials include: • How to Change Switch Management IP Address • How to Configure Login Accounts and Privilege Levels • How to Manage a Configuration File • How to Create a VLAN • ... Multicast Traffic Passing through your network. CHAPTER 5 Tutorials This chapter provides some examples of using the Web Configurator to Change Switch Management IP Address The default management IP address of the Switch is 192.168.1.1. The following figure shows an example.
User Guide
Page 34
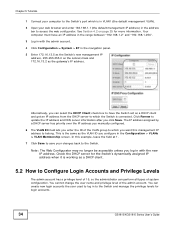
This is the same as the gateway's IP address. Check the DHCP server for login accounts. 34 GS1910/XGS1910 Series User's Guide In this management IP address to belong. Click Renew to update the IP address and DNS server information after you configure in the Configuration > VLANs > VLAN ... Click Save to save your web browser and enter 192.168.1.1 (the default management IP address) in the address bar to access the web configurator. The IP address assigned by a DHCP server has priority over the IP address you manually configured. 6 The VLAN ID field lets you can perform ...
This is the same as the gateway's IP address. Check the DHCP server for login accounts. 34 GS1910/XGS1910 Series User's Guide In this management IP address to belong. Click Renew to update the IP address and DNS server information after you configure in the Configuration > VLANs > VLAN ... Click Save to save your web browser and enter 192.168.1.1 (the default management IP address) in the address bar to access the web configurator. The IP address assigned by a DHCP server has priority over the IP address you manually configured. 6 The VLAN ID field lets you can perform ...
User Guide
Page 44
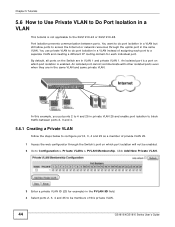
...port to do port isolation in a VLAN but still allow ports to the XGS1910-24 or XGS1910-48. You use private VLAN to a separate VLAN and creating a different IP routing domain for example) in the PVLAN ID field. 4 Select ports 2, 3,... put ports 2 to 4 and 25 in private VLAN 25 and enable port isolation to block traffic between ports. By default, all ports on which port isolation will not be members of assigning each individual port. Port isolation prevents communication between ports... port isolation in a VLAN instead of this private VLAN. 44 GS1910/XGS1910 Series User's Guide
...port to do port isolation in a VLAN but still allow ports to the XGS1910-24 or XGS1910-48. You use private VLAN to a separate VLAN and creating a different IP routing domain for example) in the PVLAN ID field. 4 Select ports 2, 3,... put ports 2 to 4 and 25 in private VLAN 25 and enable port isolation to block traffic between ports. By default, all ports on which port isolation will not be members of assigning each individual port. Port isolation prevents communication between ports... port isolation in a VLAN instead of this private VLAN. 44 GS1910/XGS1910 Series User's Guide

User Guide
Page 45
...servers. 5 Click Save to save the settings to build the binding table dynamically. The Switch builds the binding table by administrators (static bindings). GS1910/XGS1910 Series User's Guide 45 Chapter 5 Tutorials 5.6.2 Enabling Port Isolation Follow the steps below to configure port isolation. 1 Click Configuration > Private...them to the isolated port list so that attaches to port 25, such as a server or default gateway. 5.7 How to Use IP Source Guard and DHCP Snooping to Prevent Spoofed Traffic IP source guard uses a binding table to each other. From port 2, 3, or 4, you should...
...servers. 5 Click Save to save the settings to build the binding table dynamically. The Switch builds the binding table by administrators (static bindings). GS1910/XGS1910 Series User's Guide 45 Chapter 5 Tutorials 5.6.2 Enabling Port Isolation Follow the steps below to configure port isolation. 1 Click Configuration > Private...them to the isolated port list so that attaches to port 25, such as a server or default gateway. 5.7 How to Use IP Source Guard and DHCP Snooping to Prevent Spoofed Traffic IP source guard uses a binding table to each other. From port 2, 3, or 4, you should...
User Guide
Page 46
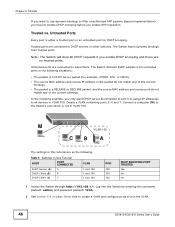
...) and password (default: 1234). 2 See Section 5.4 on page 38 for example, OFFER, ACK, or NACK). • The source MAC address and source IP address in the following . Untrusted ports are no trusted ports. Untrusted Ports Every port is not in this Tutorial HOST PORT CONNECTED DHCP Server ... following situations: • The packet is a DHCP server packet (for how to create a VLAN and configure ports to join the VLAN. 46 GS1910/XGS1910 Series User's Guide Create a VLAN containing ports 5, 6 and 7. Chapter 5 Tutorials If you want DHCP server A connected to port 5 to assign...
...) and password (default: 1234). 2 See Section 5.4 on page 38 for example, OFFER, ACK, or NACK). • The source MAC address and source IP address in the following . Untrusted ports are no trusted ports. Untrusted Ports Every port is not in this Tutorial HOST PORT CONNECTED DHCP Server ... following situations: • The packet is a DHCP server packet (for how to create a VLAN and configure ports to join the VLAN. 46 GS1910/XGS1910 Series User's Guide Create a VLAN containing ports 5, 6 and 7. Chapter 5 Tutorials If you want DHCP server A connected to port 5 to assign...
User Guide
Page 66
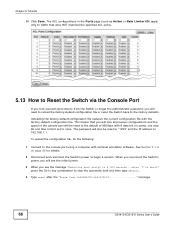
...-default configuration file or reset the Switch back to the factory defaults....default configuration file. enter ^C to abort" press the Ctrl-c key combination to none. Uploading the factory-default...IP address to begin a session. To upload the configuration file, do the following: 1 Connect to traffic that you see the initial screen. 3 When you will lose all previous configurations and the speed of the console port will also be reset to the default... of 9600bps with 8 data bit, no parity, one stop bit and flow control set to stop the automatic boot and then type default...
...-default configuration file or reset the Switch back to the factory defaults....default configuration file. enter ^C to abort" press the Ctrl-c key combination to none. Uploading the factory-default...IP address to begin a session. To upload the configuration file, do the following: 1 Connect to traffic that you see the initial screen. 3 When you will lose all previous configurations and the speed of the console port will also be reset to the default... of 9600bps with 8 data bit, no parity, one stop bit and flow control set to stop the automatic boot and then type default...
User Guide
Page 70
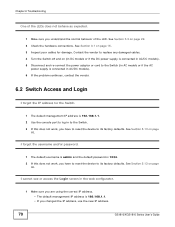
... forgot the username and/or password. 1 The default username is admin and the default password is 192.168.1.1. • If you understand the normal behavior of the LEDs does not behave as expected. 1 Make sure you changed the IP address, use the new IP address. 70 GS1910/XGS1910 Series User's Guide See Section 3.3 on page...the Switch (in AC models or if the AC power supply is connected in the web configurator. 1 Make sure you are using the correct IP address. • The default management IP address is 1234. 2 If this does not work , you have to reset the device to its factory...
... forgot the username and/or password. 1 The default username is admin and the default password is 192.168.1.1. • If you understand the normal behavior of the LEDs does not behave as expected. 1 Make sure you changed the IP address, use the new IP address. 70 GS1910/XGS1910 Series User's Guide See Section 3.3 on page...the Switch (in AC models or if the AC power supply is connected in the web configurator. 1 Make sure you are using the correct IP address. • The default management IP address is 1234. 2 If this does not work , you have to reset the device to its factory...
User Guide
Page 71
...-up windows from your Switch. Computers not belonging to the secured client set cannot get permission to check for HTTP/HTTPS and SNMP. GS1910/XGS1910 Series User's Guide 71 I can see the troubleshooting suggestions for I cannot log in the Configuration > Security > Switch > Access...you have entered the user name and password correctly. The default user name is admin, and the default password is unauthorized access to access the Switch with the default IP address. See Section 3.3 on . 2 If you have configured a secured client IP address in the same subnet as expected. Use the ...
...-up windows from your Switch. Computers not belonging to the secured client set cannot get permission to check for HTTP/HTTPS and SNMP. GS1910/XGS1910 Series User's Guide 71 I can see the troubleshooting suggestions for I cannot log in the Configuration > Security > Switch > Access...you have entered the user name and password correctly. The default user name is admin, and the default password is unauthorized access to access the Switch with the default IP address. See Section 3.3 on . 2 If you have configured a secured client IP address in the same subnet as expected. Use the ...

User Guide
Page 75
...20 copyright 73 D DHCP snooping 45 trusted ports 46 untrusted ports 46 disclaimer 73 documentation related 2 GS1910/XGS1910 Series User's Guide Index Index E Ethernet ports 17 default settings 17 F FCC interference statement 73 front panel 15 G getting help 32 H hardware installation 11... mounting 12 hardware overview 15 I Installation Rack-mounting 12 installation freestanding 11 precautions 12 Internet Protocol version 6, see IPv6 introduction 5 IP source guard 45 ...
...20 copyright 73 D DHCP snooping 45 trusted ports 46 untrusted ports 46 disclaimer 73 documentation related 2 GS1910/XGS1910 Series User's Guide Index Index E Ethernet ports 17 default settings 17 F FCC interference statement 73 front panel 15 G getting help 32 H hardware installation 11... mounting 12 hardware overview 15 I Installation Rack-mounting 12 installation freestanding 11 precautions 12 Internet Protocol version 6, see IPv6 introduction 5 IP source guard 45 ...


