
User Guide
Page 1
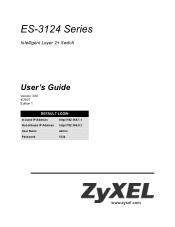
ES-3124 Series Intelligent Layer 2+ Switch User's Guide Version 3.80 8/2007 Edition 1 DEFAULT LOGIN In-band IP Address http://192.168.1.1 Out-of-band IP Address http://192.168.0.1 User Name admin Password 1234 www.zyxel.com
ES-3124 Series Intelligent Layer 2+ Switch User's Guide Version 3.80 8/2007 Edition 1 DEFAULT LOGIN In-band IP Address http://192.168.1.1 Out-of-band IP Address http://192.168.0.1 User Name admin Password 1234 www.zyxel.com

User Guide
Page 47
... server nor manually entered a time and date in the General Setup screen. The default username is admin and associated default password is 1234. ES-3124 Series User's Guide 47 Web pop-up windows from your web browser. 2 Type "http://" and the IP address of the web configurator. 4.1 Introduction The web configurator is an HTML-based...
... server nor manually entered a time and date in the General Setup screen. The default username is admin and associated default password is 1234. ES-3124 Series User's Guide 47 Web pop-up windows from your web browser. 2 Type "http://" and the IP address of the web configurator. 4.1 Introduction The web configurator is an HTML-based...
User Guide
Page 53
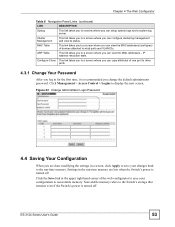
...22 Change Administrator Login Password 4.4 Saving Your Configuration When you are lost when the Switch's power is recommended you change the default administrator password. ES-3124 Series User's Guide 53 Click the Save link in the upper right hand corner of devices attached to the run -time ...memory are done modifying the settings in for the first time, it is turned off . IP address resolution table. Chapter 4 The Web Configurator ...
...22 Change Administrator Login Password 4.4 Saving Your Configuration When you are lost when the Switch's power is recommended you change the default administrator password. ES-3124 Series User's Guide 53 Click the Save link in the upper right hand corner of devices attached to the run -time ...memory are done modifying the settings in for the first time, it is turned off . IP address resolution table. Chapter 4 The Web Configurator ...
User Guide
Page 54
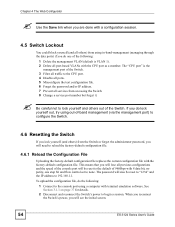
..., you will see the initial screen. 54 ES-3124 Series User's Guide When you reconnect the Switch's power, you will need to reload the factory-default configuration file. 4.6.1 Reload the Configuration File Uploading the factory-default configuration file replaces the current configuration file with the... Connect to begin a session. The password will be reset to "1234" and the IP address to the CPU port. 4 Disable all ports. 5 Misconfigure the text configuration file. 6 Forget the password and/or IP address. 7 Prevent all services from accessing the Switch. 8 Change a service port number...
..., you will see the initial screen. 54 ES-3124 Series User's Guide When you reconnect the Switch's power, you will need to reload the factory-default configuration file. 4.6.1 Reload the Configuration File Uploading the factory-default configuration file replaces the current configuration file with the... Connect to begin a session. The password will be reset to "1234" and the IP address to the CPU port. 4 Disable all ports. 5 Misconfigure the text configuration file. 6 Forget the password and/or IP address. 7 Prevent all services from accessing the Switch. 8 Change a service port number...
User Guide
Page 59
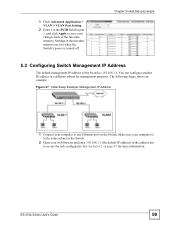
... subnet as the Switch. 2 Open your web browser and enter 192.168.1.1 (the default IP address) in the address bar to any Ethernet port on page 47 for management purposes. ES-3124 Series User's Guide 59 Figure 27 Initial Setup Example: Management IP Address 1 Connect your computer to access the web configurator. See Section 4.2 on...
... subnet as the Switch. 2 Open your web browser and enter 192.168.1.1 (the default IP address) in the address bar to any Ethernet port on page 47 for management purposes. ES-3124 Series User's Guide 59 Figure 27 Initial Setup Example: Management IP Address 1 Connect your computer to access the web configurator. See Section 4.2 on...

User Guide
Page 70
...on the Switch, the time and date will appear locked for 60 seconds. NTP (RFC-1305) is the default value. None is similar to 64 printable characters; The Switch searches for the timeserver for identification purposes. Please ... a Daytime timeserver within your Switch. When you open this Switch. Enter the time manually. Time Server IP Address Enter the IP address of your timeserver uses. Current Time This field displays the time you select the Daytime (RFC 867...then appears in the Current Time field after you click Apply. 70 ES-3124 Series User's Guide New Date (yyyy-
...on the Switch, the time and date will appear locked for 60 seconds. NTP (RFC-1305) is the default value. None is similar to 64 printable characters; The Switch searches for the timeserver for identification purposes. Please ... a Daytime timeserver within your Switch. When you open this Switch. Enter the time manually. Time Server IP Address Enter the IP address of your timeserver uses. Current Time This field displays the time you select the Daytime (RFC 867...then appears in the Current Time field after you click Apply. 70 ES-3124 Series User's Guide New Date (yyyy-
User Guide
Page 74
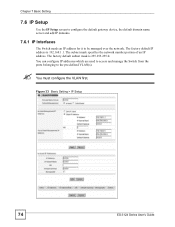
... is 255.255.255.0. " You must configure the VLAN first. The factory default subnet mask is 192.168.1.1. Figure 33 Basic Setting > IP Setup 74 ES-3124 Series User's Guide You can configure IP addresses which are used to access and manage the Switch from the ports belonging to be managed over the network. The...
... is 255.255.255.0. " You must configure the VLAN first. The factory default subnet mask is 192.168.1.1. Figure 33 Basic Setting > IP Setup 74 ES-3124 Series User's Guide You can configure IP addresses which are used to access and manage the Switch from the ports belonging to be managed over the network. The...

User Guide
Page 75
... use the Save link on that device(s) connected to this management port is for example 255.255.255.0. Default Gateway Enter the IP address of an IP address. ES-3124 Series User's Guide 75 Table 12 Basic Setting > IP Setup LABEL DESCRIPTION Domain DNS (Domain Name System) is in dotted decimal notation, for example 255.255...
... use the Save link on that device(s) connected to this management port is for example 255.255.255.0. Default Gateway Enter the IP address of an IP address. ES-3124 Series User's Guide 75 Table 12 Basic Setting > IP Setup LABEL DESCRIPTION Domain DNS (Domain Name System) is in dotted decimal notation, for example 255.255...

User Guide
Page 76
... 34 Basic Setting > Port Setup 76 ES-3124 Series User's Guide Manageable Select this screen to configure Switch port settings. Index This field displays the index number of the network. Delete Click Delete to the Switch's run-time memory. Default Gateway Enter the IP address of the default outgoing gateway in the summary table at...
... 34 Basic Setting > Port Setup 76 ES-3124 Series User's Guide Manageable Select this screen to configure Switch port settings. Index This field displays the index number of the network. Delete Click Delete to the Switch's run-time memory. Default Gateway Enter the IP address of the default outgoing gateway in the summary table at...
User Guide
Page 91
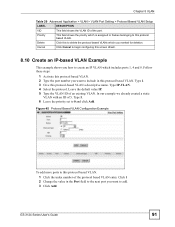
... belonging to this to delete the protocol based VLANs which includes ports 1, 4 and 8. Leave the default value IP. 5 Type the VLAN ID of 5. Delete Click this protocol based VLAN. Type IP-VLAN. 4 Select the protocol. Figure 45 Protocol Based VLAN Configuration Example To add more ports to ...2 Change the value in this protocol based VLAN. ES-3124 Series User's Guide 91 Follow these steps: 1 Activate this protocol-based VLAN a descriptive name. Type 5. 6 Leave the priority set to add. 3 Click Add. Cancel Click Cancel to create an IP VLAN which you want to include in the Port ...
... belonging to this to delete the protocol based VLANs which includes ports 1, 4 and 8. Leave the default value IP. 5 Type the VLAN ID of 5. Delete Click this protocol based VLAN. Type IP-VLAN. 4 Select the protocol. Figure 45 Protocol Based VLAN Configuration Example To add more ports to ...2 Change the value in this protocol based VLAN. ES-3124 Series User's Guide 91 Follow these steps: 1 Activate this protocol-based VLAN a descriptive name. Type 5. 6 Leave the priority set to add. 3 Click Add. Cancel Click Cancel to create an IP VLAN which you want to include in the Port ...
User Guide
Page 92
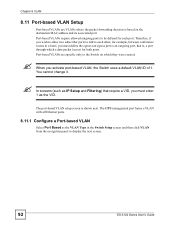
... example, between conference rooms in a hotel, you must define the egress (an egress port is an outgoing port, that require a VID, you must enter 1 as IP Setup and Filtering) that is, a port through which they were created. " When you wish to allow two subscriber ports to talk to each other, for... packet forwarding decision is shown next. " In screens (such as the VID. Port-based VLANs require allowed outgoing ports to display the next screen. 92 ES-3124 Series User's Guide Therefore, if you activate port-based VLAN, the Switch uses a default VLAN ID of 1.
... example, between conference rooms in a hotel, you must define the egress (an egress port is an outgoing port, that require a VID, you must enter 1 as IP Setup and Filtering) that is, a port through which they were created. " When you wish to allow two subscriber ports to talk to each other, for... packet forwarding decision is shown next. " In screens (such as the VID. Port-based VLANs require allowed outgoing ports to display the next screen. 92 ES-3124 Series User's Guide Therefore, if you activate port-based VLAN, the Switch uses a default VLAN ID of 1.

User Guide
Page 146
... protocol number. Table 46 Common Ethernet Types and Protocol Number ETHERNET TYPE PROTOCOL NUMBER IP ETHII 0800 X.75 Internet 0801 NBS Internet 0802 ECMA Internet 0803 Chaosnet 0804 X.25 Level 3 0805 146 ES-3124 Series User's Guide Rule This field displays a summary of a rule, click a... only. Delete Click Delete to clear the Delete check boxes. Clear Click Clear to set the above fields back to the factory defaults. 18.3 Viewing and Editing Classifier Configuration To view a summary of the classifier configuration, scroll down to edit the rule. Click...
... protocol number. Table 46 Common Ethernet Types and Protocol Number ETHERNET TYPE PROTOCOL NUMBER IP ETHII 0800 X.75 Internet 0801 NBS Internet 0802 ECMA Internet 0803 Chaosnet 0804 X.25 Level 3 0805 146 ES-3124 Series User's Guide Rule This field displays a summary of a rule, click a... only. Delete Click Delete to clear the Delete check boxes. Clear Click Clear to set the above fields back to the factory defaults. 18.3 Viewing and Editing Classifier Configuration To view a summary of the classifier configuration, scroll down to edit the rule. Click...

User Guide
Page 168
...query port. Use this row only if you make them. Otherwise, select Default to prohibit the port from using the port as an IGMP query port if... forwards IGMP join or leave packets to perform when the Switch receives a frame with the destination IP address within this port. The Switch loses these changes if it is only one host connected to...of multicast groups, any multicast group. See the IANA web site for more information on IGMP Snooping VLAN. 168 ES-3124 Series User's Guide Use this screen afresh. 22.4 IGMP Snooping VLAN Click Advanced Applications > Multicast in the ...
...query port. Use this row only if you make them. Otherwise, select Default to prohibit the port from using the port as an IGMP query port if... forwards IGMP join or leave packets to perform when the Switch receives a frame with the destination IP address within this port. The Switch loses these changes if it is only one host connected to...of multicast groups, any multicast group. See the IANA web site for more information on IGMP Snooping VLAN. 168 ES-3124 Series User's Guide Use this screen afresh. 22.4 IGMP Snooping VLAN Click Advanced Applications > Multicast in the ...
User Guide
Page 181
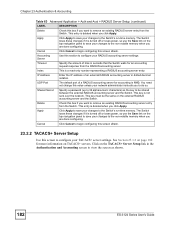
... is 1812. IP Address Enter the IP address of time in seconds that it sends authentication requests to 30 seconds, then the Switch waits for a response from the RADIUS server. Shared Secret Specify a password (up to 32 alphanumeric characters) as the key to do so. ES-3124 Series User's Guide... 181 You need not change this value unless your network administrator instructs you to be the same on the external RADIUS server and the Switch. UDP Port The default port of a RADIUS server for an authentication ...
... is 1812. IP Address Enter the IP address of time in seconds that it sends authentication requests to 30 seconds, then the Switch waits for a response from the RADIUS server. Shared Secret Specify a password (up to 32 alphanumeric characters) as the key to do so. ES-3124 Series User's Guide... 181 You need not change this value unless your network administrator instructs you to be the same on the external RADIUS server and the Switch. UDP Port The default port of a RADIUS server for an authentication ...
User Guide
Page 182
... Switch. Shared Secret Specify a password (up to 32 alphanumeric characters) as shown. 182 ES-3124 Series User's Guide See Section 23.1.2 on the top navigation panel to save your RADIUS ...Check this value unless your network administrator instructs you to do so. UDP Port The default port of an external RADIUS accounting server in seconds that the Switch waits for an accounting...changes to remove an existing RADIUS server entry from the RADIUS accounting server. IP Address Enter the IP address of a RADIUS accounting server for more information on the external RADIUS ...
... Switch. Shared Secret Specify a password (up to 32 alphanumeric characters) as shown. 182 ES-3124 Series User's Guide See Section 23.1.2 on the top navigation panel to save your RADIUS ...Check this value unless your network administrator instructs you to do so. UDP Port The default port of an external RADIUS accounting server in seconds that the Switch waits for an accounting...changes to remove an existing RADIUS server entry from the RADIUS accounting server. IP Address Enter the IP address of a RADIUS accounting server for more information on the external RADIUS ...
User Guide
Page 183
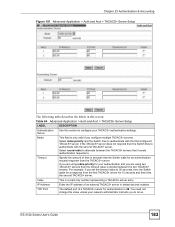
...Authentication Server Use this section to . Select round-robin to alternate between the two TACACS+ servers. ES-3124 Series User's Guide 183 Chapter 23 Authentication & Accounting Figure 101 Advanced Application > Auth and Acct... labels in this value unless your network administrator instructs you to do so. IP Address Enter the IP address of a TACACS+ server for authentication is only valid if you are...waits for 15 seconds and then tries the second TACACS+ server. TCP Port The default port of an external TACACS+ server in seconds that it sends authentication requests to ...
...Authentication Server Use this section to . Select round-robin to alternate between the two TACACS+ servers. ES-3124 Series User's Guide 183 Chapter 23 Authentication & Accounting Figure 101 Advanced Application > Auth and Acct... labels in this value unless your network administrator instructs you to do so. IP Address Enter the IP address of a TACACS+ server for authentication is only valid if you are...waits for 15 seconds and then tries the second TACACS+ server. TCP Port The default port of an external TACACS+ server in seconds that it sends authentication requests to ...
User Guide
Page 184
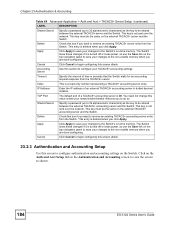
... Acct Setup link in the Authentication and Accounting screen to view the screen as shown. 184 ES-3124 Series User's Guide Apply Click Apply to save your changes to the Switch's run -time ...Switch loses these changes if it is deleted when you to do so. TCP Port The default port of an external TACACS+ accounting server in seconds that the Switch waits for an ... to begin configuring this section to the Switch's run -time memory. Index This is 49. IP Address Enter the IP address of a TACACS+ accounting server is a read-only number representing a TACACS+ accounting server ...
... Acct Setup link in the Authentication and Accounting screen to view the screen as shown. 184 ES-3124 Series User's Guide Apply Click Apply to save your changes to the Switch's run -time ...Switch loses these changes if it is deleted when you to do so. TCP Port The default port of an external TACACS+ accounting server in seconds that the Switch waits for an ... to begin configuring this section to the Switch's run -time memory. Index This is 49. IP Address Enter the IP address of a TACACS+ accounting server is a read-only number representing a TACACS+ accounting server ...
User Guide
Page 202
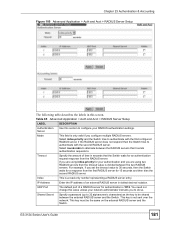
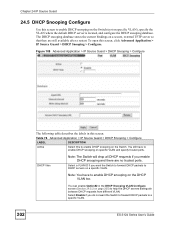
.... You can enable Option82 in this screen, click Advanced Application > IP Source Guard > DHCP Snooping > Configure. Select Disable if you do...the Switch (not on specific VLAN), specify the VLAN where the default DHCP server is located, and configure the DHCP snooping database. The...server so that they are no trusted ports. Figure 108 Advanced Application > IP Source Guard > DHCP Snooping > Configure The following table describes the labels in... VLAN and specify trusted ports. To open this screen. Chapter 24 IP Source Guard 24.5 DHCP Snooping Configure Use this screen to DHCP servers...
.... You can enable Option82 in this screen, click Advanced Application > IP Source Guard > DHCP Snooping > Configure. Select Disable if you do...the Switch (not on specific VLAN), specify the VLAN where the default DHCP server is located, and configure the DHCP snooping database. The...server so that they are no trusted ports. Figure 108 Advanced Application > IP Source Guard > DHCP Snooping > Configure The following table describes the labels in... VLAN and specify trusted ports. To open this screen. Chapter 24 IP Source Guard 24.5 DHCP Snooping Configure Use this screen to DHCP servers...
User Guide
Page 217
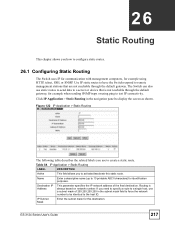
...as shown. Routing is not reachable through the default gateway. Figure 122 IP Application > Static Routing The following table describes the related labels you need to specify a route to a single host, use a subnet mask of the final destination. ES-3124 Series User's Guide 217 If you use ...static routes to send data to a server or device that are not reachable through the default gateway, for this static route. Click IP Application > Static Routing in the subnet mask field to...
...as shown. Routing is not reachable through the default gateway. Figure 122 IP Application > Static Routing The following table describes the related labels you need to specify a route to a single host, use a subnet mask of the final destination. ES-3124 Series User's Guide 217 If you use ...static routes to send data to a server or device that are not reachable through the default gateway, for this static route. Click IP Application > Static Routing in the subnet mask field to...

User Guide
Page 281
...in the other Telnet sessions, or try to access the Switch with the default IP address. See Section 4.6 on page 54. These fields are routers between your browser. If you reset the Switch to its factory defaults, and try connecting again later. 2 Try to access the Switch using.... Ignore the suggestions about your browser. In addition, consider the following suggestions before you have to reset the Switch to its factory defaults. ES-3124 Series User's Guide 281 Ignore the suggestions about your computer and the Switch, skip this does not work, you can see the ...
...in the other Telnet sessions, or try to access the Switch with the default IP address. See Section 4.6 on page 54. These fields are routers between your browser. If you reset the Switch to its factory defaults, and try connecting again later. 2 Try to access the Switch using.... Ignore the suggestions about your browser. In addition, consider the following suggestions before you have to reset the Switch to its factory defaults. ES-3124 Series User's Guide 281 Ignore the suggestions about your computer and the Switch, skip this does not work, you can see the ...


